Most Windows laptop users connect to the same network every day. They usually switch when changing locations, and it is seamless once they are connected. Now, if you are in a situation where you need to connect to different networks often, then the only way is to connect to the network manually. If that’s the case, here is a free tool that lets you create shortcuts to switch to specific WiFi on Windows 11/10 instantly.
WifiInfoView for Windows PC
The situation to change WiFi networks usually happens in the work environment. Businesses configure different wifi networks based on user authority to connect to devices or systems. It could be a device access restriction or a project restriction. So if that’s the case for you, WifiInfoView allows you to create desktop shortcuts for all the connected WiFi.
Instantly switch to specific WiFi using desktop shortcuts
Here is how to create them:
- Download WifiInfoView from Nirsoft
- Unzip and click on WifiInfoView file to launch the application
- It will list down all the available WiFi your laptop can detect
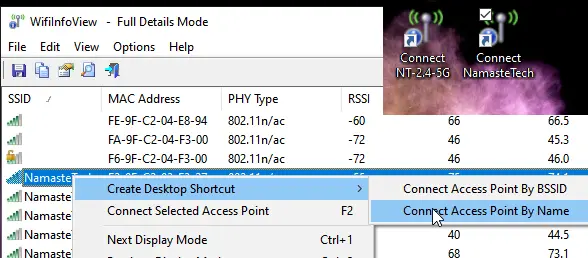
- Right-click on any of the WiFi names, and choose to Create Desktop Shortcut > Connect access point by name
- Repeat it for all the WiFi; you often switch it.
- On the desktop, double-click on the shortcut, and it will execute the code to connect to the WiFi network.
If you run shortcuts of the WiFi you have never connected to, then it will prompt for a password when you click on the Internet icon on the taskbar’s system area.
The software also allows you to connect to the desired access point by pressing F2 when you select it.
If you have multiple access points with the same name, the Windows WiFi manager will fail to connect. Windows makes a connection according to the network name. However, using this, you can see a list of all SSID separately and connect with them.
Apart from these, the software does an incredible job if you want to learn more about your Wifi connection. You can find connection type (g/n/a/c), WiFi Strength, Average signal, frequency, security type, sort it by router name, company name, model name, and so on. If you are an IT admin or a pro user, this software can be handy when troubleshooting network issues.
Since the software can reveal signal strength, it gives you another reason to switch to a different network using these shortcuts.
How do I automatically connect to a specific WiFi?
When you connect to a WiFi network, Windows adds it to the known networks list. By default, the “Connect automatically when in range” option is enabled for all WiFi networks on Windows computers. When this setting is enabled, your system gets connected to it automatically when it comes under the range of that network. To view or manage this setting, open Windows 11 Settings and go to “Network & internet > Wi-Fi > Manage known networks.”
How do I switch to a different WiFi?
On Windows 11/10, you can easily switch from one WiFi network to another WiFi network, provided that you are in the range of that WiFi network. Open Windows 11/10 Settings and go to “Network & internet > WiFi > Show available networks.” You will see all the WiFi networks detected by your system. To connect to a particular WiFI network, select it ad click Connect.

Leave a Reply