In Windows, you can set up your own keyboard shortcut to open USB Drive or other utilities so that you don’t end up wasting time navigating through settings. A large majority of users use external USB-connected drives on a regular basis. So, for them creating a keyboard shortcut for opening a USB drive directly might seem a viable option.
Create Keyboard Shortcut to open USB Drive in Windows 11/10
Keyboard shortcuts are keys or combinations of keys that provide an alternative way to do something that you’d typically do with a mouse. Many users find that using a keyboard with keyboard shortcuts for routine tasks helps them work more efficiently. The procedure to create a Keyboard Shortcut to open USB Drive is as follows:
- Connect your USB flash drive to your PC.
- Open the Run dialog box.
- Type diskmgmt.msc and hit Enter.
- Right-click the USB drive under File Explorer and choose the Change Drive Letter and Paths option.
- Assign a letter to the drive.
- Format the disk.
- Right-click on the USB drive icon on the Desktop and choose Create shortcut option.
- On the desktop screen, right-click on the shortcut icon of your USB drive and then choose Properties from the available options.
- Switch to the Shortcuts tab, enter a keyboard shortcut and hit the Apply button.
Let’s cover the above steps in a bit more detail!
Firstly, plug-in the USB flash drive to your PC. Close all the opened files and programs or files.
Open the Disk Management tool. For this, press the Windows+R keys in combination to open the Run dialog box. Type diskmgmt.msc in the empty field of the box and hit the Enter key.
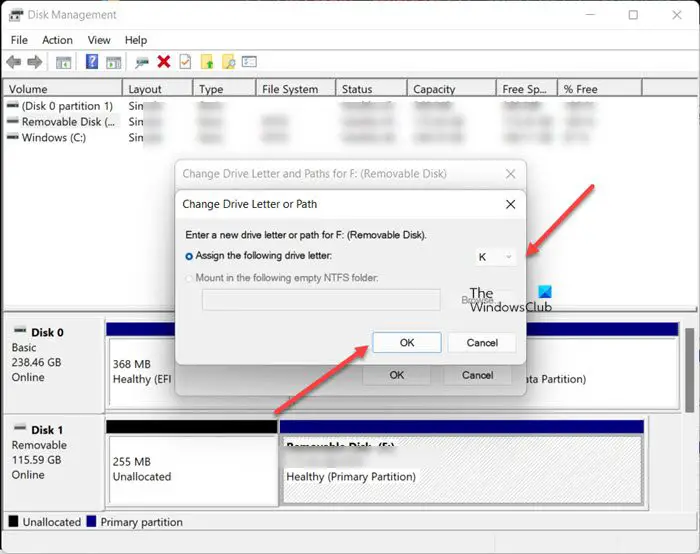
When the Disk Management window opens, right-click on your USB drive and select Change Drive Letter and Paths from the list of options visible.
Instantly, Change Drive Letter and Paths dialog should popup on your computer screen.

Locate the Change button to select it and enter a drive letter. Press OK button to assign the selected letter to your USB drive and confirm the changes.
When prompted with the following message – Some programs that rely on drive letters may not run correctly. Do you want to continue? Click the Yes button.

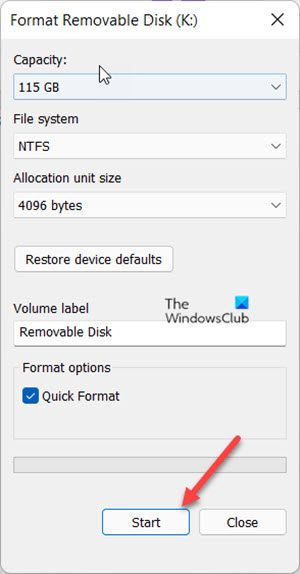
Now, you’ll need to format the disk. So, click the Format disk button to continue.
Once formatting is finished, click OK.
Now, it’s time to create a shortcut key for your USB flash drive. So, go to File Explorer, choose This PC.

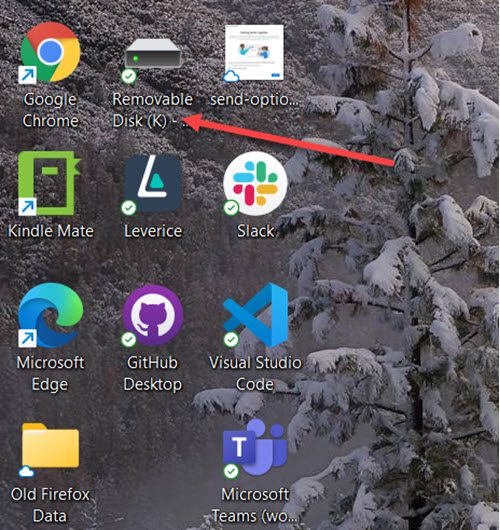
Right-click the USB drive you’ve just assigned a name and choose the Create shortcut option to create a Desktop shortcut.
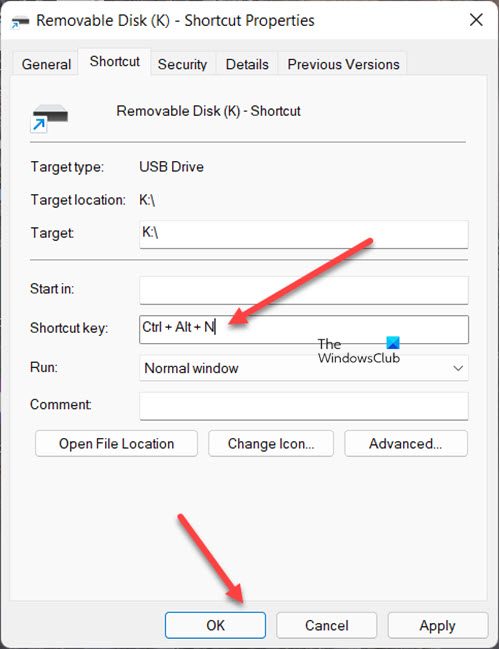
Right-click the shortcut icon of your USB drive and select Properties to open the USB Drive Properties dialog box.

Switch to the Shortcut tab.
Now, inside the Shortcut key box, enter a keyboard shortcut and then hit the Apply button. Click Apply > OK.
Hereafter, just use the assigned keyboard shortcut to open the USB Drive in Windows 11 or Windows 10.
Related: USB Disk Ejector lets you eject USB Disk with a keyboard shortcut.
TIP: Desktop Media, Desk Drive, DriveShortcut will automatically create desktop shortcuts to removable media and drives when you connect the USB, DVD, etc to PC.
How do I make USB files open automatically?
If you want to automatically open a USB drive after connecting it to your Windows PC for accessing files and folders directly, you need to set the AutoPlay defaults setting. For this, open the Settings app, access the Bluetooth & devices category, and open the AutoPlay page. Open the drop-down menu for Removable drive (under the Choose AutoPlay defaults section) and select the Open folder to view files (File Explorer) option.
What is the shortcut key to eject USB?
The simplest way to eject a USB on Windows PC is to right-click its icon under Show Hidden icons on the Taskbar system tray and choose Eject USB option. Alternatively, you can right-click on the USB drive in File Explorer and use the Eject option. There is no hotkey or shortcut key for Windows OS to eject a USB drive. macOS users can press Command+E to eject the flash drive.
That’s all there is to it!
Leave a Reply