Many a time, system admins need to create a pre-configured user account that works with fixed settings. These profiles are called Mandatory User Profiles (one of many Unique profiles) in Windows. In this guide, we will share how you can create a Mandatory User Profile, where do you need it, and how it works.
What are Mandatory User Profiles in Windows 11/10
Imagine a scenario where you need to set up an account that has pre-configured access to almost everything. It includes the icons that appear on the desktop, desktop backgrounds, user preferences in the Control Panel, printer selections, and more. Any change the user makes during the session is not stored and is only valid for that session.
This scenario fits well on a computer which is open to the public. The user can only have limited access to everything. This scenario also applies to a school computer where you don’t want kids to make any changes to the system.
That said, these profiles are usually connected to a server. A system admin can make changes. In case the server is not available, users with mandatory profiles can sign in with the locally cached copy of the compulsory profile if one exists. Otherwise, the user will be signed in with a temporary profile.
It is interesting to note that a system admin can apply a mandatory user profile to an existing profile. We will get to see that in detail.
How to create a Mandatory User profile in Windows
Just before we start, this should only apply to individual cases & it is complicated for a general user. It’s recommended not to use a computer that is for business or work. This process will remove all domain accounts available on the computer, including user profile folders. It will result in the loss of files.
- Create a default user profile and set customizations for that user profile.
- Use Sysprep (Microsoft’s System Preparation tool) to copy this customized default user profile to a network share.
- Copy Profile & Set as Mandatory Profile.
- Apply a mandatory user profile to users using the active directory.
How to create a default user profile
1] Sign in to a computer with an account that is a member of a local Administrator group. Make sure not to use a domain account.
2] Next, make changes to computer settings that should be a fit to that user profile. It can include background, uninstall applications, install business apps and so on. Uninstalling unnecessary apps will help to speed up user sign-in times.
3] After this, we need to create an answer file (Unattend.xml) which sets the CopyProfile parameter to True. In short,
- The answer file contains setting definitions and values to use during Windows Setup.
- The CopyProfile setting can customize a user profile and use the customized profile as the default user profile.
First, we customize an existing profile and then set it as the default user profile.
4] Launch the Command Prompt, and type in the Sysprep command
sysprep /oobe /reboot /generalize /unattend:unattend.xml
This command will reboot the computer and run the setup experience you usually get to see when you set up a new account. Once setup is complete, sign in to the Windows machine using an account that has local administrator privileges.
It is possible that you may get an error as “Sysprep was not able to validate your Windows installation.” If that’s the case, go to %WINDIR%\System32\Sysprep\Panther\setupact.log. It will have a list of apps that you should remove. Do it manually.
You can also use the Remove-AppxProvisionedPackage and Remove-AppxPackage -AllUsers commands in PowerShell to uninstall those apps.
Copy Profile & Set as Mandatory Profile
5] The next step is to copy this profile.
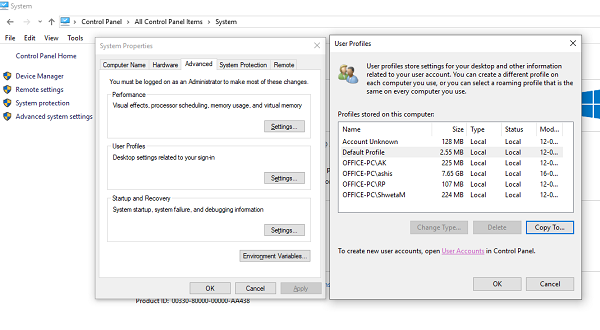
Go to Control Panel > System > Advanced system settings, and click Settings in the User Profiles section.
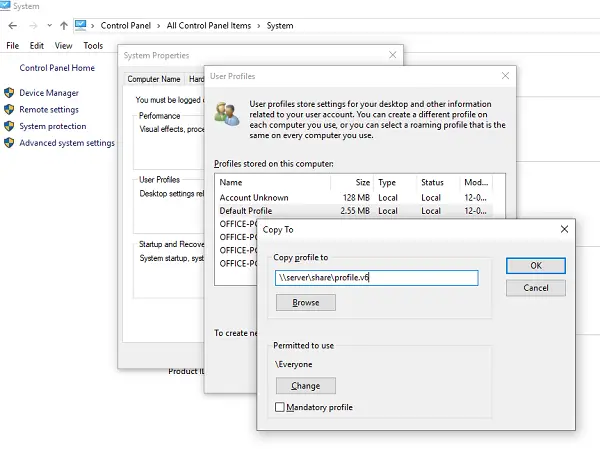
In User Profiles, click Default Profile, and then click Copy To.
Click on Copy To, under Permitted to use, click Change
Select User or Group, in the Enter the object name to select field, type everyone, click Check Names, and then click OK.

Click OK to copy the default user profile.
If you notice, there is a direct option to set this as a mandatory profile, which is our primary intention. You can check on it, and check if it works. If it doesn’t, we have another way in case of a problem.
To make the user profile mandatory
In File Explorer, open the folder where you stored the profile copy. Make sure to unhide the protected operating system files before that.
Rename the file Ntuser.dat to Ntuser.man.
Apply a mandatory user profile to users using Active Directory
If you want to ask a mandatory user profile for any user, you can follow these steps. Once complete, you must wait for the change to replicate to all domain controllers.
- Open Active Directory Users and Computers (dsa.msc).
- Navigate to the user account which you will assign the mandatory profile.
- Right-click the user name and open Properties.
- On the Profile tab, in the Profile path field, enter the path to the shared folder without the extension. For example, if the folder name is \\server\profile.v6, you would enter \\server\profile.
- Click OK.
While I have tried my best to simplify the process for you all, let us know if we can add anything which is missing.
Leave a Reply