I would say all computer users must have a rescue disk. You don’t know when you will need it. One day or the other, you might end up in a situation where your Windows computer won’t boot! Nowadays, there are many Netbook users, and most Netbooks don’t have a CD or DVD drive. I, therefore, prefer creating a rescue disk on a USB drive.
Use Universal USB Installer to create a Rescue Disk on USB Flash Drive
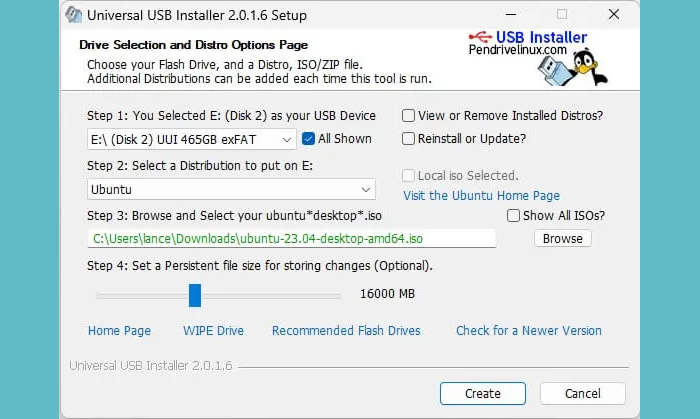
In this article, I will show you how to create a Rescue Disk on a USB Flash drive.
Step 1: First, we need to download Universal USB Installer.
Step 2: Run the setup file.

Step 3: Download a Rescue Disk ISO image. There are a lot of free software out there. You could use the drop-down list to see the ones that support by Universal USB Installer.
I would recommend SystemRescueCD or UDCD (Ultimate Boot CD).
Step 4: Choose the appropriate option from the drop-down and browser, select the ISO image and choose your Flash drive and Click on Create.

Well, you are done!
It’s easy to create and saves a lot of stress in times of emergency.
Make sure you have set the proper boot order in the BIOS so the Laptop or PC recognizes the USB when it boots.
Read: How to make a Windows PE Rescue Disk.
Can you create a system repair disk on a flash drive?
You cannot create a system repair disk on a flash drive. System Repair Discs can only be created on CD/DVDs. However, you can create a Recovery Drive on a USB flash drive, which serves a similar purpose by allowing you to troubleshoot and restore your computer.
How do I rescue a USB drive?
To rescue a USB drive, connect it to your computer, open File Explorer, right-click on it, and select “Properties.” Then, navigate to the “Previous Versions” tab, choose a previous version, and click “Restore.” This process can help recover deleted data from your USB flash drive.
How do I create a disk on a USB drive?
To create a disk on a USB drive, plug in the USB drive, open Disk Management on your computer, and select “Create and format a hard disk partition.” Choose the USB drive, create a new volume, and assign it a drive letter. Finish by formatting the drive with your desired file system.
How to create a Windows repair disk?
To create a Windows repair disk, go to the Control Panel, select “Backup and Restore,” and click on “Create a system repair disc.” Insert a blank DVD or CD, follow the prompts, and the disc will be created for future system repairs.

Another great tool you can use is EasyBCD. You can add multiple ISO files, WIM files, etc. When you boot from the UFD (USB Flash Drive) it can have a boot menu like Windows 7. Works pretty well.
redk9258 I sure would like a tutorial on how to get the most out of BCD. Do you have any recommendation? Their site is cryptic.
Open EasyBCD.
Click the “BCD Deployment” button.
Choose the UFD (USB Flash Drive) partition from the drop down. (MAKE SURE YOU HAVE TH RIGHT ONE!)
Click the “Install BCD” button.
This will add a BCD store to the UFD and make it bootable. It will ask if you want to load the newly created BCD file. Click Yes.
Now copy ISO or WIM files to the flash drive.
Click the “Add New Entry” button.
Click the appropriate tab for the type you are adding (ISO or WinPE).
Give it a name and browse to the ISO or WIM file.
Once you have an entry or two, click “Edit Boot Menu” to set the order, default timeout, etc.
Click “Save Settings” and close EasyBCD.
Your UFD should be bootable and contain the entries you added to the boot menu.
Note that EasyBCD only works on Win 7 / Vista.
http://neosmart.net/wiki/display/EBCD/Creating+a+Bootable+USB+Drive