We have noticed that the Credential Guard Service is not running but is enabled in the Services Manager of Windows 11/10. This issue can be due to various reasons such as missing Hyper-V or virtualization support or some system image corruption. In this post, we are going to talk about this issue and see what you can do if the Credential Guard Service is not working on your computer.

Fix Credential Guard Service not running but Enabled in Windows 11/10
If the Credential Guard Service is not running but enabled on your Windows 11/10 device, follow the solutions mentioned below to resolve the issue.
- Restart Credentials Gaurd Service
- Check if virtualization is enabled on your computer
- Check the status of the Credential Manager Service and start it if required
- Enable Secure Boot and Hardware Virtualization
- Update BIOS and Drivers
- Reset your BIOS
Let us talk about them in detail.
1] Restart Credentials Gaurd Service
First of all, we need to restart the Credentials Gaurd Service as the reason why it is not running could be a glitch. To do so, go to our guide where we have mentioned how you can enable or disable Credential Guard on your computer. However, if restarting is to no avail, you can move on to the next solution.
2] Check if virtualization is enabled on your computer
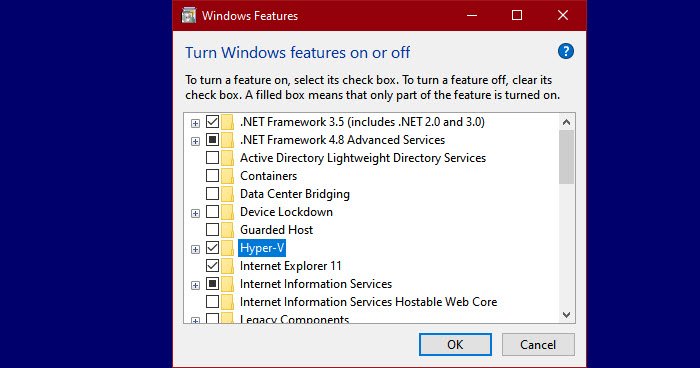
Next up, we need to check and make sure that Hyper-V and other virtualization features are installed on your computer as they are required when using the Credential Guard. To do so, you can follow the steps mentioned below.
- Open the Control Panel by searching it out of the Start Menu.
- Change the View by to Large icons and click on Programs and Features.
- Now, check and make sure that Hyper-V, Windows Hypervisor Platform, and Virtual Machine Platforms are enabled.
- Finally, click on Apply > Ok.
Once done, restart the Credentials Gaurd Service and see if the issue persists.
3] Check the status of the Credential Manager Service and start it if required
We can also see if the service responsible for the Credentials Manager is running or not using a PowerShell command. To do so, open PowerShell as an administrator by searching it out of the Start Menu and execute the following command.
Get-Service -Name LsaIso
If the service is not running, you can execute the command given below to start it.
Start-Service -Name LsaIso
In case, the service fails, you can check the Event Viewer logs for more details.
4] Enable Secure Boot and Hardware Virtualization
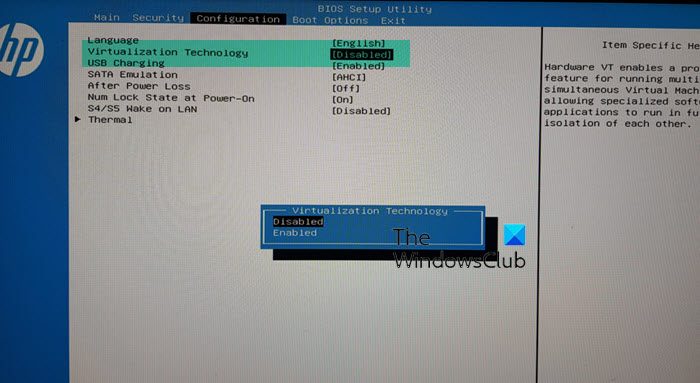
As mentioned earlier, one of the prominent reasons for this error is the lack of virtualization. We have aforementioned the steps to enable software virtualization, now, we will have to enable hardware virtualization and Secure Boot as well. To do so, follow the steps mentioned below.
- First of all, you need to boot into BIOS.
- Now, go to the System Configuration tab, then, go to Virtualization Technology, and hit Enter.
- Set Enabled and press Enter.
Finally, save and exit out of the BIOS.
Do keep in mind that every manufacturer will have a different name for the tabs and buttons mentioned there. So, if you are not sure, check the linked post. Additionally, we need to enable Secure Boot. To check if it is enabled, hit Win + S, type “System Information”, and then hit Enter. Look for Secure Boot State and see if it is On. If it is Off, you need to enable the Secure Boot from BIOS.
5] Update BIOS and Drivers
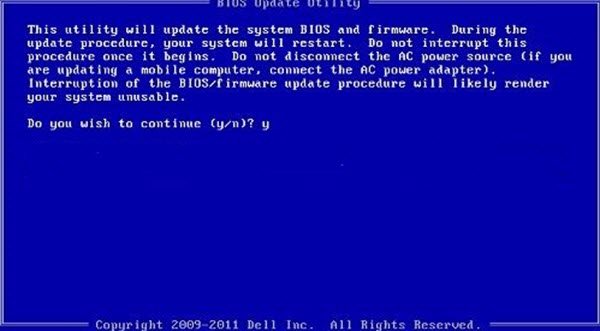
Next up, we recommend you update your BIOS along with drivers. This is to ensure that the issue is not due to incompatibility between the program, the drivers, and the BIOS. In order to update the BIOS, we recommend you check out our guide on how to check the version of the BIOS and update it. Along with the BIOS, you need to update all your drivers, we have listed a few methods below, you can check any one of them out.
- Install a driver update tool to keep your drivers updated.
- Update your drivers from the manufacturer’s website.
- Go to Windows Driver and Optional Updates to install the latest version of the driver.
Once you have updated the driver, check if the issue is resolved.
6] Reset your BIOS
In case, you encountered the same issue even after updating the BIOS, you should consider resetting it to the default value. It is not as daunting as it sounds, you are not losing your system files, all you are doing is setting your BIOS’s value to default. Once done, reboot your computer and check if the issue persists.
Hopefully, you will be able to resolve the issue using the solution mentioned in this post.
Read: Device Guard and Credential Guard Hardware Readiness Tool for Windows computers
How to start Credential Guard service?
If you want to enable Credential Gaurd Service, in the Group Policy Editor, navigate to Computer Configuration > Administrative Templates > System > Device Guard. Now, double-click “Turn On Virtualization Based Security” and select Enabled. Under Options, choose Secure Boot or Secure Boot and DMA Protection in the Platform Security Level box. Set Virtual Based protection of Code Integrity, Secure Launch Configuration, and Kernel-mode Hardware-enforced Stack Protection to Not configured. In the Credential Guard Configuration box, select Enabled with UEFI lock and click OK.
How do I know if my Credential Guard is activated?
You can run msinfo32.exe in Run (Win + R) to open the System Configuration, then in the Summary tab, and check if Credential Guard is shown next to Virtualization-based Security Services Running.
Read: Turn on Remote Credential Guard to protect Remote Desktop credentials.

Leave a Reply