CRITICAL STRUCTURE CORRUPTION Blue Screen is caused when the kernel detects critical kernel code or data corruption. It has been noted that the BSOD appears when using the computer or during the booting process. In this post, we are going to talk about this Blue Screen of Death and see what you can do to resolve it.

The CRITICAL_STRUCTURE_CORRUPTION bug check has a value of 0x00000109. This indicates that the kernel has detected critical kernel code or data corruption.
What causes CRITICAL_STRUCTURE_CORRUPTION Blue Screen?
There are multiple reasons why you might get CRITICAL_STRUCTURE_CORRUPTION BSOD error on Windows 11/10 PC. However, some of the common reasons are:
- A driver has modified critical kernel code or data.
- A hardware corruption occurred.
- A software code attempted to take some unauthorized actions and failed.
Fix CRITICAL STRUCTURE CORRUPTION Blue Screen
If you encounter CRITICAL_STRUCTURE_CORRUPTION BSOD on Windows 11/10, follow these suggestions and see if they help:
- Make sure to not have any incompatible device
- Run System File Checker and Deployment Imaging and Service Management commands
- Run Memory Diagnostics to find out if there is some hardware issue
- Update all your device drivers
- Run Online Blue Screen Troubleshooter
- Check the System Log in Event Viewer
- Troubleshoot in Clean Boot
- Repair System Files using the Installation Media.
Let us talk about them in detail.
1] Make sure to not have any incompatible device
If you have added any device to your computer, its driver gets installed, that’s why it is very important to make sure that you are not using any incompatible device. You need to confirm that any new hardware that is installed is compatible with the installed version of Windows.
If you do that, both devices will conflict will each other and cause BSOD. So, just remove any such devices, go to Device Manager, right-click on its driver, and select Uninstall device. Finally, reboot your computer and your issue will be resolved.
You can also try running the hardware diagnostics supplied by the system manufacturer and see if that helps
2] Run System File Checker and Deployment Imaging and Service Management commands

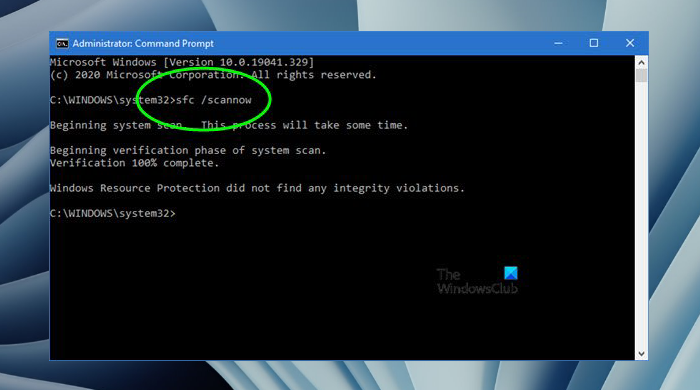
Next up, we will be repairing your system files using the SFC and DISM commands. These commands will scan your computer for corrupted files and then repair them. To do the same, open Command Prompt as an administrator and run the following command.
sfc /scannow
If this SFD doesn’t work, run the following command.
Dism /Online /Cleanup-Image /RestoreHealth
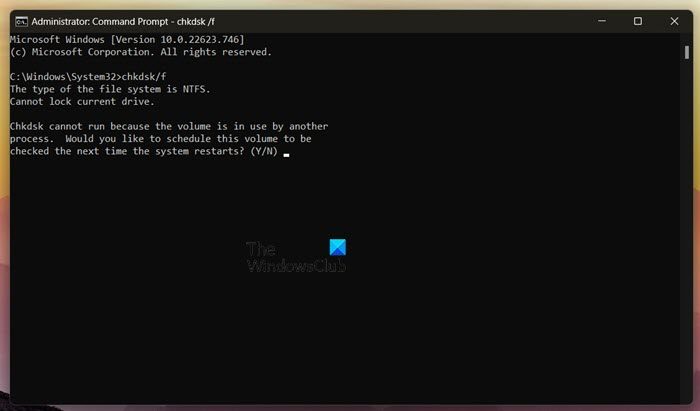
You may see the error code in question if some of the disk files are corrupted. That is why we will be running a CHKDSK command that will scan your disk and repair the bad sector.

To do the same, first of all, open Command Prompt as an administrator and run the following command.
chkdsk/f
You will be asked to confirm your action, so, hit Y and then Enter. Hopefully, this will do the job for you
3] Run Memory Diagnostics to find out if there is some hardware issue

There is a possibility that BSOD is caused due to malfunctioning hardware. Windows has a built-in program called Memory Diagnostics that will scan your computer for malfunctioned hardware parts and then show you the results. To run the tool, you need to open Memory Diagnostics using Run, just hit Win + R, type “mdsched.exe”, and hit Enter. Then, select Restart now and check for problems. Your computer will shut down and it boots up again, Memory Diagnostics will show you the results. In case, your hardware is not malfunction, there is no need to worry. However, if there is some kind of malfunction contact an expert or computer manufacturer.
4] Update all your drivers
A BSOD can also be caused because of a bug in one of your drivers. Since we are not developers of those drivers, the only thing we can do is wait for an update that will resolve the issue.
If a driver is identified in the bug check message, disable the driver and see if that helps; else update your drivers and see.
Windows actually has great integration with drivers and more often than not, it will either prompt you to update them or install the latest version automatically. Either way, we have mentioned some simple ways to update your drivers.
- Use a free driver update software
- Install Driver and Optional Update from Windows Settings.
- Update all your drivers from Device Manager.
Hopefully, this will do the job for you.
5] Run Blue Screen Troubleshooter
Next up, let us run the Microsoft Online Blue Screen Troubleshooter which will scan your computer for the cause and then repair it. Hopefully, this will do the job for you.
6] Check the System Log in Event Viewer
Check the System Log in Event Viewer for additional error messages that might help identify the device or driver that is causing this bug check. You check the BSOD log file in Event Viewer and then ask the experts to suggest solutions.
7] Troubleshoot in Clean Boot
Maybe the reason why you see this BSOD is a third-party application. It can interfere with Windows processes and stop them from performing their task as a result of which, the BSOD is caused. However, since we don’t know which app is the culprit, in this case, we will be performing Clean Boot which will turn off all processes except that of Microsoft. You can then enable processes manually to find out which app is the culprit here. Then, uninstall the app and hopefully, that will do the trick for you.
8] Repair System Files using Installation Media
If nothing worked, your last resort is to repair the system files using Installation Media. This is something we use when the system image is corrupted beyond the point of repair using the commands we mentioned earlier.
We hope that your issue will be resolved using the solutions mentioned in this post.
Also Read: Bluescreen after installing Drivers in Windows 11/10
How do you fix Critical Structure Corruption error in Windows 11/10?
More often than not, Critical Structure Corruption is a result of corrupted system files. In order to fix the issue, you need to find a way to repair the corrupted file or any other elements of your computer. You can do that, by following the solutions mentioned in this post, just, start from the first solution and then move your way down. Hopefully, you will be able to resolve the issue pretty easily.