If your custom credential providers don’t load when you first log on to Windows 11/10, this post will be able to guide you. Credential providers are the primary mechanism for user authentication—they currently are the only method for users to prove their identity which is required for logon and other system authentication scenarios.
The Windows Credential Provider Framework enables developers to create custom credential providers. When Winlogon wants to collect credentials, the Logon UI queries each credential provider for the number of credentials that it wishes to enumerate. After all, providers have enumerated their tiles, the Logon UI displays them to the user. The user then interacts with a tile to supply the necessary credentials. The Logon UI submits these credentials for authentication.
Custom credential providers fail to load on Windows 11/10
Let us say that you have a Windows 11/10-based computer that is not joined to a domain and custom credential providers are installed on the computer. You log on to the computer for the first time after it starts. In this scenario, the custom credential providers are not called.
According to Microsoft, this issue is by design. A Windows 11/10 update improves the Use my sign in info to automatically finish setting up my device after an update sign-in option. This feature is used for the first login. Therefore, custom credential providers do not take effect.
To work around this issue, you’ll need to disable the automatic system logon of the last user by setting the DisableAutomaticRestartSignOn Registry key.
Before you proceed with the registry tweak, backup the registry or create a system restore point in case the registry operation goes south.
If custom credential providers fail to load on Windows 11/10 PC, follow these steps:
- Press Win+R to open the Run prompt.
- Type regedit and hit the Enter button.
- Click the Yes button.
- Go to System in HKLM.
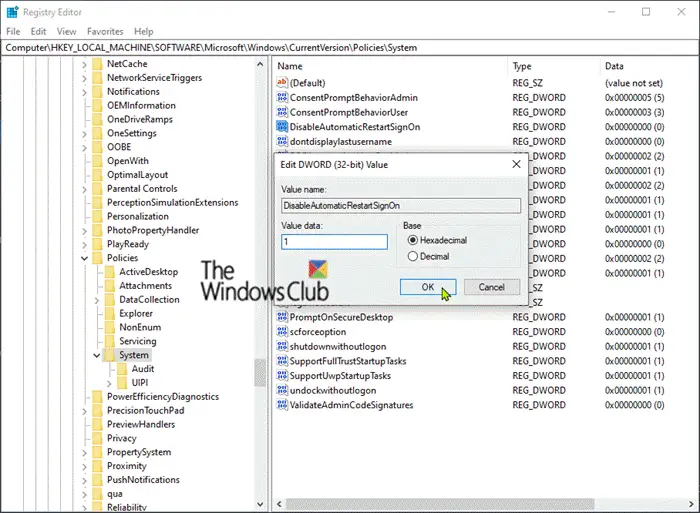
- Double-click on DisableAutomaticRestartSignOn.
- Enter the Value data as 1.
- Click the OK button.
- Restart your computer.
To learn more about these steps, continue reading.
To get started, you need to open the Registry Editor. For that, press Win+R to open the Run prompt, type regedit, and hit the Enter button. Then, click on the Yes button on the UAC prompt.
Navigate to the following registry key:
HKEY_LOCAL_MACHINE\Software\Microsoft\Windows\CurrentVersion\Policies\System
On the right pane, double-click the DisableAutomaticRestartSignOn entry to edit its properties. Set the Value data as 1 and click the OK button.

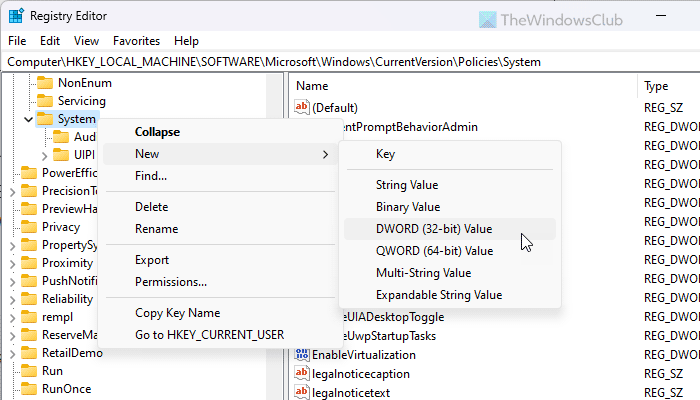
However, if you cannot find this REG_DWORD value, you need to create it manually. For that, right-click on the System key, select New > DWORD (32-bit) value, and set the name as DisableAutomaticRestartSignOn.

Then, you can double-click on it to set the Value data.
Finally, close all the windows and restart your computer.
And that’s it! I hope this guide helped you.
Read: Disable or Enable Biometrics Sign In on Windows joined to a Domain
How do I disable Windows credential provider?

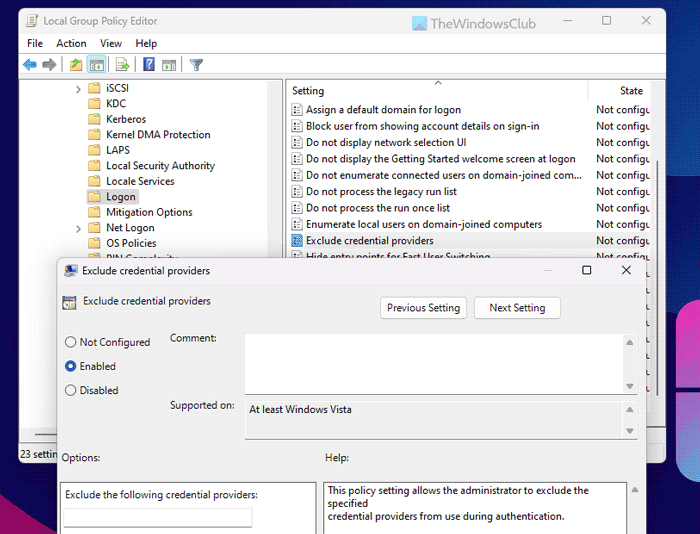
To disable the Windows credential provider, you need to open the Local Group Policy Editor and navigate to this path: Computer Configuration > Administrative Templates > System > Logon. Then, double-click on the Exclude credential providers setting and choose the Enabled option. Enter the CLSIDs in the empty box. Finally, click the OK button to save the change.
What does it mean when your computer says your domain isn’t available?
If your computer shows an error message saying that We can’t sign you with this credential because your domain isn’t available, it implies that your computer is not connected to the domain. It mainly happens due to network interruptions or DNS problems. You can fix this issue by removing the user from the protected user’s group, verifying the DNS settings, etc. It is also suggested to check the Interactive logon: Number of previous logons to cache (in case of the domain controller is not available) setting in the Local Security Policy.
Leave a Reply