It is very easy to customize keyboard shortcuts for Microsoft Word. This is an efficient way of saving time while working on your PC. All you have to do is to assign these shortcut keys to a font, command, macro, or any frequently used key. Windows has made assigning keyboard shortcuts that will automatically launch programs very convenient. Most programs like Excel, Chrome, and Word already have their own shortcuts for different menu options, however, customizing them could make it easier for users who have their own specifications.
Customize Keyboard Shortcuts for Word
Making one-key combos using AutoHotkey can speed up and amplify your computing life. You can easily assign or remove keyboard shortcuts with the use of your keyboard or mouse. You can create custom shortcuts on your keyboard by doing the following steps:
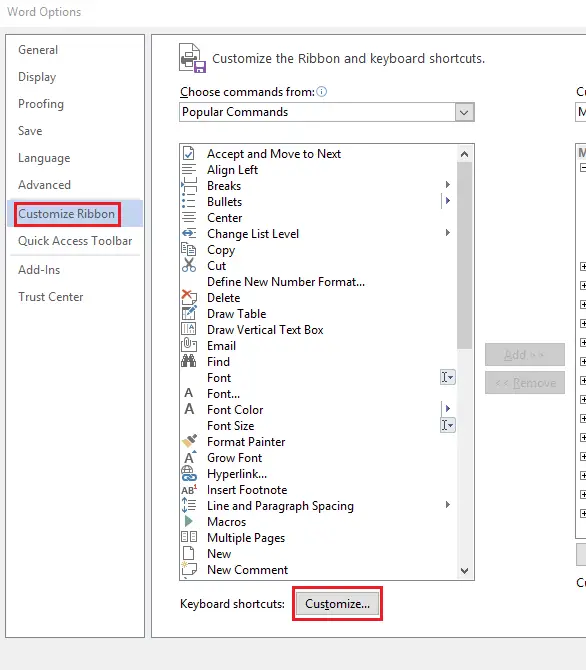
Open Word Options by clicking on ALT+F and T. Click on the Down Arrow key to choose Customize Ribbon option. Now repeatedly click on the TAB key until the Customize option is selected then hit ENTER.

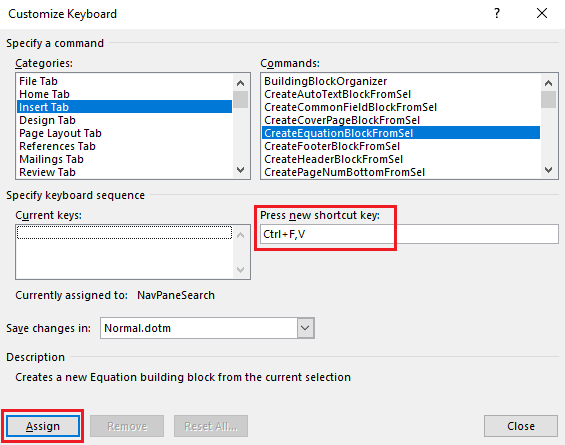
Now under Categories, press on the UP ARROW and DOWN ARROW in order to highlight and select the category want to either assign a certain command or keyboard shortcut to or to delete or remove a keyboard shortcut.
Next, go to Commands dialog box by pressing the TAB key and click on the UP ARROW or DOWN ARROW to highlight the specific command or item that you would want to assign the keyboard shortcut on or delete the keyboard shortcut to which it is assigned from. You can check on the commands assigned to particular keyboard shortcuts by clicking on the Current Keys box or Currently Assigned To box.
Read: Keyboard Shortcuts not working in Word.
To assign a keyboard shortcut, keep pressing the TAB button, on the left of the keyboard till the cursor moves to the Press New Shortcut Key box. Click on the arrangement of keys that you wish to assign by hitting on CTRL and then the specific key that you would want to use.
Finally, check on the Currently Assigned To or Current Keys to verify whether the key combinations are already taken or assigned to a particular item or command. If a key combination is already assigned, then you must try typing a different set of combinations.
Next, press the TAB key continuously until Save Changes In is highlighted. After you have done this, press the UP ARROW and DOWN ARROW keys in order to select the name of the document that you would want to save the changes in keyboard settings in and then hit ENTER. Finally, repeatedly press the TAB key to highlight Assign and then hit ENTER.
TIP: You can also open Office apps using Ctrl+Shift+ Alt+Win Keyboard Shortcuts
To remove a keyboard shortcut, continuously press the TAB key until the Save Changes In option is selected. Next, click on the UP ARROW or DOWN ARROW to select the document name that you would want to save keyboard shortcut in and then hit ENTER.
Now, click on SHIFT+TAB key continuously until the cursor is in the Current Keys.
Next, click on UP ARROW or DOWN ARROW to choose the keyboard shortcut that you would want to delete.
Finally, click on the TAB key continuously until Remove is highlighted, and then click on ENTER.
That is all there is to it!
Here is the complete list of Windows 10 keyboard shortcuts, if you want to take a look at it.
Leave a Reply