Microsoft Word comes with countless options that you can change or tweak as per your requirements. For some people, default settings are enough to get the job done, whereas some of you might not be satisfied fully. If you are one of them, you can check out this article. Here are some of the default Microsoft Word settings you can change to improve your productivity or personalize the app as per your wish.

Default Microsoft Word settings you need to change
Some of the default Microsoft Word settings that you must change are:
- Spelling and grammar settings
- Disable Automatic bulleted and numbered lists
- Cut, copy, and paste settings
- Default font and font size
- Disable CTRL + Click to follow hyperlink
- Change File Block settings
- Customize Quick Access Toolbar
- Add necessary options to Ribbon
- AutoCorrect options
- Change default save location
To learn more about these settings, continue reading.
1] Spelling and grammar settings
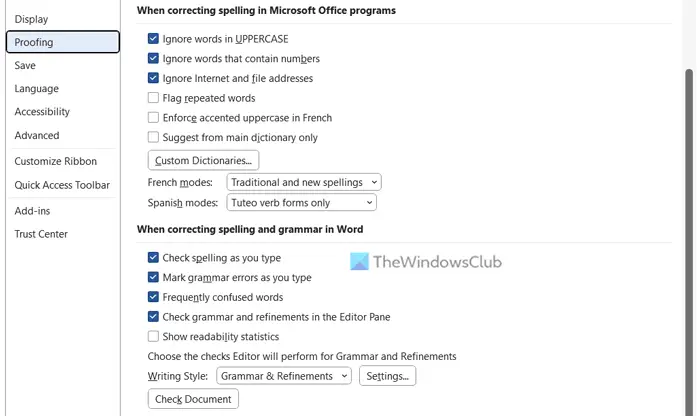
The default Spelling and grammar settings might not satisfy you since several things get skipped when using the preset version. That is why you need to open the Word Options > Proofing and head to the When correcting spelling and grammar in Word section. Then, change the setting as per your requirements. Not only that but also, you must click on the Settings button and tweak the refinements settings as well. However, this panel appears only when you select the Grammar & Refinements option.
2] Disable Automatic bulleted and numbered lists
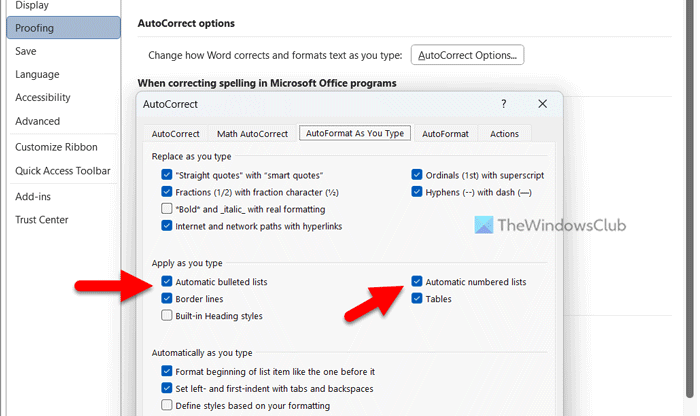
By default, Word creates a bulleted and numbered list automatically. For example, if you type the digit first and hit the space bar, it starts a numbered list automatically. At times, you might not like this setting since you might want to add the number as prefix to a sentence. That is why follow these steps to disable Automatic bulleted and numbered lists:
- Open Word Options on your computer.
- Switch to the Proofing tab.
- Head to the AutoCorrect options section.
- Click on the AutoCorrect Options button.
- Go to the AutoFormat As You Type tab.
- Remove the tick from the Automatic bulleted lists checkbox.
- Remove the tick from the Automatic numbered lists checkbox.
- Click the OK button the change.
3] Cut, copy, and paste settings
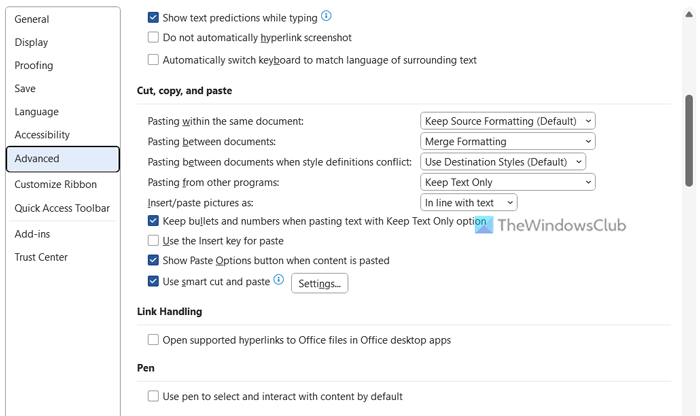
The default cut, copy, and paste settings might not be handy for you if you often copy contents from one document to another or from the internet. That is why you must change the default Cut, copy, and paste settings. For that, open the Word Options first. Then, go to the Advanced tab on the left-hand side.
Next, you need to scroll down to get to the Cut, copy, and paste section. Here you can find these options:
- Pasting within the same document
- Pasting between documents
- Pasting between documents when style definitions conflict
- Pasting from other programs
- Insert/paste pictures as
- Keep bullets and numbers when pasting text with Keep Text Only option
- Use the Insert key for paste
- Show Paste Options button when content is pasted
You can expand all these settings and choose the required option as per your requirements.
4] Default font and font size

By default, Microsoft Word uses Calibri font at 11px. However, the font and font size might not be big enough for your eyes if you have a high-resolution display on a small 14-inch laptop. In such cases, you need to change the default font and font size settings. To do that, follow these steps:
- Open Microsoft Word on your computer.
- Make sure that you are in the Home tab.
- Head to the Font section.
- Click the arrow icon.
- Choose the font and font size accordingly.
- Click on the Set As Default button.
- Choose All documents based on the Normal.dotm template option.
- Click the OK button.
After that, it will start using the new font and font size you selected.
TIP: Change these default Outlook settings to boost productivity
5] Disable CTRL + Click to follow hyperlink
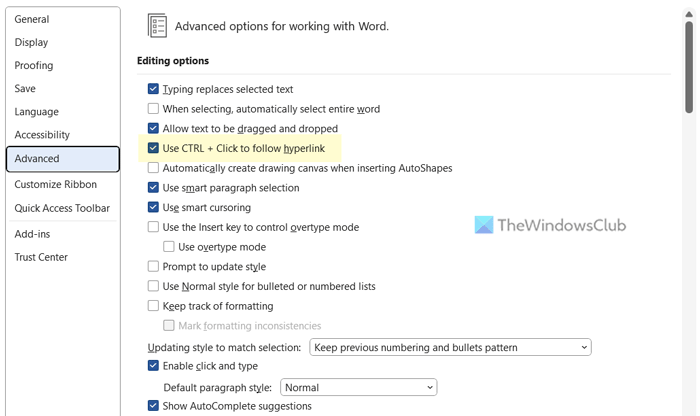
By default, Microsoft Word opens a hyperlink only when you click on the link while holding the Ctrl key. However, if you need to open many hyperlinks frequently, this process might not be handy for you. Instead of holding the Ctrl key, you can get rid of this key and follow the hyperlink by just clicking on it. To disable Ctrl + Click to follow the hyperlink, follow these steps:
- Open Word Options on your PC.
- Go to the Advanced tab.
- Find the Use CTRL + Click to follow hyperlink option.
- Remove the tick from this checkbox.
- Click the OK button to save the change.
After that, you do not need to hold the CTRL key to follow a hyperlink in any Word document.
6] Change File Block settings
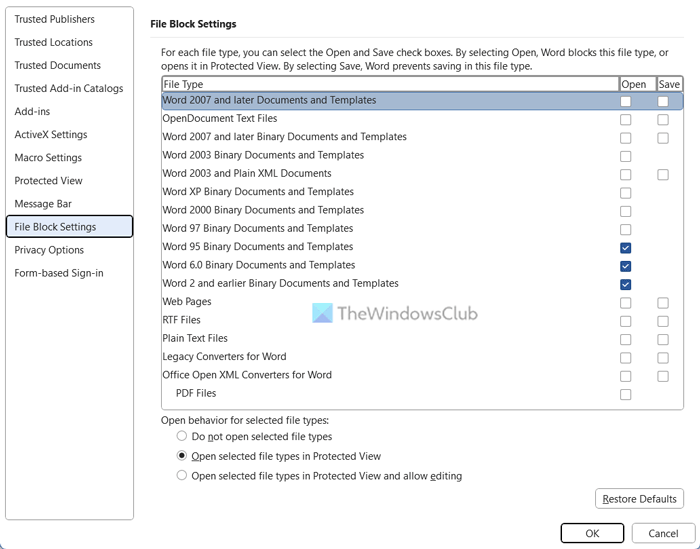
By default, Word opens only Word 95, Word 6.0, and Word 2 files in the Protected view. Considering today’s safety situations, regular users should always open documents in protected view to safeguard their computers. That is why it is suggested to change the File Block settings. For that, do the following:
- Open Microsoft Word and open the Word Options panel.
- Go to the Trust Center tab on the left side.
- Click on the Trust Center Settings button.
- Switch to the File Block Settings tab.
- Make sure the Open selected file types in Protected View is selected.
- Tick the required checkboxes.
- Click the OK button to save the change.
For your information, it is highly recommended to tick the PDF Files and Web Pages options, no matter what you do with others.
7] Customize Quick Access Toolbar
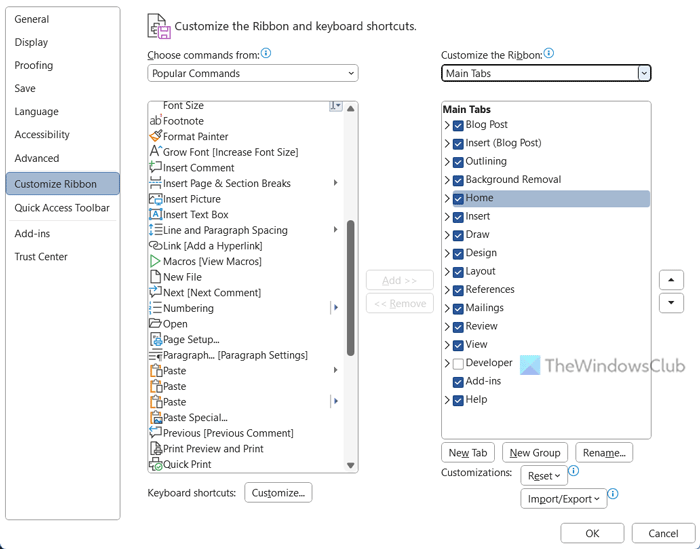
By default, Word displays only the Save button in the Quick Access Toolbar, which is one of the most important parts of getting things done quickly. You can quickly change this setting and add other options. For example, you can add the Print, Paste, etc., options to the Quick Access Toolbar. For that, you need to follow these steps:
- Open Word Options.
- Switch to the Quick Access Toolbar tab.
- Select the option you want to add to the Quick Access Toolbar.
- Click the Add button.
- Click on the OK button.
You can find those new options or buttons instantly in the Quick Access Toolbar in Word.
Read: Default PowerPoint settings you should change
8] Add necessary options to Ribbon
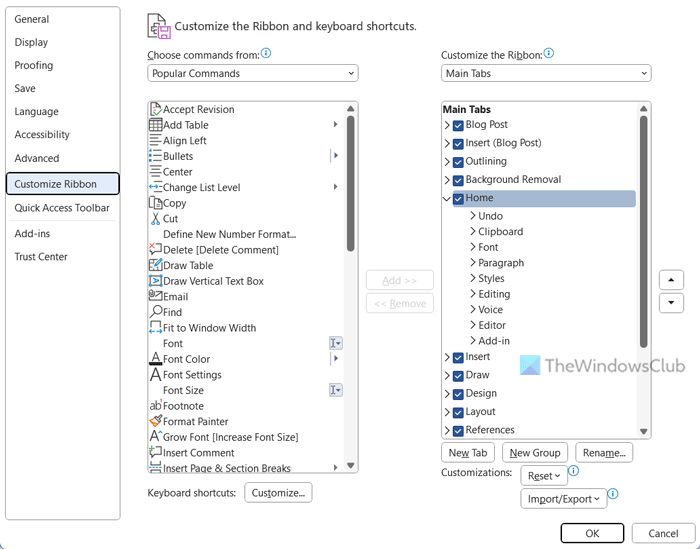
The default setting of Word displays Home, Insert, Draw, Design, Layout, etc., tabs in the Ribbon. However, if you do not want a certain tab or add or remove a specific option from a specific tab, you can do that. As Word displays countless options in those tabs, you might be confused and often spend much time finding out a certain option when in a hurry. That is why follow these steps to add or remove necessary options to Ribbon:
- Open the Word Options wizard on your PC.
- Go to the Customize Ribbon tab on the left side.
- Find the option you want to add on the left side.
- Click the Add button.
- Find the option you want to remove on the right side.
- Click the Remove button.
- Click the OK button to save the changes.
All the changes are applied almost instantly.
Read: Change these default settings in Excel for a better experience
9] AutoCorrect options
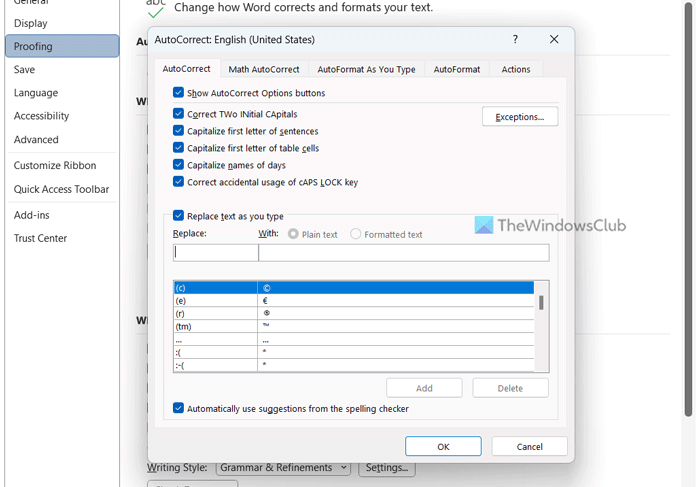
Microsoft Word comes with so many AutoCorrect options that you can change or tweak to get the most out of this application. By default, Word capitalizes the first letter of sentences or names of the days automatically. In case you do not want to do such a thing, you can change those setting instantly. For that, follow these steps:
- Open the Word Options panel on your computer.
- Switch to the Proofing tab.
- Click on the AutoCorrect Options button.
- Find the option you want to change in the AutoCorrect tab.
- Remove the tick from the checkboxes to enable or disable.
- Go to the Math AutoCorrect tab and do the same.
For your information, you can switch between other tabs as well. For example, you can find AutoFormat As You Type, AutoFormat, and Actions tab. Each tab includes several options to customize the experience.
Read: How to add or remove AutoCorrect Exceptions in Word, Excel, PowerPoint
10] Change default save location
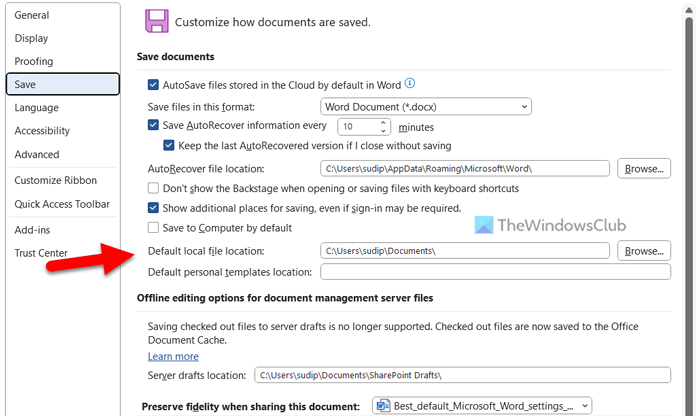
By default, Microsoft Word saves all documents in the Documents folder. However, you might not want to do that at times. If so, you can change the default save location in Word using these steps:
- Open Word Options.
- Go to the Save tab.
- Head to the Default local file location section.
- Click the Browse button.
- Select a path where you want to save your files.
- Click the OK button.
After that, Microsoft Word will start saving files in that location.
Read: 10 Most Useful Microsoft Word Tips & Tricks
What are the default settings for Microsoft Word?
All the default settings can be found when you open Microsoft Word for the very first time. However, if you change the font, font size, or anything else, the default template will be tweaked instantly. For your information, default settings allow you to get things done, but you need to change a few things in order to get more out of Microsoft Word.
How do I reset Microsoft Word to default settings?
Although there is a way to reset Word to the default template, there is no other option to reset all settings at once. For that, you need to reset the Office app. To do that, open Windows Settings > Apps > Installed apps > Office. Click the Advanced options and click on the Reset button twice.
Why is it important to know the default settings in Word?
There are multiple reasons why it is important to know the default settings in Word, Excel, PowerPoint, or any other Office app. However, the most important reason is that you can do more or get more out of Microsoft Word by changing some default settings. It is undoubtedly possible to improve your productivity and customize the app as per your requirements.
That’s all! Hope this guide helped you.
Leave a Reply