Microsoft’s OneNote notebook is a popular application that has replaced a physical notebook. Onenote notebook aka digital notebook is a perfect application for organizing and saving your million ideas all at a single place instantly. Users can also share the notes over the internet so that the participants can read and contribute at the same time. The original version of OneNote is OneNote 2016 and the notes related to this version are stored locally on computer devices. While OneNote is no longer updated with new features, it is optionally available for the users who are using locally stored notebooks.
OneNote users may want to sync notes on OneDrive account, which, as a matter of fact, offers several benefits like allowing users to edit the notes as well as view the notes across any devices irrespective of location. Additionally, it also lets users share the notes with friends, colleagues, and family thus promoting multi-user collaboration. On a related note, One can also delete the notebook from OneDrive when you no longer need them to appear on OneDrive. If in any case, you wish to retain the content from the notebook before deleting them on OneDrive, you can move the notebook to a computer by creating a new notebook on your system and then delete the old notebook from OneDrive.
Read: Difference between OneNote and OneNote 2016.
It’s important to note that moving a notebook to a computer will take away most of the benefits from the user that OneDrive had offered and you won’t be able to view or edit notes from any other devices. If you don’t want others to view your notes on OneDrive and at the same time take full advantage of OneNote on OneDrive, you can anytime stop sharing it with the participants or can also change the permissions on who can view or edit the notebook. By changing the permissions and retaining the notebook on OneDrive will allow users the flexibility to open notebook on any device like tablet, web, smartphone etc. If for any reason you no longer want to keep your notes on OneDrive, you can anytime delete them for good. In this article, we explain step by step on how to delete a notebook from OneDrive and how to move a notebook to your system if in case you want to keep the content of the notebook before deleting them from OneDrive.
Delete OneNote notebook from OneDrive
If you no longer want to save the content of shared notebook on OneDrive and no longer want your notebook to appear on One Drive, you can permanently delete your notebook from OneDrive. The following steps will explain in detail how to delete a notebook from OneDrive.
Open your OneDrive and locate the notebook you want to delete.
Move the cursor over the title and select the box that appears on the notebook.
Click on Manage and choose Delete.
Once the notebook is deleted from OneDrive, it is important to close the deleted notebook in OneNote. Failing to close the deleted notebook on OneNote will result in syncing error wherein the OneNote will keep trying to sync with a notebook that no longer exists in OneDrive. The following steps will guide you on how to close the deleted notebook in OneNote.
Open the OneNote and locate the notebook which you deleted from OneDrive.

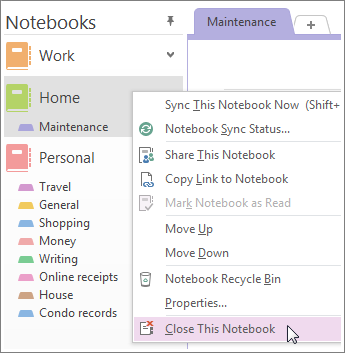
Right-click on the notebook and click on Close This Notebook from the drop-down menu.
How to move a notebook to a computer
If in any case, you wish to retain the content from the notebook before deleting them on OneDrive, you can move the contents of the old notebook section by section to a computer by creating a new notebook on your system and then delete the old notebook from OneDrive.
- Open OneNote and go to Files.
- Click on New and choose Computer.
- Type the name you want to give for the new notebook and click on Create Notebook.
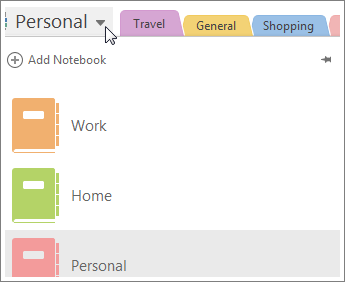
- In order to see all the notebooks, click on the arrow next to the name of the notebook.

To pin the Notebook pane, you can click the pushpin icon and all your notebooks will be visible.

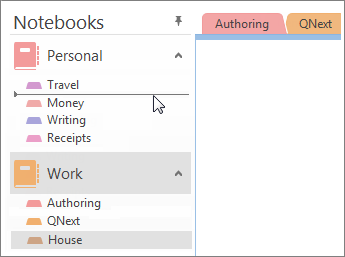
Choose the notebook you want to delete on OneDrive. Drag each section of the old notebook which you want to delete on OneDrive to the new Notebook which you just created. Note that there is no way that you can move a whole notebook to a new location. You can move the contents section by section only by first creating a new notebook.
Once the content is copied to the local system, Open your OneDrive and locate the notebook you want to delete.
Move the cursor over the title and select the box that appears on the notebook.
Click on Manage and choose Delete.
Now Return back to OneNote and locate the name of the notebook which you deleted from OneDrive.
Right-click on the notebook and click on Close This Notebook from the drop-down menu.
How to delete a Notebook in Microsoft OneNote?
- Open the OneNote desktop application
- Click on the drop-down menu next to the name of the Notebook
- Locate the Notebook you want to delete
- Right-click on the selected Notebook
- Choose Close This Notebook from the drop-down menu.
- The OneNote Notebook will be removed.
That’s all.
Leave a Reply