There may be times when your Windows Update may give you problems on your Windows 11/10 computer. You may even see Pending Windows Updates which refuse to install for some reason in spite of several attempts. In such cases, you should consider deleting the failed and pending Windows Updates that are downloaded incompletely to your computer and then try to restart the installation once again as soon as you restart your computer.
Delete Downloaded, Failed, Pending Windows Updates

1] Delete the contents of the Temporary folder
You can delete all the downloaded, failed and pending Windows 10 updates by using the ‘Run’ command.
Open the ‘Run’ dialog box by pressing Win+R in combination and in the dialog box that opens, type %temp% and hit Enter. In the folder that opens before you select all the files and folders within the Temp folder and then delete them.
%temp% is one of many environment variables in Windows that can open the folder designated by Windows as your Temporary folder, typically located at C:\Users\[username]\AppData\Local\Temp.
2] Remove pending.xml file

Navigate to C:\Windows\WinSxS\ folder, search for a pending.xml file and rename it. You may even delete it. This will allow Windows Update to delete pending tasks and build a fresh new update check. See if this helps.
3] Delete contents of SoftwareDistribution folder
You need to delete all the contents of the Software Distribution folder. The Software Distribution folder in the Windows operating system is a folder located in the Windows directory and used to temporarily store files that may be required to install Windows Update on your computer. It is thus required by Windows Update and maintained by WUAgent. It also contains your Windows Update History files, and if you delete them, chances are you will lose your Update history. Also, the next time you run Windows Update, it will result in a longer detection time.
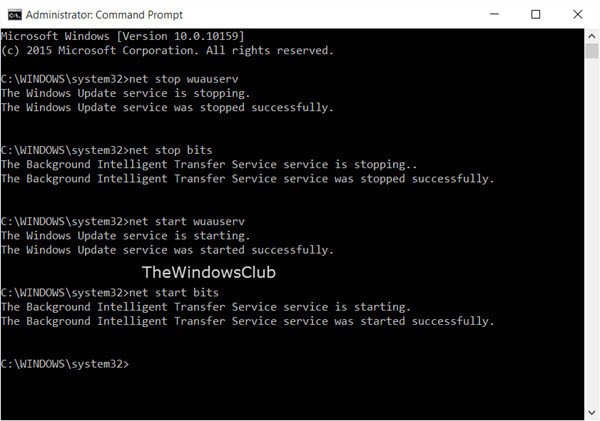
To delete the contents of the Software Distribution folder, in Windows 10, from the WinX Menu, open Command Prompt (Admin). Type the following one after the other and hit Enter:
net stop wuauserv
net stop bits
This will stop the Windows Update Service and the Background Intelligent Transfer Service.
Now browse to the C:\Windows\SoftwareDistribution folder and delete all the files and folders inside.
You may press Ctrl+A to Select All and then click on Delete.
If the files are in use, and you are unable to delete some files, restart your device. After rebooting, run the above commands again. Now you will be able to delete the files from the mentioned Software Distribution folder.
After you have emptied this folder, you may restart your computer, or you may type the following commands, one at a time in the CMD, and hit Enter to restart the Windows Update related Services.
net start wuauserv
net start bits
Now that folder has been flushed; it will now get populated afresh once you restart your PC and run Windows Update.
4] Reset the catroot2 folder
Resetting the catroot2 folder has been known to fix several Windows Update problems.
Catroot and catroot2 are Windows operating system folders that are required for the Windows Update process. When you run Windows Update, the catroot2 folder stores the signatures of the Windows Update package and helps in its installation. The Cryptographic service makes use of the %windir%\System32\catroot2\edb.log file for the updating process. The updates are stored in the SoftwareDistribution folder which are then used by Automatic Updates to carry out the updating process.
NOTE: Please do not delete or rename the Catroot folder. The Catroot2 folder is automatically recreated by Windows, but the Catroot folder is not recreated if the Catroot folder is renamed.
TIP: You can also use the Show or hide updates troubleshooter to block updates that refuse to install or give you trouble. But you have to remember to not block important security updates. If you are facing issues, you may use the Windows Update Troubleshooter.

Leave a Reply