The Windows Recent Documents list offers users quick access to their latest work. The feature is available in various Windows apps like Microsoft Microsoft WordPad Microsoft Word and so on. But, if you do not clear this regularly, the list keeps on piling up. So, here’s a way to clear your Recent Documents list from WordPad.
The goal of the Recent items list is to make it easy for you to access your most recent work. So, instead of burrowing through File Explorer, you can access it all in a single click. However, if you believe it’s always a good idea to start afresh, do the following.
Delete recent documents in WordPad

Please note that the method requires you to modify Registry entries. Serious problems can occur if you modify the registry incorrectly. Therefore, make sure that you follow these steps carefully. For added protection, back up the Registry before you modify it. Then, you can restore the registry if a problem occurs.
Open the ‘Run’ dialog box by pressing Windows Key + R in combination. Type ‘regedit’ in the empty field of the ‘Run’ dialog box and hit ‘Enter’.
Next, when the Registry Editor opens, navigate to the following path address –
HKEY_CURRENT_USER\Software\Microsoft\Windows\CurrentVersion\Applets\Wordpad
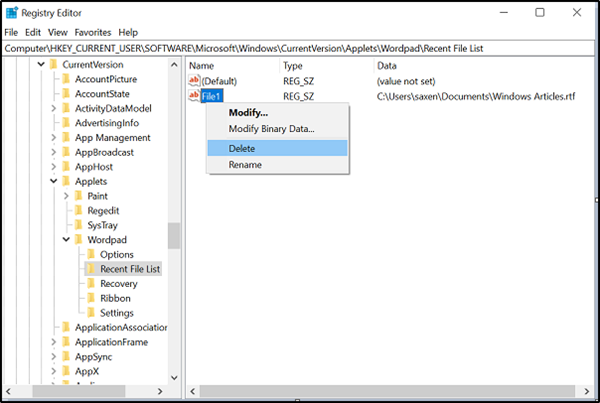
Expand the WordPad folder to locate Recent File List and click to open it.
After that, in the right-hand pane, you will see the list – File1, File2 . . .etc.
Right-click on each entry separately and select the ‘Delete’ option to delete the file.
During the entire process, make sure to leave the ‘Default’ value there.
When done, close the ‘Registry Editor’ and exit.
Restart your computer.
Hereafter, you should not see the list of WordPad file list under ‘Recent Documents’.
This post will show you how to clear Most Recently Used (MRU) lists.