If you want to delete Volume Shadow Copies in Windows 11/10 computers, here is how you can do that. It is possible to remove them using VSSAdmin, Disk Cleanup Tool, etc.
What is Volume Shadow Copy?
Volume Shadow Copy is a feature in Windows that creates snapshots or shadow copies of disk volumes. One known example is System Restore Point. Every time you create one, it will create a copy. So it is an excellent tool if you want to recover deleted files.
If you want to see how many copies you have per drive, then use the Shadow Explorer software. It is free software that offers File Explorer view and displays all the Shadow copies. You can even use it to retrieve old copies of files if you deleted some.
Why Shadow Copies could result in more trouble, is because of leftover shadow copy files. Some backup software will create a persistent shadow copy, and after they have backed up the shadow copy to the designation, they fail to delete the original copy that is stored on the volume.
Delete Volume Shadow Copies in Windows 11/10
To delete Volume Shadow Copies in Windows 11/10, follow these methods:
- VSSAdmin Delete Shadow Copies command
- Limit Shadow Storage
- Limit System Restore Size
- Disk Cleanup Tool
- Check Backup Configuration
Make sure to read all of them and follow the method which works best for you.
1] Vssadmin Delete Shadow Copies command

This command displays current volume shadow copy backups and all installed shadow copy writers and providers. You can add, create, delete, or even delete service providers.
Open Command Prompt with admin privileges by typing CMD in the Run prompt (Win +R) and pressing the Enter key
Execute the following command, where F is the drive letter where you are running out of space:
Vssadmin delete shadows /For=F:
It will delete all the shadow copies from that drive.
If you want to delete only the oldest copy, use the /oldest option.
2] Limit Shadow Storage
Vssadmin also offers a command to resize the shadow storage space. You can specifically set the maximum size for each partition on your computer. Using the vssadmin command, which we used above but with different options, you can set size by percentage or set it to exact storage space.
vssadmin resize shadowstorage /for=<ForVolumeSpec> /on=<OnVolumeSpec> [/maxsize=<MaxSizeSpec>]

vssadmin Resize ShadowStorage /For=C: /On=D: /MaxSize=900MB
vssadmin Resize ShadowStorage /For=C: /On=D: /MaxSize=UNBOUNDED
vssadmin Resize ShadowStorage /For=C: /On=C: /MaxSize=20%
3] Limit System Restore Size

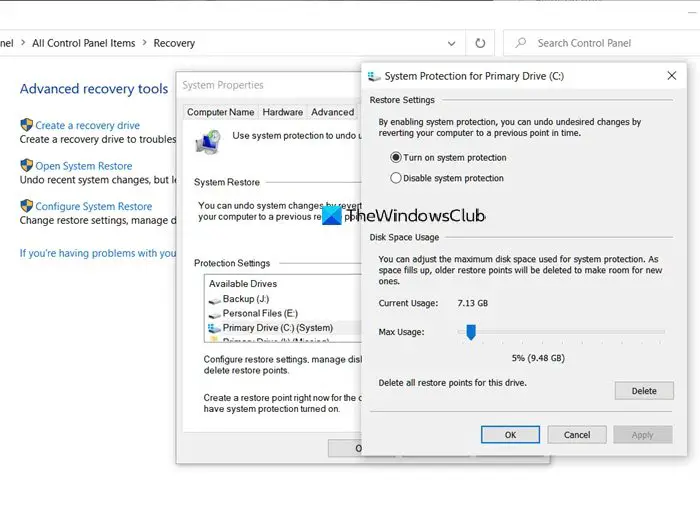
If the System Restore is turned on for a drive, then there is a certain percentage of the drive that is dedicated to System Restore. When the size goes beyond that, the old one gets deleted. If you are in a crunch of space, then you can choose to reduce it to the minimum possible level. Once you do that, all old copies will be automatically deleted.
- Type System Restore in the Start menu search bar.
- Click on the Recovery (Control Panel) option that shows up.
- Then click on Configure System Restore.
- Select the drive for which you want to reduce the space occupied by shadow copy files
- Click on the Configure button and then use the slider to set the percentage.
- Click OK and apply the changes.
Do note that even if the System Restore is 5%, it could be substantial if your disk is of a large capacity.
4] Disk Cleanup Tool

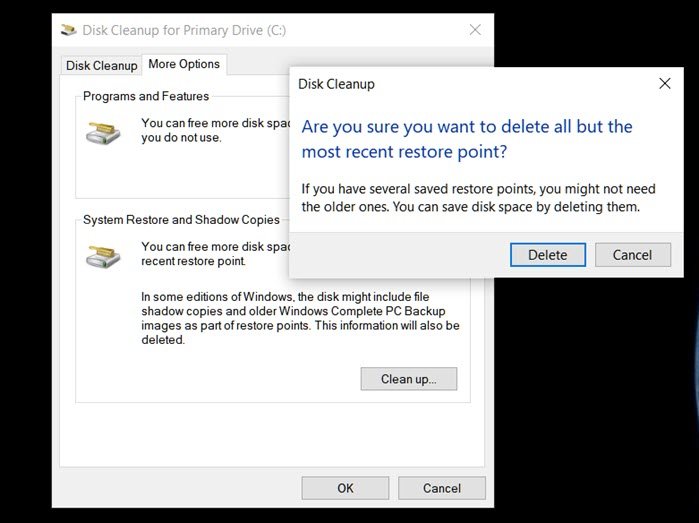
- Type Disk Cleanup in the Windows Start Menu and click on the tool when it shows up
- Select the partition for which you want to delete the Shadow Copies
- In the next window, switch to more options, and it will have the option for “System Restore and Shadow Copies.”
- Click on the “Clean up” button, and it will delete all the copies when you confirm.
Read: Free up disk space by deleting previous System Images and Backups.
5] Check Backup Configuration
When using third-party software, these Shadow copies are also backed up. So if you recently restored from a backup, and you are running out of space for no reason, then it’s best to rerun the commands to delete those shadow copies. That said, you may also want to check if the backup-restore software offers an option to skip Shadow copies. It will also help to reduce the overall backup size.
Volume Shadow Copies are essential. They offer a way to restore files, which comes in handy, especially when you don’t have backup software in place. However, when you are running out of space, then this post helps to delete the Shadow copies. Make sure to follow these with admin permission.
Read: Shadow Copies are lost during backup in Windows
How do I turn off Volume Shadow Copy in Windows 11?

To turn off Volume Shadow Copy in Windows 11, press Win+R to open the Run prompt, type services.msc, and click the OK button. Double-click on the Volume Shadow Copy service. Choose the Disabled option from the Startup type drop-down menu and click the OK button.
How to remove Volume Shadow Copy files?
You can remove Volume Shadow Copy files using Command Prompt or Terminal by entering this command: Vssadmin delete shadows /For=drive-letter:. Alternatively, you can use the Disk Cleanup Tool to delete existing Volume Shadow Copy files from system or C drive. Apart from that, you can limit the System Restore size to get them erased as well.
Read: How to use Vssadmin command-line to manage VSS in Windows.