If you are trying to apply desktop wallpaper or background using the Local Group Policy Editor on Windows 11/10, but it is not working, here are some fixes to troubleshoot the issue. These solutions will let you get rid of the black screen wallpaper problem in Windows 11/10 as well.
There are numerous methods to set a desktop background on Windows. It is possible to set desktop wallpaper using Group Policy and Registry Editor. However, if you have done everything correctly, but it is not working, follow these suggestions. Before getting started with these solutions, make sure you sign out of your account and re-sign in. It is essential to do so after changing the wallpaper using the Local Group Policy Editor or Registry Editor. If you don’t do it, your wallpaper won’t get updated.
Desktop Background Group Policy not applying
To fix Desktop Background Group Policy not applying error in Windows 11/10, follow these steps-
- Verify Registry Editor settings
- Check wallpaper path and name
- Rename TranscodedWallpaper
- Delete content of slideshow.ini
- Check Prevent changing desktop background setting
Let’s check out these steps in detail.
1] Verify Registry Editor settings
As it is possible to change the desktop background using Registry Editor, it is essential to verify the Registry Editor settings. If you have set something in the Registry files and are entering something else in the Local Group Policy Editor, it might not work because of some internal conflicts.
To get started, open Registry Editor on your computer and navigate to this path-
HKEY_CURRENT_USER\SOFTWARE\Microsoft\Windows\CurrentVersion\Policies
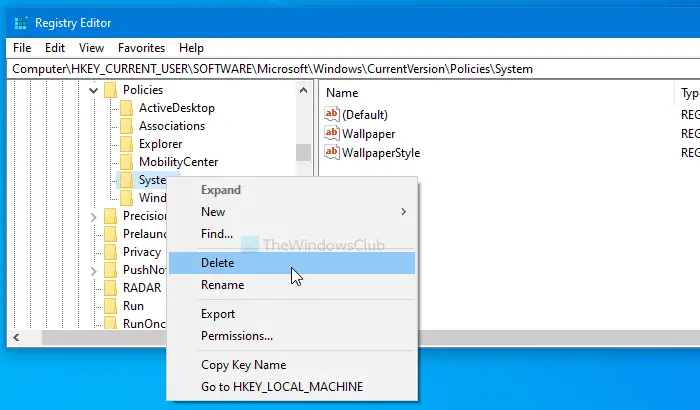
If you find a sub-key named System, open it and check whether there are two String Values named Wallpaper and WallpaperStyle. If so, right-click on System and select the Delete option.

Following that, confirm the removal. Then, follow the same steps to set wallpaper using Group Policy.
2] Check wallpaper path and name
When you use the Desktop Wallpaper setting in the Local Group Policy Editor, it is mandatory to enter a path defining the wallpaper. Later on, it cannot be changed anyhow. If you move the wallpaper file from one place to another, it is imperative to change the corresponding Group Policy setting path. Similarly, if you change the name of the wallpaper file, you have to do the same. Otherwise, you will see a black or blank desktop background next time you re-sign into your user account.
To verify that, open the path where you have kept your file. Then, open the Local Group Policy Editor and navigate to this path-
User Configuration > Administrative Templates > Desktop > Desktop
Double-click on Desktop Wallpaper setting and enter the new path before clicking the OK button.
3] Rename TranscodedWallpaper
In simple terms, you have reset the wallpaper cache on your Windows 10 computer. For that, two files are responsible, and one of them is TranscodedWallpaper. Therefore, press Win+R to open the Run prompt and enter the following path-
%USERPROFILE%\AppData\Roaming\Microsoft\Windows\Themes
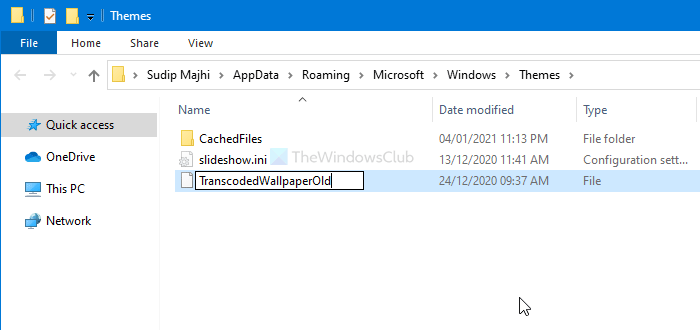
Here you can see a file named TranscodedWallpaper. Right-click on it and select the Rename option.

Then, enter a name like TranscodedWallpaperOld or anything else.
4] Delete content of slideshow.ini
The second file responsible for the wallpaper cache is slideshow.ini. You will see this file in the same location as TranscodedWallpaper’s. Therefore, open the File Explorer and navigate to this path-
C:\Users\username\AppData\Roaming\Microsoft\Windows\Themes
Before doing this, don’t forget to show hidden files and folders. After opening the Themes folder, you will see the file called slideshow.ini. Right-click on it and select the Edit button. If you see anything in the file, select them all and delete them before pressing Ctrl+S to save.
Similar: Group Policy keeps reverting on Windows
5] Check the Prevent changing desktop background setting
Suppose you cannot change wallpaper in Windows 10 in any way. In that case, it is essential to verify the Prevent changing desktop background setting in the Group Policy and the similar value in the Registry Editor.
To get started, open the Local Group Policy Editor and navigate to this path-
User Configuration > Administrative Templates > Control Panel > Personalization
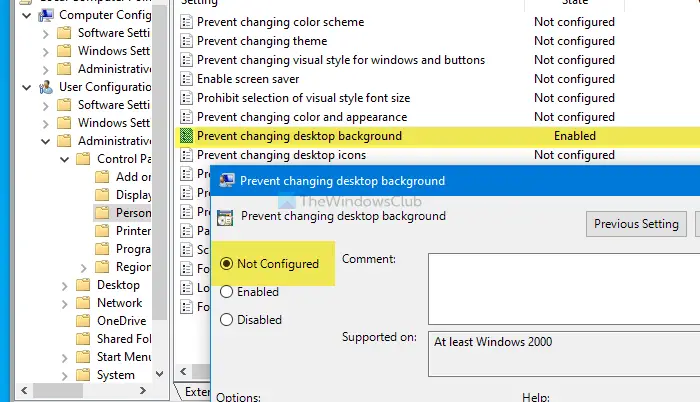
Double-click on the Prevent changing desktop background setting on your right-hand side. If it is set to Enabled, choose the Not Configured option and click the OK button.

Similarly, you have to verify if there is a corresponding Registry value or not. If yes, it can cause the same issue. For that, press Win+R, type regedit, and hit the Enter button. Then, press the Yes button in the UAC prompt to open the Registry Editor on your computer. After that, navigate to this path-
HKEY_LOCAL_MACHINE\SOFTWARE\Microsoft\Windows\CurrentVersion\Policies\
In the Policies key, you will see a sub-key named ActiveDesktop. If you can see it, you will also find two DWORD (32-bit) Values called NoAddingComponents and NoComponents.
Double-click on each of them set the Value data as 0, and click the OK button.
Alternatively, you can right-click on ActiveDesktop, select the Delete button, and confirm the change.
I hope these suggestions work for you.
Why is Windows 11 desktop background black on domain users?
A black desktop background on domain users in Windows 11 can occur if the Group Policy file path for the wallpaper is incorrect or inaccessible. Ensure the file path is accurate and accessible to all users to prevent this issue and display the correct wallpaper.
How do I force desktop background in Group Policy?
To force a desktop background using Group Policy, navigate to User Configuration > Administrative Templates > Desktop > Desktop, and enable the “Desktop Wallpaper” setting. Specify the path to the desired wallpaper image and ensure “Style” is set. This policy setting will apply the specified wallpaper upon user login.
Leave a Reply