If you are using Windows 11/10, you may be aware that Microsoft collects diagnostic data. Microsoft has launched a new tool called Diagnostic Data Viewer, which helps users know which diagnostic data has been sent to Microsoft server from their computers.
Your computer sends diagnostic data like information about installed software or apps, the apps’ workflow, hardware configuration, and compatibility, installed drivers, etc., to Microsoft to improve the user experience. Now using the Diagnostic Data Viewer, you will be able to find out what data Microsoft has collected from your computer.
How do I enable Diagnostic Data in Windows?
If you want to enable Diagnostic Data Viewer on Windows 11 or Windows 10 computer, then this can be done using the Settings app available in both operating systems. The steps for enabling Diagnostic Data Viewer on Windows 11 and Windows 10 are also covered separately by us in this post above.
Diagnostic Data Viewer in Windows 11/10
To get started, you need to enable Diagnostic Data Viewer in the Windows Settings panel.
Windows 11

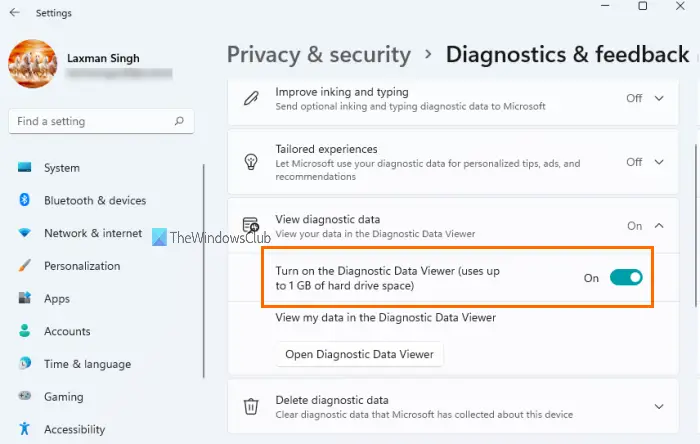
To enable or turn on Diagnostic Data Viewer in Windows 11, you need to follow these steps:
- Use Win+I This will launch the Settings app
- Click on the Privacy & security category
- On the right-hand section, click on Diagnostics & feedback menu
- Expand View diagnostic data section
- Use the button available for the Turn on the Diagnostic Data Viewer option.
That will enable this feature. Now you can install the Diagnostic Data Viewer app from Microsoft Store and start using it.
Windows 10

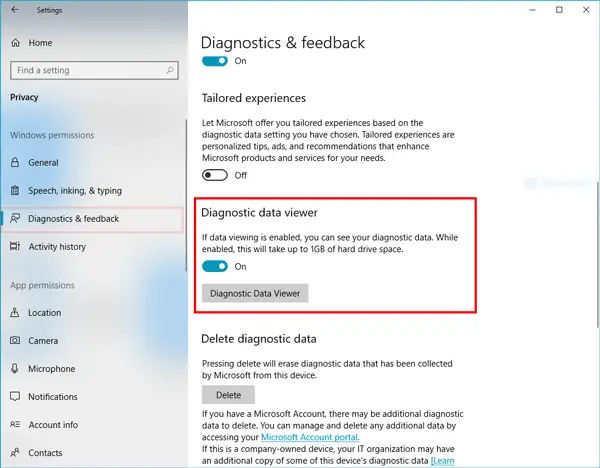
In Windows 10, open Windows Settings and go to Privacy > Diagnostics & feedback.
Now scroll down on your right-hand side until you get an option called Diagnostic data viewer. Click the toggle button to enable this feature.
Related:
- Allow or Prevent Users from deleting Diagnostic Data in Windows
- How to disable Diagnostic Data Viewer in Windows 11
How do I delete Windows Diagnostic Data?
To delete the Diagnostic Data in Windows 11/10:
- Use Win+I This will launch the Settings app
- Click on the Privacy & security category
- On the right-hand section, click on Diagnostics & feedback menu
- Press the Delete diagnostic data button.
Install Diagnostic Data Viewer from Microsoft Store
Following that, click the Diagnostic Data Viewer button to open the tool in the Microsoft Store. You need to install this app on your Windows computer.
After installing the app, you can see that it has the following categories-
- Browsing history
- Device Connectivity and Configuration
- Inking Typing and Speech Utterance
- Product and Service Performance
- Product and Service Usage
- Software Setup and Inventory
You can check this data using this free app.
What is Diagnostic Data Viewer?
Based on the privacy settings set by you in the diagnostics settings on your Windows computer, Microsoft collects data from Windows and Office apps in real-time to improve Windows experience, keep your operating system up to date, secure it, etc. You have the option to send required data as well as optional data to Microsoft. But you can’t see what type of data you’re sending from your system to Microsoft directly. For that, Diagnostic Data Viewer is needed.
Diagnostic Data Viewer is an app by Microsoft that helps you see what type of information is being collected from your Windows 11/10 computer. You can use this app to view diagnostic data as well as export all your diagnostic data as a CSV file.
Export data from Diagnostic Data Viewer app

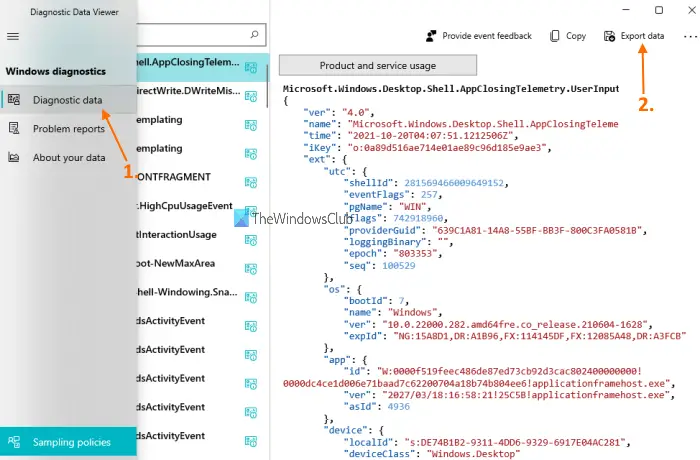
If you want to analyze the data further on a different computer, you can export the data in .csv format. The steps are:
- Launch Diagnostic Data Viewer app using the Search box or Start menu
- Click on the Diagnostic data option available on the left section
- Click on the Export data option available on the top right part of its interface.
- After that, you can select the output location, and save all the diagnostic data in a CSV file.
Hope this helps.
Leave a Reply