Windows lets you create and manage a Search Index to show search results quickly, irrespective of the keyword. However, if you want to prevent others from tweaking some of the Indexing Options, you can disable Advanced indexing options in Windows 10. No third-party app is required as you can block this option using Registry Editor and Local Group Policy Editor.
The Advanced Options in Indexing Options panel lets you manage several things, including these:
- Index encrypted files
- Treat similar words with diacritics as different words
- Delete and rebuild the index when you face a problem related to Windows Search
- Change index location
- Choose a particular file type to be included or excluded
If multiple people use your computer and you do not want others to tweak any of these aforementioned settings, you can prevent them by disabling this option.
Before following the REGEDIT method, it is recommended to create a System Restore point so that you can be on the safe side.
Disable Advanced Search Indexing Options using Registry
To disable Advanced indexing options using Registry in Windows 11/10, follow these steps:
- Press Win+R to open the Run dialog.
- Type regedit, press Enter button, and select the Yes option.
- Go to Windows in HKEY_LOCAL_MACHINE.
- Right-click on Windows > New > Key.
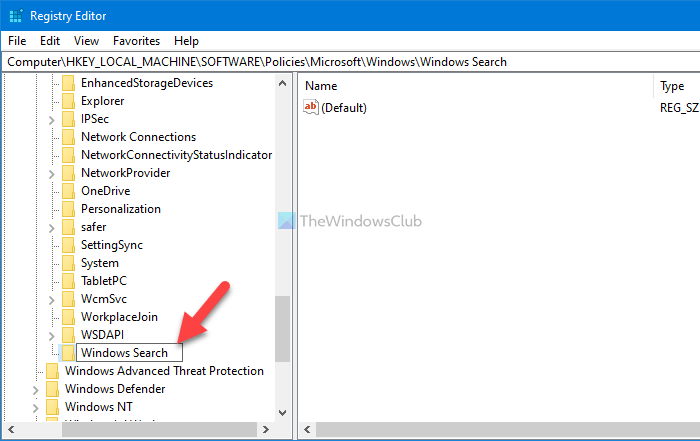
- Name it Windows Search.
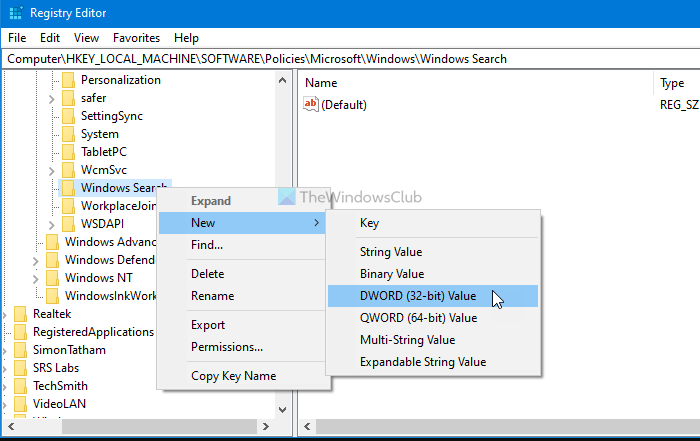
- Right-click on Windows Search > New > DWORD (32-bit) Value.
- Name it as PreventUsingAdvancedIndexingOptions.
- Double-click on it to set the Value data as 1.
- Click the OK button.
To learn more about these steps, keep reading.
At first, press Win+R to open the Run prompt > type regedit > press the Enter button and click on the Yes option to open Registry Editor on your PC.
Once it is visible on your screen, navigate to the following path:
HKEY_LOCAL_MACHINE\SOFTWARE\Policies\Microsoft\Windows
Right-click on the Windows key and select New > Key.

Then, name it Windows Search. Following that, right-click on the Windows Search key, and select New > DWORD (32-bit) Value.

Name the REG_DOWRD value as PreventUsingAdvancedIndexingOptions, and double-click on it to set the Value data as 1.

Click the OK button to save the change. Now restart your computer to check the difference.
In case you want to enable the Advanced Options again, you need to open the same path in the Registry Editor > right-click on the PreventUsingAdvancedIndexingOptions REG_DWORD value > select the Delete option.
Confirm the change by clicking the Yes option and restart your computer.
Read: How to disable Cloud Content Search in Taskbar search box.
Turn off Advanced Search Indexing Options using Group Policy
To disable Advanced indexing options using Group Policy, follow these steps:
- Press Win+R to open the Run prompt.
- Type gpedit.msc and hit the Enter button.
- Go to Search in Computer Configuration.
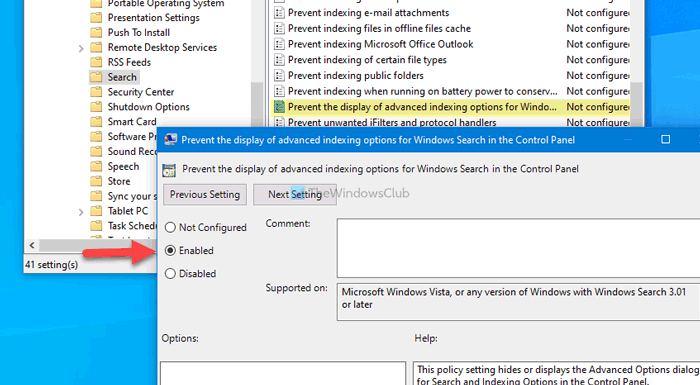
- Double-click on the Prevent the display of advanced indexing options for Windows Search in the Control Panel setting.
- Select the Enabled option.
- Click the OK button.
Let’s check out the detailed version of these steps.
At first, you need to open the Local Group Policy Editor on your PC. For that, press Win+R, type gpedit.msc, and hit the Enter button to open the Group Policy on your computer. Once it is opened, navigate to the following path:
Computer Configuration > Administrative Templates > Windows Components > Search
Here you can find a setting called Prevent the display of advanced indexing options for Windows Search in the Control Panel. You need to double-click on this setting and select the Enabled option.

Click the OK button to save the change.
If you want to re-enable the Advanced Options in the Indexing Options dialog, you need to navigate the same path in the Local Group Policy Editor, open the same setting, and select the Not Configured option.
At last, you can click the OK button to save the change.
That’s all! If you have any doubt, feel free to comment down below.
Read next: How to prevent users from modifying Search Index Locations in Windows.