After the introduction of Windows 11 24H2, both Windows Pro and Home versions will have encryption enabled automatically. However, if you do not want to use a BitLocker PIN to start their system, we have your back. In this post, we will discuss how to disable automatic BitLocker Device Encryption during installation on Windows 11.
What is BitLocker automatic device encryption?
BitLocker automatic device encryption employs BitLocker drive encryption technology to automatically encrypt internal drives after the user completes the Out Of Box Experience (OOBE) on devices that meet hardware requirements. It requires TPM (Trusted Platform Module), either TPM 1.2 or TPM 2.0, and wants you to have UEFI Secure Boot enabled.
Rufus allows you to create a bootable drive that can be used to install any version of Windows. In their latest version, they have provided an option to disable the automatic application of BitLocker device encryption. In this guide, we will leverage the prowess of Rufus and install a version of Windows 11 that will allow you to decide whether you want to use BitLocker.
Disable automatic BitLocker Device Encryption during installation on Windows 11
To disable automatic BitLocker Device Encryption during installation on Windows 11, follow the steps mentioned below.
- Download the latest version of Rufus
- Use Rufus to download Windows 11 ISO and disable BitLocker automatic drive encryption
- Disable Device Encryption when installing Windows 11
- Disable Device Encryption after the installation
Let us discuss them in detail.
1] Download the latest version of Rufus

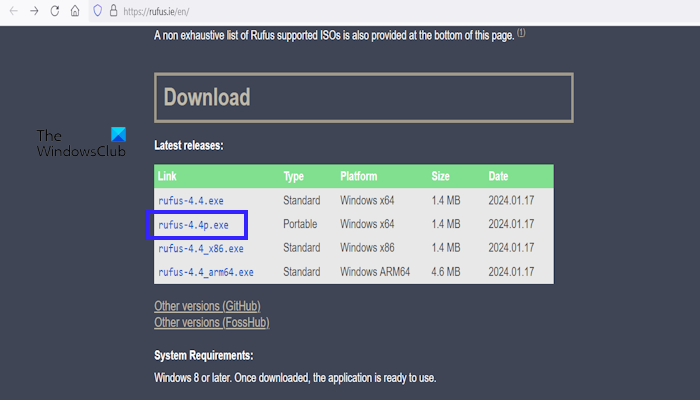
We will create a bootable drive for Windows 11 ISO files but remove the drive encryption part, you will get to know once we get there. Go ahead and download the latest version of Rufus. Make sure not to download an older version, as that might not be able to stop automatic BitLocker device encryption. Once you have the tool, go to the next step.
2] Use Rufus to download Windows 11 ISO and disable BitLocker automatic drive encryption

Now that we have Rufus, let us use it to download Windows 11 ISO file. We are also going to disable the drive encryption so that when we do decide to install the operating system, we don’t have to worry about BitLocker. Follow the steps given below to do the same.
- Open Rufus.
- In Device, select the removable device that you want to make bootable.
- Select Download from the Boot Selection drop-down (by default it says “Select”).
- Click on Download.
- Select Windows 11 and then follow the on-screen instructions to select the correct version.
- Since ISO is a big file, download it on a drive with abundant space.
- Finally, start downloading the ISO image.
- After downloading the ISO file, click on Start.
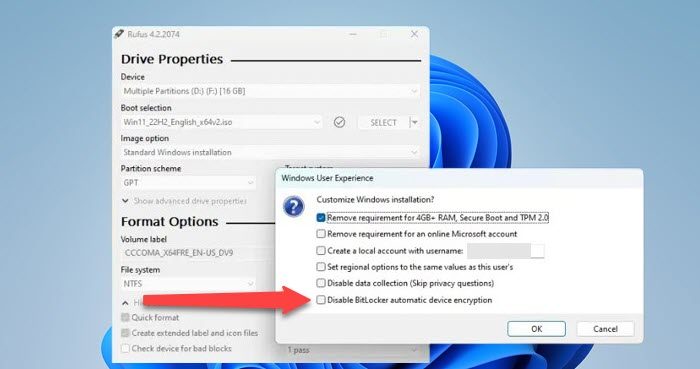
- When the Windows User Experience menu appears, select the Disable BitLocker automatic drive encryption option.
- Click Ok.
Finally, let the ISO file make your drive bootable.
3] Disable Device Encryption when installing Windows 11

After creating a bootable drive, let us install the operating system. Follow the steps mentioned below to do the same.
- Boot into BIOS.
- Then change the boot order to boot using your USB drive.
- Once the setup pops up, select the correct language and make sure that all the other options are selected correctly to install the operating system.
- After installation, press “Shift + F10” to access the first page of the out-of-the-box experience (OOBE).
- Type “regedit” to open the Registry Editor.
- Navigate to the following location.
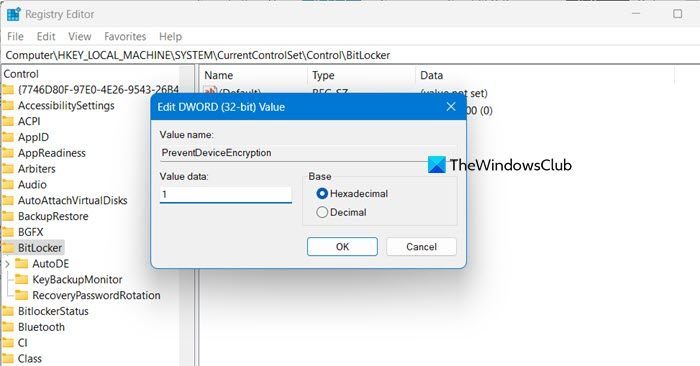
HKEY_LOCAL_MACHINE\SYSTEM\CurrentControlSet\Control\BitLocker
- Now, go to the BitLocker key, right-click, and select New > DWORD (32-bit) Value.
- Name it PreventDeviceEncryption.
- Right-click on PreventDeviceEncryption and select Modify.
- Replace 0 with 1 in the Value data field and click Ok
Finally, follow the on-screen instructions to install Windows 11.
Read: How to find BitLocker Recovery Key with Key ID in Windows 11
4] Disable Device Encryption after the installation

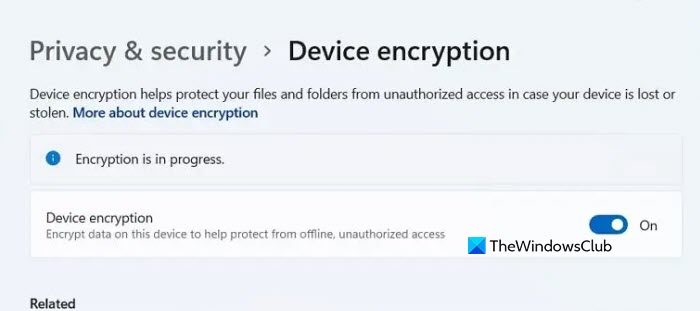
Our last step involves turning off Device Encryption from the Windows Settings. For that, you need to wait for Windows 11 to install completely. Once done, follow the steps mentioned below.
- Open Settings by Win + I.
- Now, go to the Privacy & security tab.
- Click on Device encryption.
- And finally, switch off the toggle for Device encryption.
This will do the job for you.
That’s it!
Read: BitLocker missing or not showing in Windows 11
How do I disable BitLocker during Windows installation?
You can disable BitLocker at the time of creating the ISO file that will be used later to install Windows. We will be using Rufus 4.5 or above to create a bootable drive and in the Windows User Experience window, we need to turn off the Disable BitLocker automatic drive encryption option. You can check out the detailed guide earlier in this post.
Also Read: Create a BitLocker Drive Encryption shortcut in Windows 11.
Leave a Reply