Windows 11/10 automatically downloads and installs updates for Windows Store apps. Windows 8.1 too updated apps automatically – Windows 8 did not. This is quite convenient actually, but if you do not want it this way, then you may turn off or disable Automatic Updates for Microsoft Store Apps, by following the steps laid down in this post.
Why disable automatic app updates via the Microsoft Store?
There are many reasons for a person to want to disable automatic app updates. Maybe they fear having to deal with bugs that might plague apps after an initial update. You see, waiting to see if the latest update is bug-ridden before downloading it is common practice among many Windows users.
Disable Microsoft Store apps Automatic Updates in Windows 11
You will find that getting the job done can take less than a minute if you know what you’re doing. The information below will explain everything you need to know to ensure you have the proper knowledge.
- Open the Microsoft Store
- Click the profile icon
- Select App Settings
- Disable automatic app updates.
1] Open the Microsoft Store
To begin the process, you must first open the Microsoft Store on your Windows 11 computer. Get this done by clicking on the Store icon situated on the Taskbar, or click the Windows button to fire up the Start Menu, then select the Microsoft Store from there.
Alternatively, you could click the All Apps button via the Start Menu. From the list, scroll down until you’ve come across the Microsoft Store icon. Select the icon right away to open it.
2] Click the profile icon

From the top-right section of the Microsoft Store, you will want to click on the profile icon to reveal a dropdown menu with a few options to choose from.
3] Select App Settings
The next step, then, is to choose App Settings from the dropdown menu. A new section will appear that gives the user the ability to change how the Microsoft Store operates.
4] Disable automatic app updates

Under the section that reads App Settings, you should see App Updates: Update apps automatically. If the toggle button is on, click it to turn off the function, and right away, your apps will no longer update without your consent.
Disable Microsoft Store apps Automatic Update in Windows 10
![]()
Log in to your Windows 10 PC with your Microsoft Account. This is a must as some services like this one depend on the Microsoft Account.
Next, open the Windows Store app from the Start Menu and click on ‘3-dots’ to open the Options menu.
Next, click on Settings, as shown in the image.
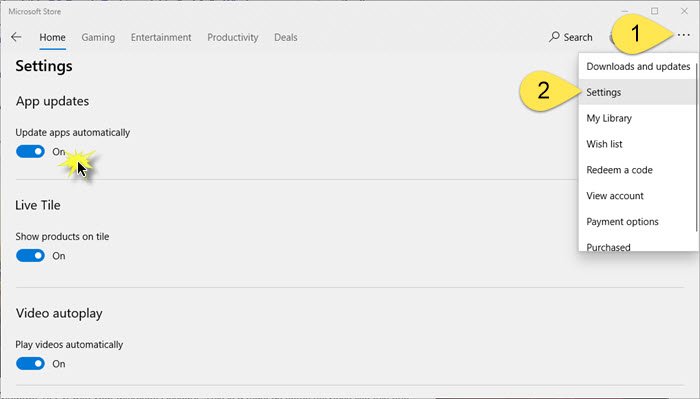
In the Settings, under App updates, you will see Update apps automatically.
It will be enabled by default and slider will be on the On position. Turn the slider to the Off position.
That is all you need to do.
You can also Turn Off Automatic Updates for Microsoft Store apps via Registry, GPO or Command line. If you do this, remember to check for Windows Store App updates manually.
There is no way to easily disable automatic Windows Updates in Windows 11/10. The new OS will automatically download and install new updates. You can at most defer them. But there is a workaround you may try if you need to turn off Windows Update – although we do not recommend that you do it.

for windows 10 home users that option is greyed out.
is there any way to get around it? perhaps disabling a service?
Windows 10 Home edition does not have this feature, and they may see the option greyed out, currently. If you disable the Windows Update service, it will disable both Windows Updates as well as App Updates, and that is why it is not recommended by us.
you are correct sir, thanks!
would be nice to decide what and when i want to update, because: i like to check the reviews and see that the devs have not mistakenly introduced a terrible crashy bug; and also because my old laptop slows down to a crawl when trusted installer starts running in the background :-/
What about registry options to disable the automatic updates?
They’ve added the option back in for Home users now if you’re on the latest build :)
Omg you mst be so good!
Alternative is Linux Ubuntu or switching to Apple.