The Compact view is a new feature in File Explorer that you can use to decrease or increase space between items. Windows 11 and Windows 10 has received this unique feature that uses a new layout with extra padding in the File Explorer.
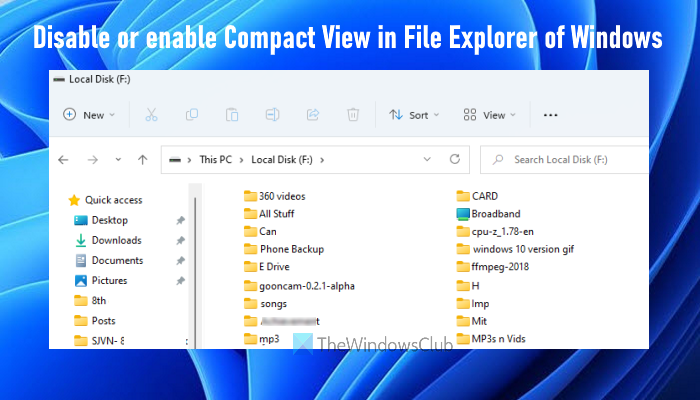
File Explorer is a graphical user interface that provides a centralized location for the user’s files. It secures data and allows the user to read, write and make changes in the document. Since the file explorer saves and keeps the record of various documents, its display plays an important role while the user searches for a document. The newly added feature in file explorer is a compact display that decreases the in-between spaces of files and provides a wider view to the user. This post is a complete guide on how to enable or disable Compact view in Windows File Explorer.
How to disable Compact View in File Explorer in Windows 11
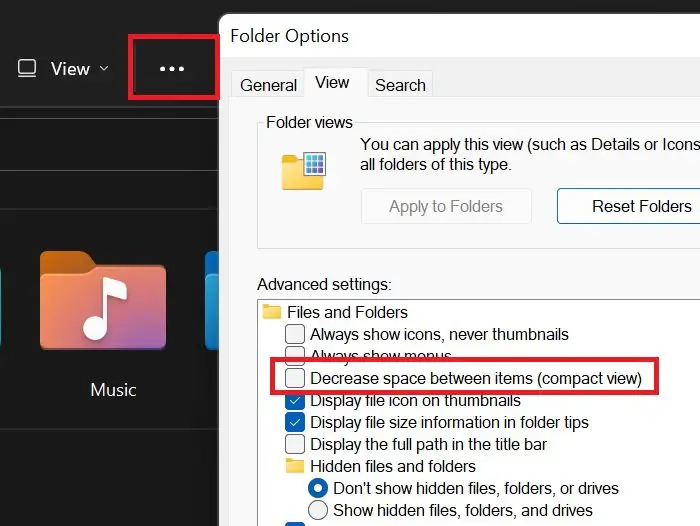
Those who migrated to Windows 11 from Windows 10 must have observed that icons and menus are visibly larger in Windows 11. This, Compact View is very helpful for many users who are used to the previous interface. However, if you wish to disable Compact View in Windows 11, then the procedure is as follows:
- Open the File Explorer window.
- Click on the 3 dots at the top menu. It should be somewhere around the center for most users.
- From the drop-down menu, select Options. This will open the Folder Options menu.
- In the Folder Options menu, go to the View tab.
- In the View tab, uncheck the box associated with Decrease space between items.
- Doing so will disable Compact View in File Explorer in Windows 11.
Alternatively, you could use the following method:
- Open the File Explorer.
- Click on the View tab.
- From the View menu, if Compact View is checked, click on it again to uncheck it.
How to disable Compact view in Explorer in Windows 10
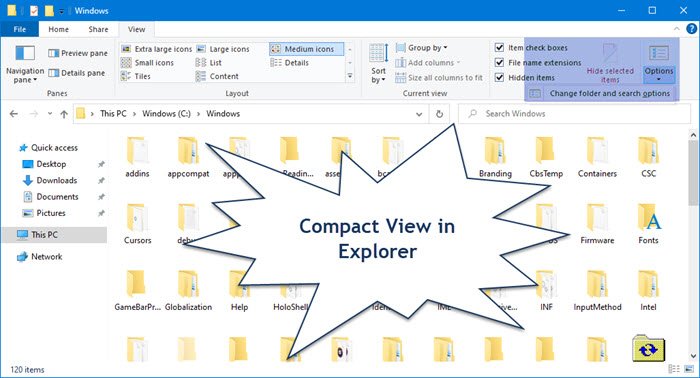
The new feature comes with extra padding in the file list and the navigation bar that is based on the uniform look of all apps in Windows 10. If you want to enable or disable Compact view on Windows 10, follow the below suggestions:
- Press Windows+E to open File Explorer.
- Then go to the View tab in the ribbon.
- Double-click on Options to open the File Explorer Options window.
- Go to the View tab and check the box next to the Decrease space between items (compact view) option.
- Click Apply > OK.
To get it started, press the Windows+E keyboard shortcut to launch the File Explorer window directly. Once it opens, go to the ribbon area and select the View tab.
Under the View tab, go to the right end of the ribbon and double-click on Options to open the File Explorer Options earlier called Folder Options.
Inside the Folder Options window, switch to the View tab.
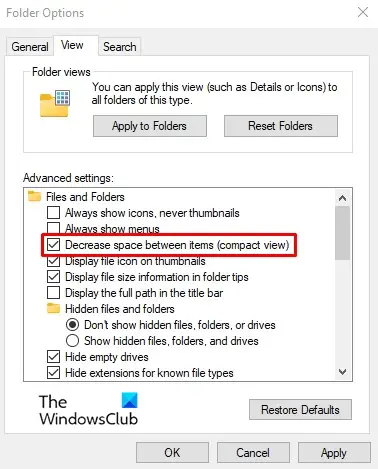
Under the Advanced settings section, check the Decrease space between items (compact view) option to enable the feature.
If you want to disable the feature, simply uncheck the same box and click the Apply button and then select OK to save the changes.
Disable or enable Compact View in Explorer using Registry in Windows 11/10
It is recommended to backup the Registry, just in case. Once the Registry is backed up, follow these steps:
- Open Registry Editor
- Access the Advanced key
- Create UseCompactMode DWORD value
- Add 1 to Value data of UseCompactMode
- Press the OK button.
Let’s check these steps in detail.
At first, open Registry Editor window. You can type regedit in the Search box and hit the Enter key to open the Registry Editor.
When Registry is opened, access the Advanced key. You can access this key using the following path:
HKEY_CURRENT_USER\Software\Microsoft\Windows\CurrentVersion\Explorer\Advanced
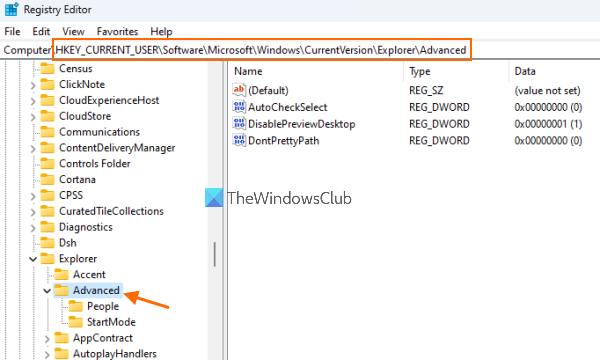
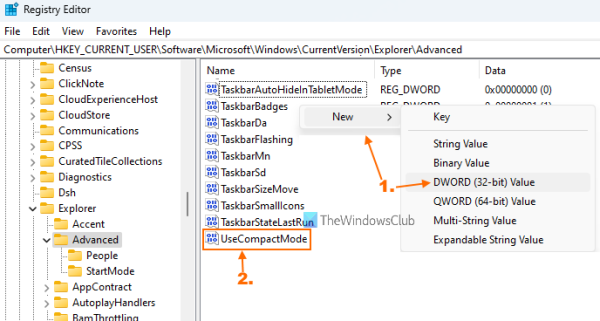
On the right-hand section of the Advanced Registry key, create a UseCompactMode DWORD value. To create it, right-click on the empty area, access the New section, and click on the DWORD (32-bit) Value. When the new DWORD value is created, rename it as UseCompactMode.
Double-click on the UseCompactMode value created by you and a small box will pop up. There, add 1 in the Value data field.
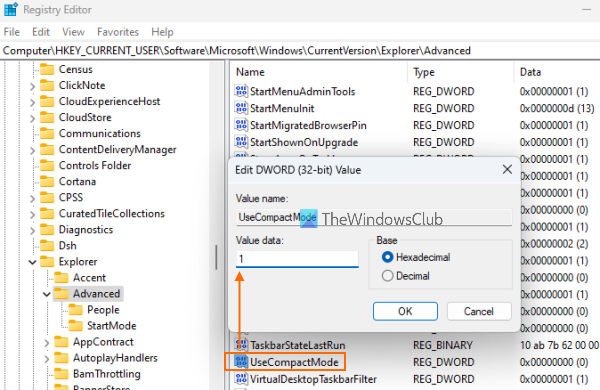
Finally, hit the OK button, and close the Registry Editor.
The changes are applied immediately. You don’t need to close or restart File Explorer to view the changes.
In case you want to turn off or disable the compact view in Windows 11/10 File Explorer, just follow the steps mentioned above, and delete the UseCompactMode DWORD value.
That’s it.
What are the benefits of the Compact View mode?
The Compact View mode decreases space between icons. Usually, the Quick Access menu on the list on the left-hand side is longer than the space could absorb. Thus, you would find a scroll bar to check through the folders. In case you add more items to the menu, it would be even more difficult to view more options at the same time. Thus, Compact View is a boon for such users. Furthermore, if you have a lot of icons in a folder, then the Compact View mode would make it easier to view all of them at once. If not possible, at least you could access more in one go.
What are the disadvantages of the Compact View mode?
People with weaker vision prefer larger icons with more spacing between them. For such users, Compact View mode wouldn’t be the best option.
How do I change the view options in File Explorer?
If you want to change how files and folders and other items are visible or displayed in File Explorer on Windows 11/10 computer, then it can be done using the View menu present in the Ribbon menu of File Explorer. This is a built-in feature of a Windows 11/10 computer. You can switch to List, Details, Tiles, Extra large icons, Small icons, Large icons view mode, etc., for items present in the File Explorer. Just open the View menu and all the options will be visible to you.
That’s it. Hope it helps.
Related: How to remove Shadow Effect for Explorer windows.
Leave a Reply