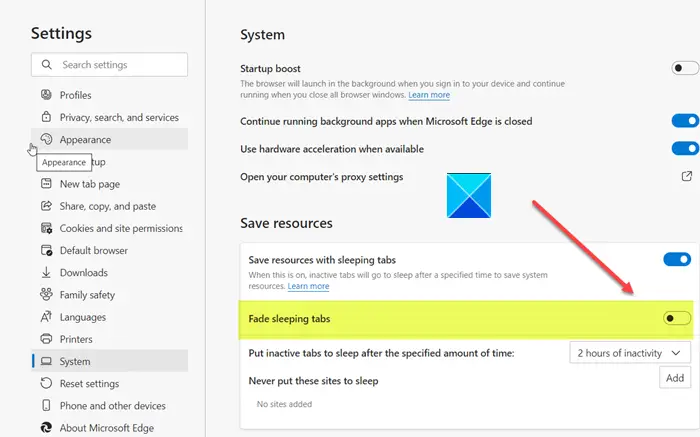
Sleeping Tabs in Microsoft Edge prevents your PC from becoming slow and sluggish. It puts the background tabs into the idle state and becomes active when clicked. However, when you turn on the Sleeping Tabs feature, the Fade Sleeping Tabs option is enabled by default. This fades tabs in the background. If you do not like this feature, here’s a simple way to disable it and make all your opened tabs look active.
How to disable Fade Sleeping Tabs in Microsoft Edge
Microsoft research reveals normal background tab uses 29% more CPU for Microsoft Edge than a sleeping tab. This reason alone explains how Edge’s Sleeping Tabs and Fade sleeping tabs help in saving battery. Although an individual’s opinion on this topic may vary.
- Launch the Edge browser.
- Choose Settings and more.
- Go to System.
- Scroll down to the Save Resources section.
- Disable Fade Sleeping tabs.
When you disable the Fade Sleeping Tabs feature, all the opened tabs in the browser will un-fade and your content will be made accessible immediately. You can also add sites you never want to sleep to a block list in Settings.
Launch the Microsoft Edge browser.
Go to the Settings and more menu, visible as three horizontal dots in the upper right corner of the browser.
Click the menu to select the Settings option.
When directed to the Settings screen, scroll down to System entry (Seen as a PC icon) in the left navigation pane.
Switch to the right pane and locate the Save Sources section.

Under it, you will find the Fade Sleeping tab option. This option is enabled by default. To disable it and turn all your background tabs active, simply slide the toggle from on to Off position.
![]()
The Fade Sleeping Tabs option will be disabled instantly.
That’s all there is to it!
TIP: Learn how to use Kids Mode in Microsoft Edge browser.
How do I stop Microsoft Edge from opening after sleep?
To stop Microsoft Edge from opening after sleep, disable the “Startup Boost” feature. Open Edge, go to Settings > System and Performance, and toggle off “Startup Boost.” Additionally, check Task Manager’s Startup tab to ensure Edge isn’t enabled there. This should prevent Edge from launching automatically after waking your device.
How do I stop Edge from discarding tabs?
To stop Microsoft Edge from discarding tabs, type “edge://flags/” in the address bar and press Enter. Search for “Automatic Tab Discarding” in the search box, then select “Disabled” from the drop-down menu. This setting will prevent Edge from automatically discarding tabs to save memory. Restart the browser to apply changes.
Leave a Reply