If you want to disable Internet Connection Sharing (ICS) in Windows 11/10, follow this step-by-step guide. As Windows 10 comes with an in-built option, no additional software is required to install to disable this functionality.
ICS or Internet Connection Sharing is a feature that lets you share one computer’s internet connection with multiple computers connected in a Local Area Network or LAN. In other words, it is possible to provide an internet connection to more than one computer from a single IP address via NAT technology.
Disable Internet Connection Sharing (ICS) in Windows 11/10
To disable Internet Connection Sharing (ICS) in Windows 11/10, follow these steps-
- Press Win+R to open the Run prompt.
- Type ncpa.cpl and hit the Enter button.
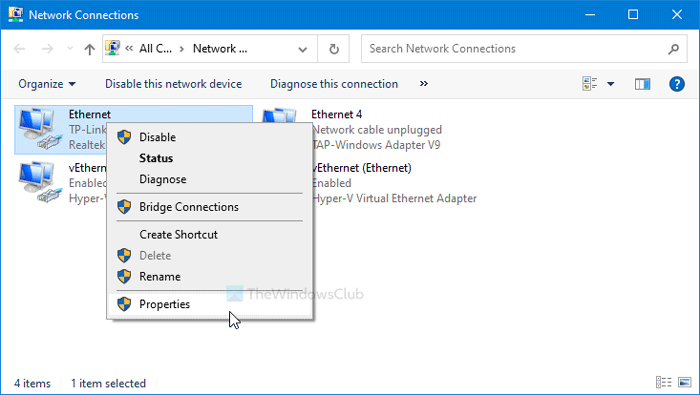
- Right-click on the network adapter.
- Select the Properties option.
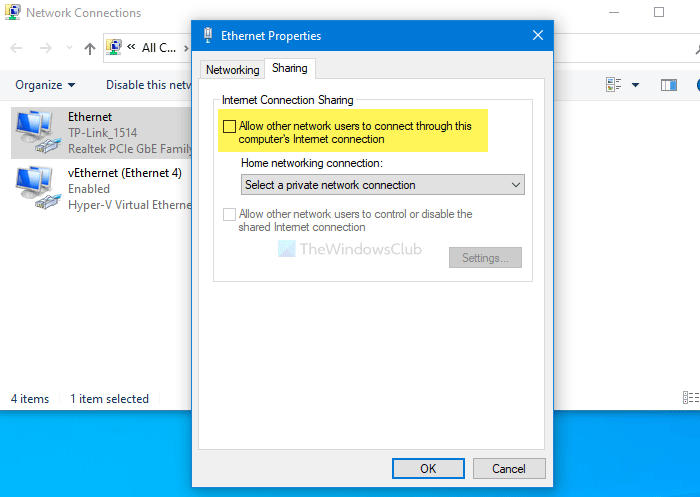
- Switch to the Sharing tab.
- Remove the tick from Allow other network users to connect through this computer’s Internet connection checkbox.
- Click the OK button.
Ppress Win+R to open the Run prompt. Type ncpa.cpl, and hit the Enter button to open the Network Connections window. Alternatively, you can search for “network connections” in the Taskbar search box and click on the respective result. After opening the window, right-click on the desired network adapter and select the Properties option.

Then, switch to the Sharing tab and remove the tick from the Allow other network users to connect through this computer’s Internet connection checkbox.

Click the OK button to save the change.
This method works per connection source basis. In other words, if you want to disable it for multiple internet sources, you have to repeat the steps for each one of them. However, if you want to disable it altogether, you can use the Services panel.
Related: Internet Connection Sharing not working on Windows.
Turn off Internet Connection Sharing (ICS) using Services
To turn off Internet Connection Sharing (ICS) in Windows 11/10 using Services, follow these steps-
- Search for services in the Taskbar search box.
- Click on the respective result.
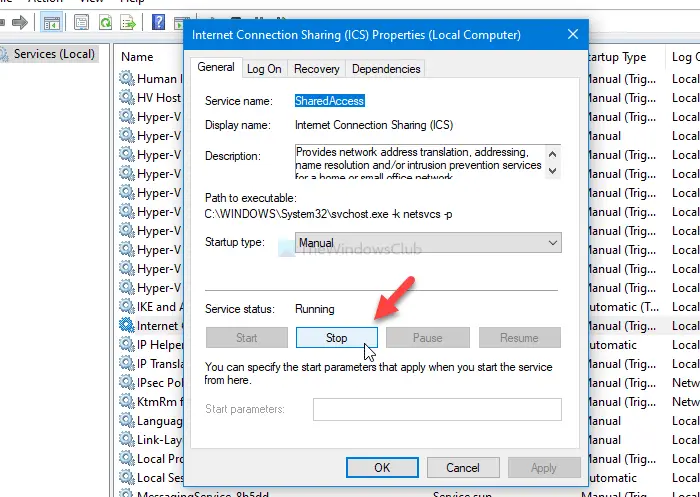
- Double-click on the Internet Connection Sharing (ICS).
- Click the Stop button.
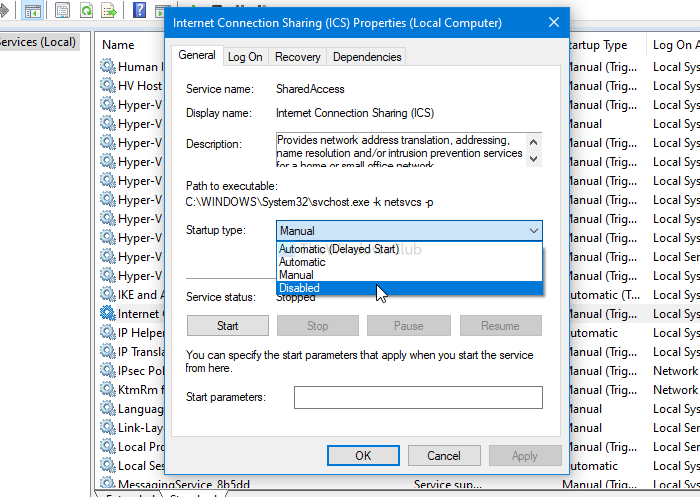
- Choose Disabled from Startup type drop-down list.
- Click on the OK button.
Let’s check out the detailed version of these steps.
To get started, search for services in the Taskbar search box, and click on the corresponding result. Next, find out Internet Connection Sharing (ICS) and double-click on it. Click on the Stop button.

Following that, expand the Startup type drop-down list and choose Disabled.

Then, click the OK button to save the change.
I hope it helps.
Read next: An error occurred while Internet Connection Sharing was being enabled.
Leave a Reply