The Lock Screen in Windows 11/10 is pretty good to look at, but not required on a PC or a laptop. Sure it has its use on a Tablet, where users may like to see notifications, dates or times even when their device is inactive. But on a desktop, it’s just one more step to cross before you can log in. You have to open the Lock Screen by either clicking on it or hitting Enter, which is a waste of effort.

Disable Lock Screen in Windows 11/10
If you do not like the default Lock Screen, you can always change it. But if you wish to completely disable the Lock Screen in Windows 11/10, you can do that too.
Using Group Policy Editor
To do so, Run gpedit.msc to open the Group Policy Editor. Now navigate to the following settings:
Computer Configuration > Administrative Templates > Control Panel > Personalization.
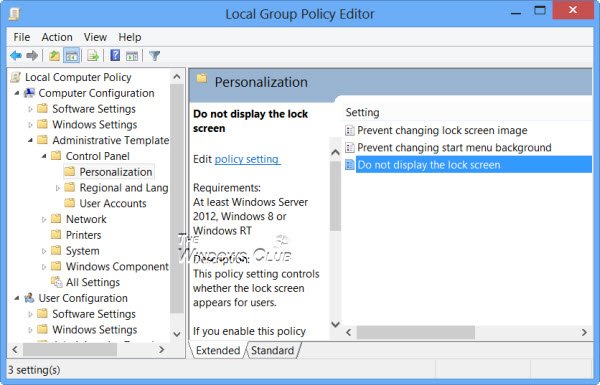
In the right-side pane, double-click on Do not display the lock screen to open its settings box.
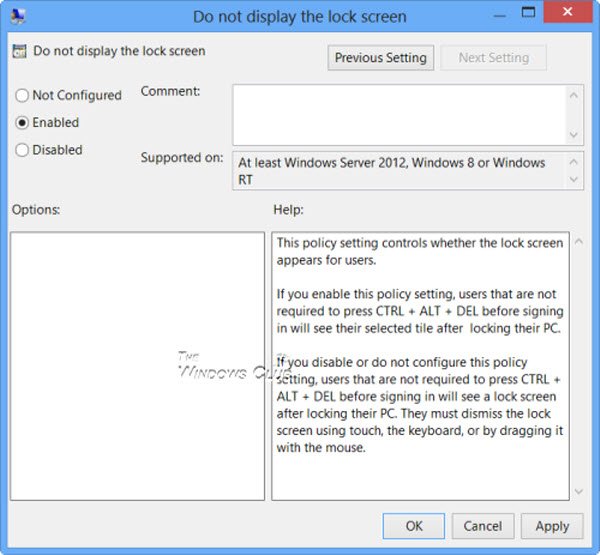
Select Enabled and click on Apply/OK. That’s it!
This policy setting controls whether the lock screen appears for users, in Windows Server 2012, Windows 8 or Windows RT. If you enable this policy setting, users that are not required to press CTRL + ALT + DEL before signing in will see their selected tile after locking their PC. If you disable or do not configure this policy setting, users that are not required to press CTRL + ALT + DEL before signing in will see a lock screen after locking their PC. They must dismiss the lock screen using touch, the keyboard, or by dragging it with the mouse.
This post will help you if the Lock Screen slideshow is not working.
Using Registry Editor
If you wish, you can also disable the Windows 11/108 Lock Screen by editing the Registry Editor. To do so, type regedit in search and hit Enter to open it.
Navigate to the following registry key:
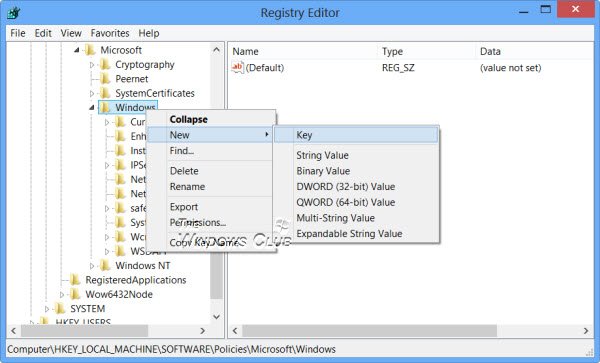
HKEY_LOCAL_MACHINE\SOFTWARE\Policies\Microsoft\Windows\Personalization
If you do not see Personalization, you will have to create a new Key and name it so.
Now in the right pane, create a new DWORD and name it NoLockScreen.
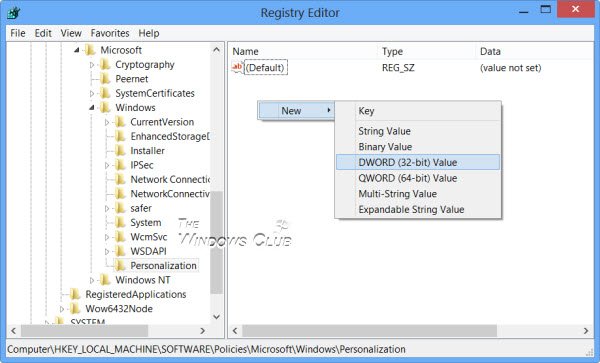
Next double-click on NoLockScreen to change its value from 0 to 1.
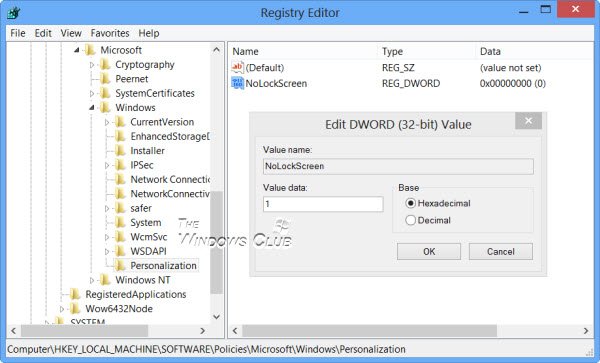
Click OK and exit the Registry Editor.
Restart your Windows computer.
You will now, NOT see the Lock Screen, but will directly see the login screen after the boot screen.
Related: How to Enable or Disable Lock Screen Background Motion.
Lock screen not working in Windows
If you find that the lock screen not working then you need to open GPEDIT and set the Do not display the lock screen setting to Not configured. Alternatively, you can open REGEDIT and set the value of NoLockScreen to 0. This will enable the Lockscreen in Windows 11/10. This has been explained above in this post.
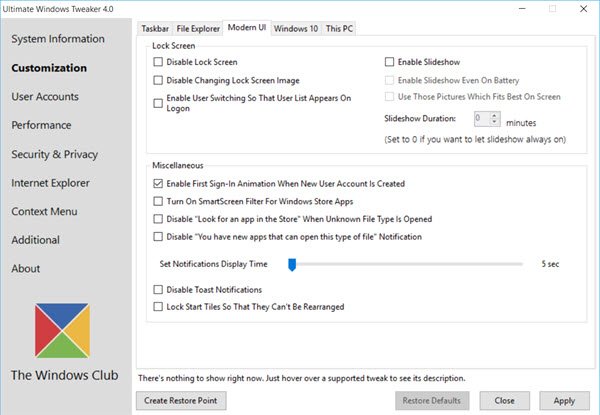
Enable or Disable Lock Screen using Ultimate Windows Tweaker with a click
There is one easy way to do it! Use our Ultimate Windows Tweaker. You will find the setting to Enable or Disable Lock Screen under Customization > Modern UI > Lock Screen.
Go here if you want to prevent users from changing the Lock Screen or Start Screen image in Windows.
Thanks for the post…
Words to be read and digested…
TWC please post the link to the lock screen wallpaper to download .
Thank you, this worked on my 2 windows 8 devices. It does not work on windows RT (surface, freshly bought).
THANK YOU!!!
Thank you, works as advertised.
Thank you!
what if my lock screen is locked and i cannot open it what will i do?
That won’t happen. :)
All of this is great if you have win 8, the Pro edition, or a 32bit version… I tried everything here on a 8.1, 64 bit machine and NO JOY. Please advise…
Well done Anand some sites would have barred him for that
Same here. No joy with either method. Its so frustrating to have the lockscreen on a media system hooked up to a TV, and more so not to be able to do anything about it!!
how weird are you? what kind of question is that? are you asking for help or just a jerk?
http://techtrickers.com/remove-password-for-windows/
This does not work at all, the file path names are not even correct.
If you don’t know how, you have no business on this site.