Some Windows users are skeptical about two protocols, NetBIOS over TCP/IP and LLMNR. These protocols are responsible for the compatibility of your network with the legacy Windows version. However, these are very vulnerable to MITM attacks. Therefore, to increase the security of their network, many Windows users tend to disable NetBIOS and LLMNR Protocols. In this article, we will see how to disable NetBIOS and LLMR Protocols using Group Policy Editor.
Before you begin, please create a system restore point first.
If you want to disable NetBIOS and LLMR Protocol, it is better to know a few things about them.
LLMNR or Link-Local Multicast Name Resolution is a protocol used by IPv6 and IPv4 clients to know the names of neighboring systems without having to use DNS Server. It was introduced in Windows Vista and has been used in subsequent versions. So, if DNS is unavailable, this protocol kicks in.
NetBIOS over TCP/IP is a follow-up protocol of LLMNR and it is used to publish in the LAN and look for resources. If you want to know more about this protocol, open Command Prompt as an administrator and type the following command.
nbtstat
This will display protocol statistics and the current TCP/IP connection using NetBIOS over TCP/IP.
Disable LLMR using Group Policy Editor

You can disable the LLMR protocol on a computer using Group Policy Editor easily. To do that, launch Run (Win + R), type “gpedit.msc”, and hit Enter (make sure that the GPO is applied to all the workstations in the domain).
Now, navigate to the following locations.
Computer Configuration > Administrative Templates > Network > DNS Client
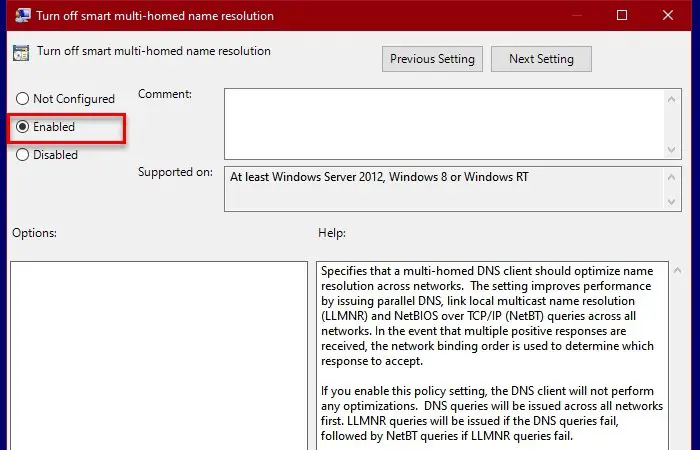
Double-click on “Turn off smart multi-homed name resolution“, select Enabled, and click Apply > Ok.
This policy specifies that a multi-homed DNS client should optimize name resolution across networks. The setting improves performance by issuing parallel DNS, link local multicast name resolution (LLMNR) and NetBIOS over TCP/IP (NetBT) queries across all networks. In the event that multiple positive responses are received, the network binding order is used to determine which response to accept.
If you enable this policy setting, the DNS client will not perform any optimizations. DNS queries will be issued across all networks first. LLMNR queries will be issued if the DNS queries fail, followed by NetBT queries if LLMNR queries fail.
If you disable this policy setting, or if you do not configure this policy setting, name resolution will be optimized when issuing DNS, LLMNR and NetBT queries.
Now, ask all the users to wait for the Group Policy to be updated. Or use the following command to force the update.
gpupdate /force
This way, you will be able to disable LLMR using GPO.
You can disable LLMR locally on a Windows computer with the help of PowerShell commands. Launch PowerShell as an administrator and execute the following commands:
New-Item "HKLM:\SOFTWARE\Policies\Microsoft\Windows NT" -Name DNSClient -Force
New-ItemProperty "HKLM:\SOFTWARE\Policies\Microsoft\Windows NT\DNSClient" -Name EnableMultiCast -Value 0 -PropertyType
DWORD -Force
Disable NetBIOS over TCP/IP

If you are a Windows 11/10 or Server user, use the following steps to disable NetBIOS over TCP/IP on your computer.
- Launch Control Panel from the Start Menu.
- Make sure your View by is set to Large icons and click Network and Sharing Center > Change adapter setting
- Right-click on the connected network and select Properties.
- Select Internet Protocol Version 4 (TCP/IPv4) and click Properties.
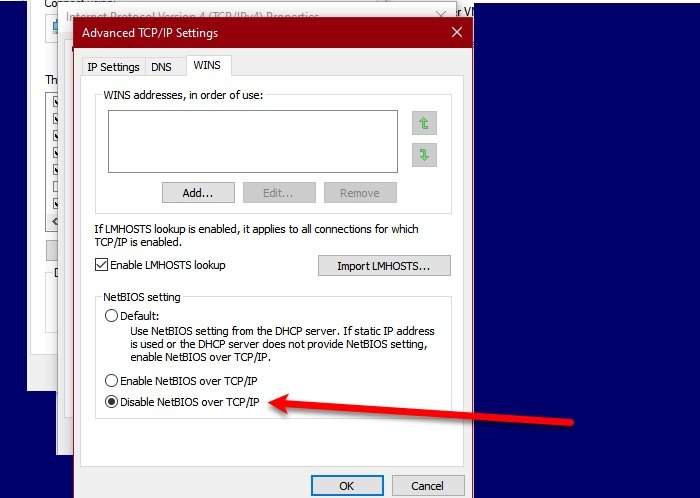
- Click Advanced > WINS > Disable NetBIOS over TCP/IP > Ok.
This way, you have disabled the NetBIOS over TCP/IP on your Windows computer
Disable NetBIOS over TCP/IP with GPO

Unfortunately, there is no separate way to disable NetBIOS over TCP/IP with GPO. However, we will create a .ps1 file to do the same.
Copy the following code in Notepad and name it “disableNetbios.ps1”.
$regkey = "HKLM:SYSTEM\CurrentControlSet\services\NetBT\Parameters\Interfaces"
Get-ChildItem $regkey |foreach { Set-ItemProperty -Path "$regkey\$($_.pschildname)" -Name NetbiosOptions -Value 2 -Verbose}
Now, open Local Group Policy Editor and go to the following location.
Computer Configuration > Windows Settings > Script (Startup/Shutdown) > Startup
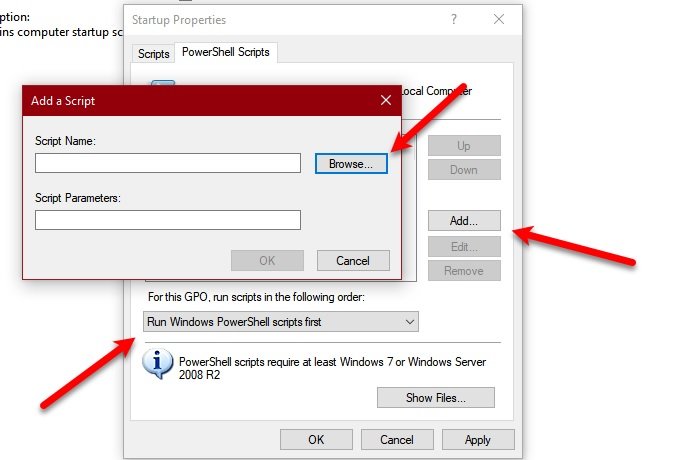
Double-click on Startup, go to PowerShell Scripts, and change “For this GPO, run scripts in the following order” to Run Windows PowerShell script first.
Click Add > Browser and select the “disableNetbios.ps1” file from its location. Finally, click Apply > Ok to run the script.
To force changes either restart your computer or restart your Network Adapter. If you want to see the changes, use the following command to check if NetBIOS over TCP/IP is disabled for Network Adapters.
wmic nicconfig get caption,index,TcpipNetbiosOptions
Hopefully, with the help of this article, you will be able to disable NetBIOS and LLMR Protocols via GPO.
Read Next: How to enable or disable NetBIOS over TCP/IP on Windows.