You may have encountered instances where, while listening to music or watching videos on your computer, the audio levels sometimes fluctuate between being too high and too low, even when your device’s media volume stays stagnant. For example, action scenes or commercials usually tend to have a higher audio level than dialogues. And this disparity between audio levels runs throughout the movie you are watching or the podcast you’re listening to, thus making your experience a bit frustrating.
This common problem, for most people, has only one solution, which is to change the volume level again and again so as to adjust it with the varying audio frequencies, but it is only so long that a person can go on without getting annoyed out of his/her mind.
This is where Loudness Equalization can come to your rescue on Windows 11/10. This functionality helps control audio levels by bringing both sounds that are too high-pitched and those that are too low-pitched to an average level, thus eliminating the need for you to constantly flicker with your computer’s volume. Several applications offer this feature and while it will be a soothing experience for you to listen to music or watch videos in one such program, the Loudness Equalization will only be limited to that particular application.
Thus, what one can do is enable the Loudness Equalization from Windows’ Audio Enhancement settings which will help normalize audio levels for files played across all programs on your computer. Today, I will show how users can enable or disable Loudness Equalization on Windows 10.
Enable Loudness Equalization on Windows 11/10

- Type in the words ‘Control Panel’ on the search pane of your taskbar and open it.
- Here, you will see a search bar on the top-right corner of the screen. Type the word ‘Sound’ there and press Enter.
- This will present you with your system’s Sound settings.
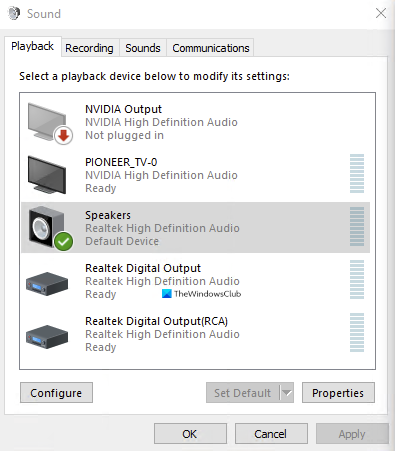
- Here, click on Manage audio devices, which will then open a separate dialog box for you.
- Click on the audio output device in which you want to enable the Loudness Equalization setting.
- In our case, it is the computer’s built-in RealTek speakers. After having selected the audio device, click on properties from the bottom-right.
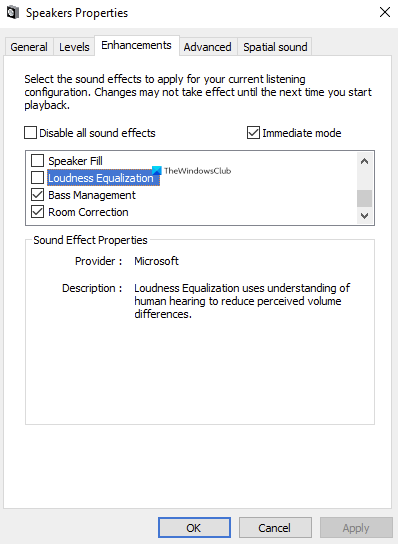
- Select Enhancement from the array of categories on the top of the dialog box, enable Loudness Equalization, and apply these settings.

That is all that had to be done in order to enable Loudness Equalization on your computer. The process of disabling the feature is analogous to the one of enabling it. You can directly open Manage Audio devices in the control bar via the search pane since, if you’re disabling it, you are already familiar with it, and all you have to do is follow the steps mentioned above, disable the setting from where you enabled it and select apply.
You can find a couple more features under the Enhancements category like Room Collection, Speaker Fill, and Bass Management. You may also encounter a scenario where the Loudness Equalization setting is missing under Enhancements. In that article, we talk about the probable causes for it and what users can do to fix it.
Related reads:
- Windows 10 user? Read how to Turn off or Disable Audio Enhancements in Windows 10
- Windows 11 user? Read how to use Enhance audio feature on Windows 11.
What does Windows loudness equalization do?
The loudness equalizer normalizes the volume of sounds being produced. It balances the more loud and more quiet parts of the audio and either boosts the volume or reduces it so that it sounds at a constant level.
Related: How to adjust Bass and Treble in Windows 11
Should you enable loudness equalization?
Yes, you should enable loudness equalization as it evens out the sounds much better, allowing lower volume settings, so you don’t damage your ears.