This article will show you how to disable or enable Preview Pane in File Explorer in Windows 11/10.
File Explorer in Windows 11/10 displays several file layouts, e.g., descriptions, tiles, text, and different sizes of icons. When you choose one of the icon size formats, like large icons or extra-large icons, the snapshot of the file gives you a preview of the file. This preview is especially for image files, e.g., PNG or JPG. A common preview thumbnail is not displayed for other file formats.
There are three types of panes in File Explorer:
- Navigation pane,
- Preview pane and
- Details pane.
The preview pane in File Explorer helps you preview a selected image, TXT file, PDF document, etc. There are multiple ways to turn on or show the preview pane for File Explorer to preview supported files on the right section. You can also increase/decrease the preview pane size to fit your needs. However, if you don’t want to use the preview pane and need to disable it, this post is helpful.
How to show the Preview Pane for File Explorer in Windows 11
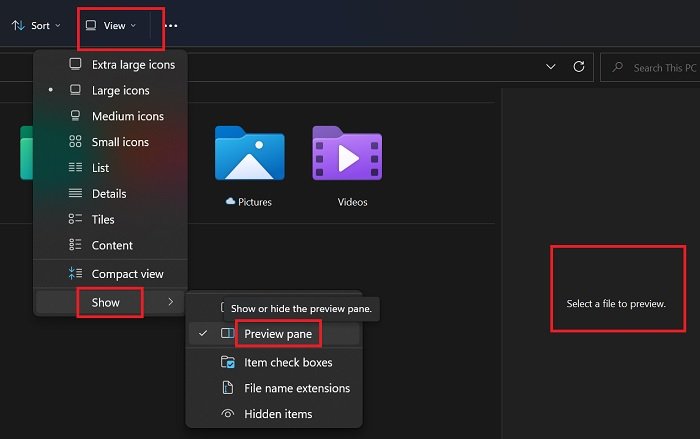
Windows 11 has changed quite a lot compared to Windows 11. This is especially true with the right-click settings and File Explorer. If you wish to show the preview pane for File Explorer in Windows 11, then the procedure is as follows:
- Open the File Explorer window.
- Click on View on the tabs on the top.
- From the drop-down menu, click on Show.
- From the list which comes up, click on Preview Pane and check the box associated with it to enable the Preview Pane for Windows 11.
Show Preview pane for File Explorer in Windows 10
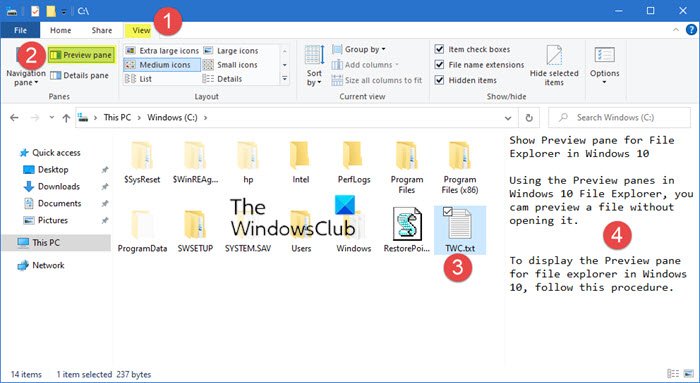
Using the Preview panes in Windows 10 File Explorer, you can preview a file without opening it.
To display the Preview pane for File Explorer in Windows 10, follow this procedure step by step.
- Open File Explorer by clicking the icon on the taskbar.
- When you open File Explorer, you will see four different tabs on top of the screen.
- Click the View tab as highlighted in the above image.
- As soon as you click the View tab, you will see that a ribbon will appear like this.
- Now click the Preview pane from the ribbon as highlighted in the above image.
- As you click the Preview pane option, this pane will be enabled.
Now, whatever file is selected by you, its contents will appear in the Preview pane and you will be able to view it without opening it.
This is how an image file appears.

By following this procedure, you will be able to display the Preview pane for File Explorer in Windows 10 and see the contents of the file without opening them.
There is another way. Simply press Alt+P to make it appear or disappear.
Enable or Disable Preview Pane in File Explorer of Windows 11/10
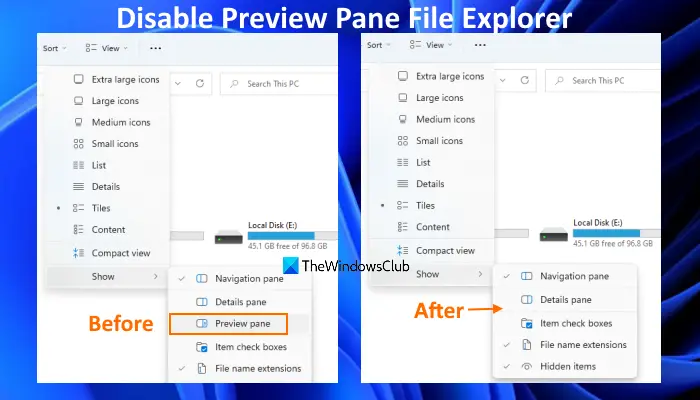
To disable the preview pane in File Explorer, you can take the help of two native features of Windows 11/10 OS. These are:
- Group Policy Editor
- Registry Editor.
Let’s have a look at both options.
1] Disable Preview Pane in File Explorer using Group Policy Editor
If you are a home edition user of Windows 11/10 OS, then first, you have to add Group Policy Editor to Home edition of your computer so that you can use this option. Pro and Enterprise edition users don’t need to do this as Group Policy Editor is already present there. Once you have done this, follow these steps to disable the preview pane:
- Open Group Policy Editor
- Access Explorer Frame Pane folder
- Open Turn off Preview Pane setting
- Select the Enabled option
- Press the Apply button
- Press the OK button.
Let’s have a look at these steps in detail.
In the very first step, open Group Policy Editor window. To do this, click on the Search box of your Windows 11/10 computer, type gpedit, and press the Enter key.
Now access the Explorer Frame Pane folder present under the Group Policy Editor window. Here is the path to that folder:
User Configuration > Administrative Templates > Windows Components > File Explorer > Explorer Frame Pane
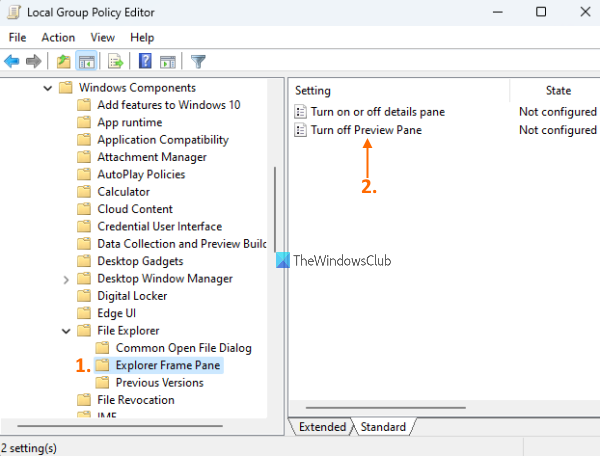
Double-click on the Turn off Preview Pane setting to open the right-hand section of this folder. It will open in a separate window.
In the newly opened window, select the Enabled option present on the top left part. Once it is done, press the Apply button, and then the OK button.
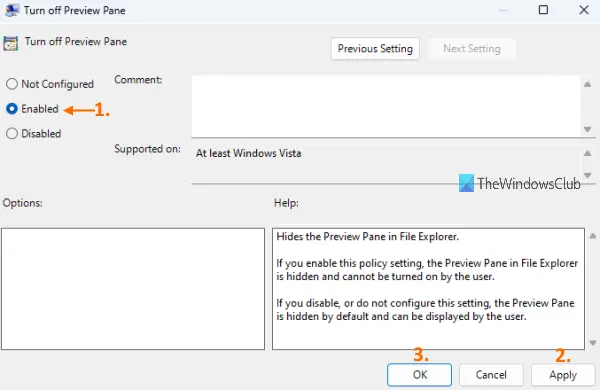
Now close the File Explorer window if you have already opened it. After that, launch File Explorer and open a folder. You will notice that the preview pane option has vanished from the View menu.
To enable the preview pane again in File Explorer, you need to repeat the above steps, and select the Not Configured option in the Turn off Preview pane setting window. Finally, press Apply button, and then OK button to save the changes.
Related: How to show Details pane in File Explorer.
2] Disable Preview Pane in File Explorer using Registry Editor
This is another option for disabling the preview pane from Windows 11/10 File Explorer. Before using this option, it is recommended to backup Registry so you will be able to restore it if anything wrong happens. After backing up the Registry, use these steps:
- Open Registry Editor
- Access the Explorer Registry key
- Create NoReadingPane DWORD value
- Set Value data of NoReadingPane value to 1
- Press OK button
- Restart File Explorer.
In the very first step, you need to open Registry Editor. To do that, open the Search box, type regedit, and hit the Enter key.
When the Registry Editor window is opened, access the Explorer Registry key. Here is its path:
HKEY_CURRENT_USER\Software\Microsoft\Windows\CurrentVersion\Policies\Explorer
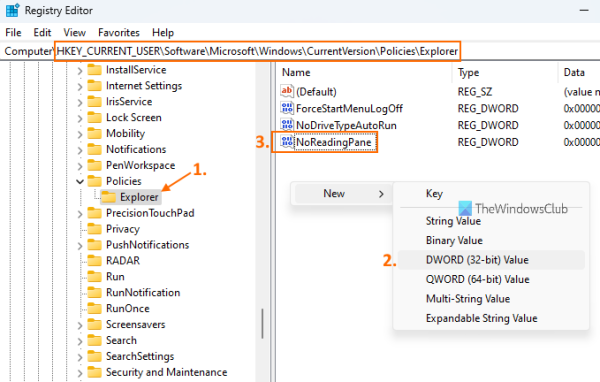
On the right-hand part of the Explorer key, you need to create a NoReadingPane DWORD value. To create this value, right-click on an empty area, expand the New menu, and click on DWORD (32-bit) Value. After creating this new value, rename it with NoReadingPane.
Now set the value data of NoReadingPane value to 1. For doing this, double-click on the NoReadingPane value. A small box will pop up. Enter 1 in the Value data field and press the OK button.
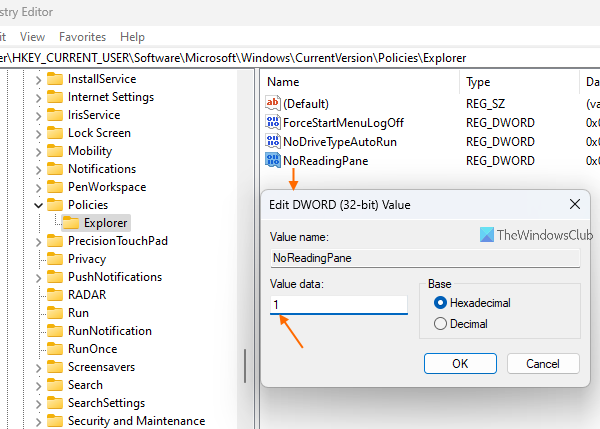
Finally, just restart File Explorer. This will disable the preview pane of File Explorer.
To re-enable the preview pane again in Windows 11/10 File Explorer, you just need to follow the above steps and delete the NoReadingPane DWORD value. After that, restart File Explorer, and you will be able to use the preview pane again.
Once you have disabled the preview pane, its option to turning it on will be removed. Also, the hotkey (Alt+P) to turn on/off the preview pane won’t work. Do not worry as you can also re-enable the preview pane for File Explorer whenever needed.
Why have the File Explorer settings been changed?
Microsoft has its own reasons for changing the options. With Windows 11/10, most lists were smaller in font size, and the contents were larger in number. With Windows 11, the lists have shrunk into sub-menu names, Showing more options. This way, the size of each element remains larger. Perhaps the main reason is to improve the system’s accessibility. As mentioned by Microsoft’s top executives, this has actually been the main focus while designing Windows 11.
How do I get rid of the preview pane in a folder?
If the preview pane is turned on in File Explorer of your Windows 11/10 computer, then you can turn it off using the Alt+P hotkey. The same hotkey can be used to turn on the preview pane again in a folder. You can also turn on/off the preview pane by accessing the View menu available in the Ribbon menu of File Explorer.
If you want to disable the preview pane from Windows 11/10 File Explorer permanently, you can use Registry Editor and Group Policy Editor. This post covers the steps for both options.
TIP: You can also Preview files in Windows using these free apps.
How do I fix the Preview pane?
Many users face this issue when they turn on the preview pane in File Explorer and try to preview a file supported by the preview pane, then they find that the preview pane is not working. In other cases, users find that the preview pane is missing or they cannot preview certain files in File Explorer. If you also face such an issue and want to fix the preview pane in File Explorer of Windows 11/10 computer, then you can try the following fixes:
- Enable preview pane from Folder Options
- Run System File Checker sfc/scannow
- Add more file types to the preview pane.
I hope this will help you.
See this post if Preview Pane is missing or not working.
Leave a Reply