In this post, we will show you to disable your Proxy server setting in the Firefox browser on Windows 11/10. Towards the end, we also tell you what you can do if the LAN Proxy settings button is greyed out.
A proxy system is a server application or appliance that acts as a middleman between your computer and the ISP. In that scenario, sometimes you may need to disable your proxy settings to avoid unwanted problems on your computer. If you’re currently facing any internet connection problems, it might be due to the proxy server. Read this article and learn how to disable your Firefox browser’s proxy settings.
Disable Proxy settings in Firefox

If you want to disable proxy settings in Firefox, follow the below suggestions:
- To get it started, open the Firefox browser first.
- Once it opens, go to the upper right corner of the page and click on the Menu (three horizontal lines) button.
- From the menu list and select Options.
- Now go to the left pane of the screen and click on the General section.
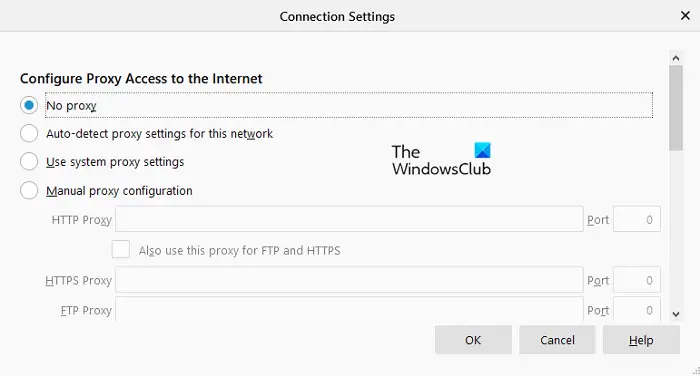
- Scroll down to the bottom of the screen. Under Network Settings, click on the Settings button to open the Connection Settings window.
- Under Configure Proxy Access to the Internet, check the No proxy radio button.
- Click on the OK button to apply the changes, and then exit the window.
Once you disable your proxy server, check.
Related: How to disable Proxy or Prevent changing Proxy settings in Windows.
Firefox LAN Proxy settings button greyed out

Some people reported that their LAN Proxy settings button greyed out for some reason. If you’re also facing such issue, follow the below steps to fix it:
Right-click on the Start button and select Run to open the Run dialog box.
In the Run dialog box, type Regedit and press the Enter key to launch the Registry Editor.
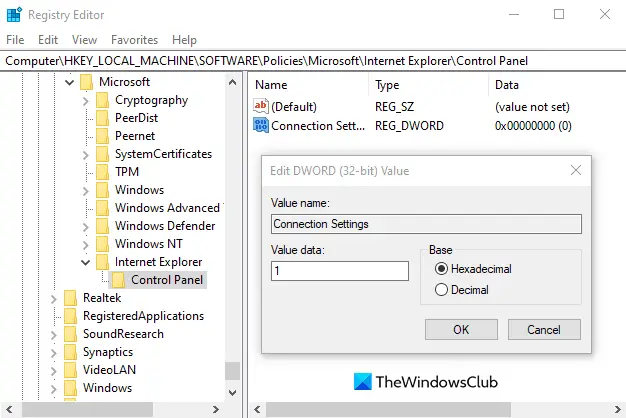
Click on the Yes button if the UAC window appears on the screen. In the Registry Editor window, go to the following registry path:
HKEY_LOCAL_MACHINE\SOFTWARE\Policies\Microsoft\Internet Explorer\Control Panel
You can also copy and paste the above registry path in the address bar and press Enter.
Now go to the right side of the registry editor window, right-click on the empty space, and select New > DWORD (32-bit) Value.
Name the new registry value as Connection Settings and then double click on it. In the small popup window, set the Value data field from 1 to 0, and then hit Enter to apply the changes.
Now close the Registry Editor window and restart your computer.
Once it starts, check if the LAN Proxy settings button is visible now.
I hope you find this article helpful.