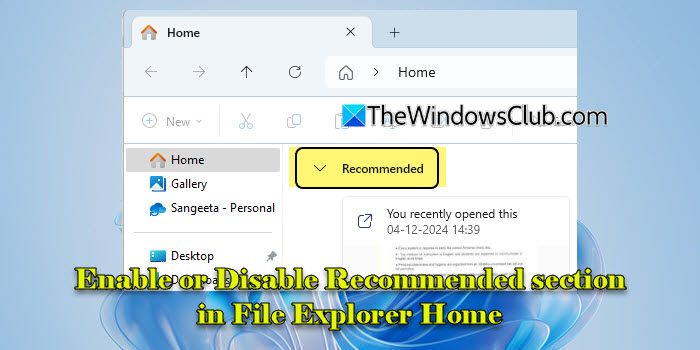
In this post, we will show you how to enable or disable the ‘Recommended’ section in the File Explorer Home section in Windows 11. Microsoft is rolling out a new feature that adds a ‘Recommended‘ section at the top of the Home page of your File Explorer to show you files that Microsoft thinks you might need based on your activity.

The feature, known as File Recommendations, was initially available to a subset of Windows Insiders in the Dev and Canary channels. It was limited to users signed into Windows with Azure Active Directory (AAD) or Microsoft Entra ID accounts and was designed to recommend cloud files associated with these accounts.
File Recommendations is now more widely available and is gradually being rolled out to users on stable channels. If you’ve already received the update but don’t want to see the recommendations, there are settings to manage or turn off the feature in Windows 11.
Enable or Disable Recommended section in File Explorer Home in Windows 11
To enable or disable the ‘Recommended’ section in the File Explorer Home section in Windows 11, you may use either of the two methods:
- File Explorer Options
- Registry Editor
Let us see this in detail.
1] File Explorer Options
The easiest way to turn on or off File Recommendations in File Explorer Home is by using the Folder Options dialogue.
Press Win + I to open the Settings app. Type ‘file explorer options’ in the search bar, and click File Explorer Options under search results.
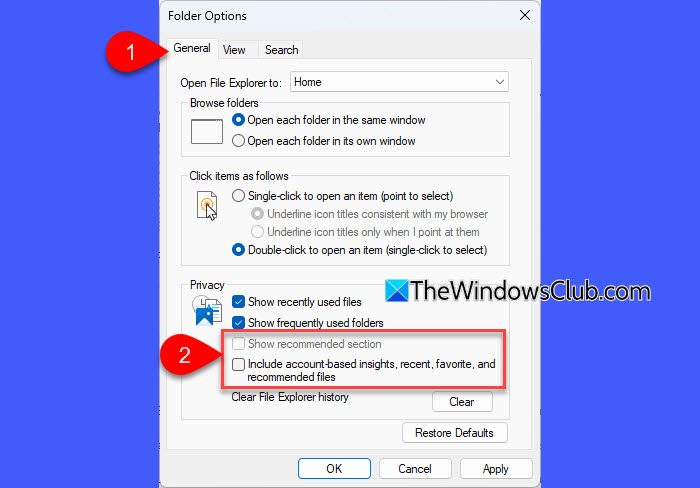
In the File Explorer Options dialogue, uncheck the following options under the Privacy section within the General tab:
- Show recommended section
- Include account-based insights, recent, favorite, and recommended files
Click Apply, followed by OK to save changes. Restart File Explorer to ensure the changes take effect.

Once you uncheck the above settings, you’ll no longer see the ‘Recommended’ section in your File Explorer Home section (the ‘Recommended’ section turned on is the default setting).
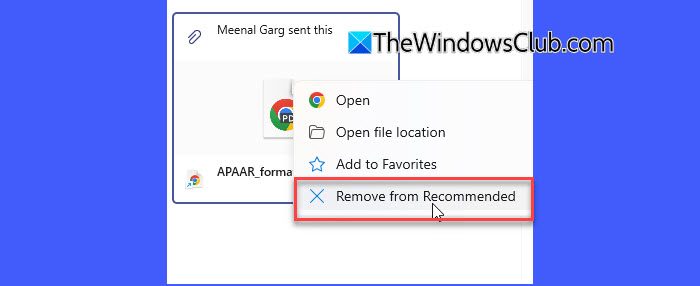
Tip: If you want to hide individual file from the Recommended section, right-click the file and select ‘Remove form Recommended‘.

If you wish to have the section back, you may undo these changes.
Open the File Explore Options dialogue and check the box for ‘Include account-based insights, recent, favorite, and recommended files‘. Next, check the box for ‘Show recommended section‘. Click Apply > OK, and restart File Explorer to apply the changes.
2] Registry Editor
Advanced users may tweak Windows Registry to enable or disable File Recommendations in File Explorer Home. However, modifying the Registry could lead to serious consequences if not done correctly. So proceed with caution or take a backup of your Registry before making any edits.
Press Win + R, type ‘regedit‘ in the Run dialogue, and press Enter. Click Yes in the User Account Control prompt.
The Registry Editor will open up. Navigate to the following key in the Registry Editor window:
HKEY_CURRENT_USER\Software\Microsoft\Windows\CurrentVersion\Explorer
In the right-panel, locate these two DWORDs:
- ShowCloudFilesInQuickAccess
- ShowRecommendations
The above DWORDs control whether recommended files are shown in the File Explorer. To disable the Recommended section, double-click these DWORDs and set their Value data to ‘0‘.

To re-enable the section, change their Value data back to ‘1‘. Restart File Explorer each time you make these changes.
Note:
- The Quick Access and Recommended sections are interconnected in certain ways, especially in Windows 11.
- When ShowRecommendations is set to 0, File Explorer will show only Quick Access or other default views. When ShowRecommendations is set to 1, it takes precedence over Quick Access, replacing it with recommendations for recent files.
- When Recommendations is enabled (ShowRecommendations = 1) and Cloud Files in Quick Access is disabled (ShowCloudFilesInQuickAccess = 0), the Quick Access section is replaced by Recommended, but no cloud files are displayed in this section. To show cloud files in the Recommended section, you must re-enable ShowCloudFilesInQuickAccess by setting it to 1.
I hope you find this useful.
Read: How to remove Recommended section from Start menu in Windows.
How to disable Recommended in Windows 11 File Explorer?
Open File Explorer, click the three-dots icon on the top menu, and select Options. In the Folder Options dialogue, uncheck the ‘Show recommended section‘ and ‘Include account-based insights, recent, favorite, and recommended files‘ options. Click OK and restart File Explorer to apply changes.
How do I change File Explorer back to normal in Windows 11?
To restore File Explorer to default in Windows 11, open the Folder Options dialogue (three-dots icon > Options) and click the Restore Defaults button under the General tab. If you see a Recommended section on top of your File Explorer Home, you may hide it using the settings available in the Folder Options dialogue, as explained in this post. After hiding the section, your File Explorer will switch back to its default interface with the Quick Access panel at the top.
Read Next: How to enable or disable Quick Access in File Explorer of Windows.
Leave a Reply