This post will show you how to Enable or Disable Secure Boot in Windows 11. To ensure that Windows 11/10 remains safe from Malware, Microsoft enabled support for Secure Boot, which works on top of UEFI. Secure Boot makes sure that when your PC boots up, it only uses firmware that is trusted by the manufacturer. However, many a time because of some hardware misconfiguration, you will need to disable Secure Boot in Windows 11/10.
If you are wondering what is UEFI, then it expands to Unified Extensible Firmware Interface and is the next generation of the popular BIOS. It’s secure, can hold more data, is much faster than BIOS, and is almost like a tiny operating system that runs on top of the PC’s firmware. It can do a lot more than BIOS. The best part is that it can be updated by the OEM over Windows Update.
It’s because of UEFI that Windows 11/10 offers security features like Secure Boot, Windows Defender Device Guard, Windows Defender Credential Guard, and Windows Defender Exploit Guard. Below is a list of features you get:
- Faster boot and resume times.
- It easily supports large hard drives (more than 2 terabytes) and drives with more than four partitions.
- Support for multicast deployment, which allows PC manufacturers to broadcast a PC image that can be received by multiple PCs without overwhelming the network or image server.
- Support for UEFI firmware drivers, applications, and option ROMs.
How to disable Secure Boot in Windows 11/10

Just before you jump to disable Secure Boot, because you can, let’s find out if your PC has Secure Boot.
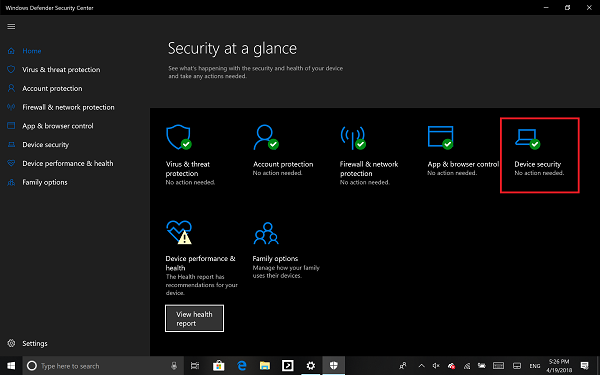
Open Windows Defender Security Center, and click on Device Security.
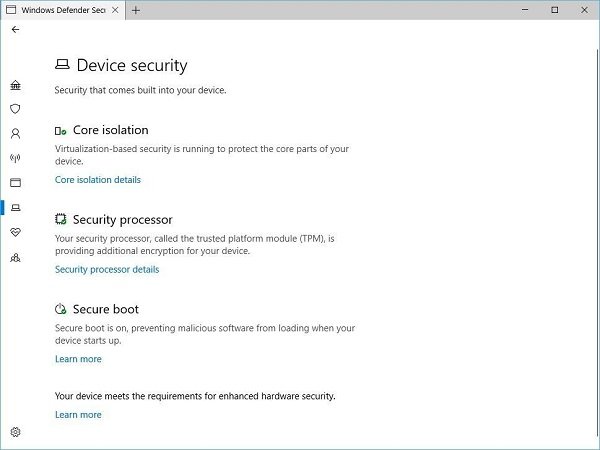
In the next screen if you see Secure Boot mentioned, then your PC has it, else it doesn’t. If it’s available, you will know if it actually turned on for your PC. We recommend you turn it on.

If you want to have Secure Boot on your PC, you will need to buy a new PC from the OEM that supports it.
Assuming you have Secure Boot and it’s turned on, let’s figure out how to disable it.
Make sure to read our guide completely, especially this warning message.
Warning: If you are disabling Secure Boot
After disabling Secure Boot and installing other software and hardware, it may be difficult to re-activate Secure Boot without restoring your PC to the factory state. Also, be careful when changing BIOS settings. The BIOS menu is designed for advanced users, and it’s possible to change a setting that could prevent your PC from starting correctly. Be sure to follow the manufacturer’s instructions exactly.

- Go to Settings > Windows Update, and check if you have anything to download, and install. OEMs send and update the list of trusted hardware, drivers, and operating systems for your PC.
- Once done, you need to go to the BIOS of your PC.
- Go to Settings > Update & Security > Recovery > Advanced Startup options.
- Then you click on Restart Now, it will reboot your PC, and offer you all these advanced options.
- Select Troubleshoot > Advanced Options.
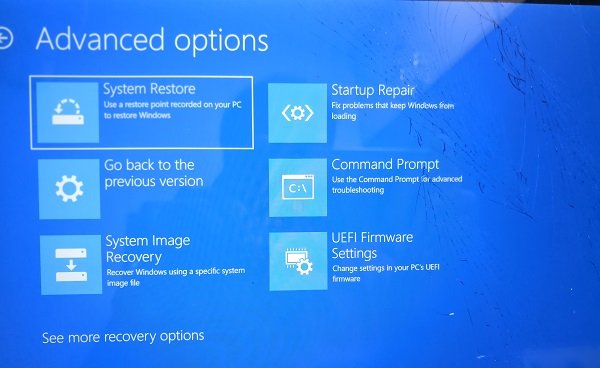
- This screen offers further options, which include System Restore, Startup repair, Go back to the previous version, Command Prompt, System Image Recovery, and UEFI Firmware Settings.
- Select UEFI Firmware Settings, and it will take you to the BIOS.
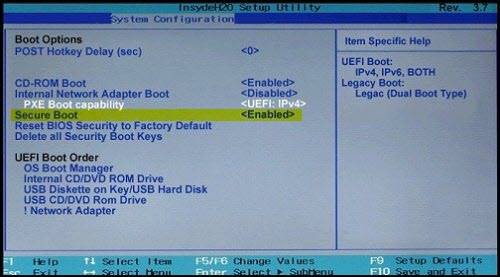
- Every OEM has its own way of implementing the options. Secure Boot is usually available under Security / Boot / Authentication Tab.
- Set it to Disabled.
- Save changes and exit. The PC will reboot.

After this, you can change your graphics card or any other hardware which you believe is giving you trouble. Make sure to follow the same steps again, and this time enables the Secure Boot.
How to enable Secure Boot for Windows 11
To enable Secure Boot on Windows 11/10, take these steps:
- Open Windows Settings and go to Settings > Update & Security > Recovery > Advanced Startup options.
- Click on Restart Now, and on restart, select Troubleshoot > Advanced Options.
- Select UEFI Firmware Settings next, which will take you to the BIOS.
- Secure Boot is usually available under Security, Boot or Authentication Tab.
- Set it to Disabled.
- Save changes and exit.
Cannot re-enable Secure Boot
As mentioned above, if after disabling Secure Boot and installing other software and hardware, you might not be able to re-enable Secure Boot without restoring your PC to the factory settings. You can, however, try the above-mentioned method and see if that works for you.
How do I fix Secure boot is greyed out in BIOS?
If Secure boot is greyed out in BIOS, try the following suggestions:
- Set admin password
- Disable Fast Boot
- Go back into BIOS and Load BIOS Factory Defaults
- Under BIOS Security settings, set the security level to default.
- Update BIOS.
I hope this helps.
Microsoft let some of the “Golden Keys” for Secure boot slip out into the wild. Leaving this ideal of key protections a bit exposed and not completely fixable although Microsoft has tried the last couple years since it happened. Personally I just think creating a master key system is bound to fall into the wrong hands and becomes useless. Windows is so targeted Microsoft had to do something, but frankly this was never a good ideal from the start.