The Snap feature – a window management feature introduced in the earlier version of Windows has been improved in the latest version viz. Windows 11/10, and called Snap Assist. The feature wasn’t noticed much in Windows 8, but eventually resurfaced in 8.1 when the feature was enabled for Windows Store apps. It’s of great use as it allows you to juggle apps, arrange open windows, resize windows by simply dragging and dropping them to the edges of the screen.
Snap Assist feature in Windows 11/10

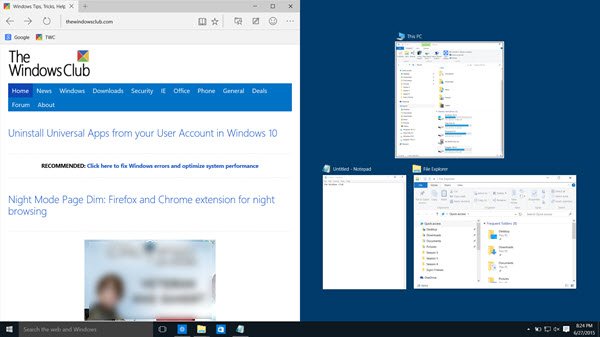
In Windows, when you use the Snap Assist feature to snap an app with the mouse, it shows up instantly and displays a thumbnail list of your open windows. It then allows you to click one of them and have it snapped to the left or right side of the screen. On the other hand, if you snapped a window on Windows 7 or 8, the Windows OS just displayed the empty space and waited for you to snap a second app.
When arranging two windows side-by-side, we noticed in practice that this scenario frequently involved snapping the first window and then spending time wading through other windows on screen to find the second one to drag and snap. This insight lead us to ask: instead of making you hunt for the second window to snap, why not present a list of recently used windows up front? This is the fundamental idea behind Snap Assist in Windows, says Microsoft.
If you snap a window to one side, Windows 10’s Snap Assist will arrange the other open windows in the remaining blank space of your computer screen as thumbnails. It comes into play only when you have half or quarter of your screen empty.
How to disable Snap Assist feature in Windows 11

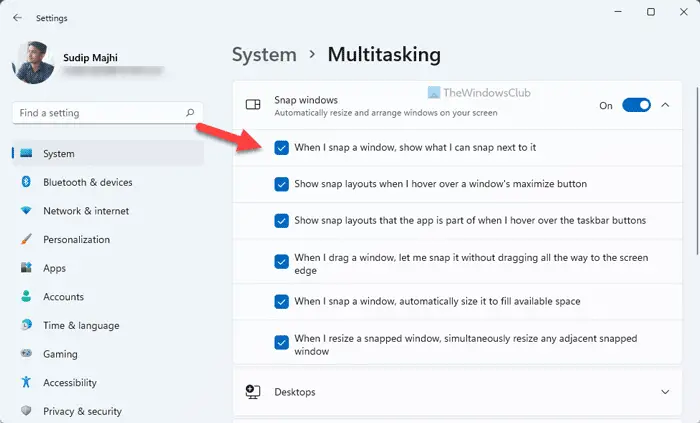
To disable Snap Assist in Windows 11, follow these steps:
- Press Win+I to open Windows Settings.
- Go to System > Multitasking.
- Expand the Snap windows
- Remove the tick from the When I snap a window, show what I can snap next to it
However, if you are using Windows 10, you need to follow these steps.
Turn off Snap Assist in Windows 10
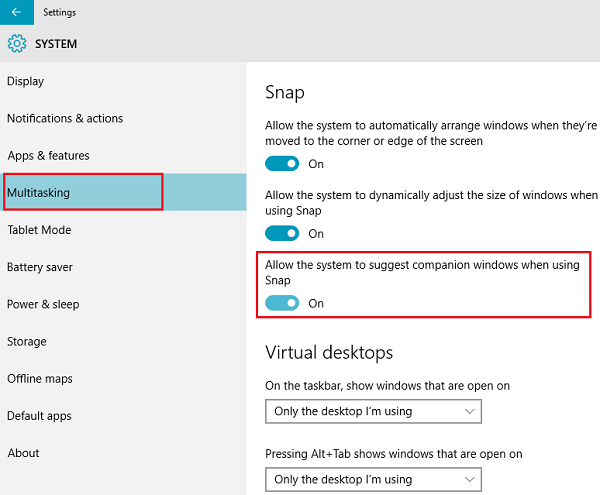
If you do not find this feature useful, you can disable Snap Assist feature in Windows 10. To disable Snap Assist, launch the Settings app from your Start Menu, or by searching for it with Taskbar Search bar.
When there, chose ‘System’ from the Settings window.
In the System Settings window, locate the Multitasking option. When you find it, click on the option.
Then, under the “Snap” category on the right, search the option reading Allow the system to suggest companion windows when using Snap.

Set this option to Off.
This will disable Snap Assist in Windows 10.
How do you turn off windows Snap Assist?
To disable Snap Assist in Windows 11/10, you need to follow the above-mentioned steps. Earlier, in Windows 10, the option was called Allow the system to suggest companion windows when using Snap. However, in Windows 11, it is called When I snap a window, show what I can snap next to it.
How do I Snap Assist in Windows 11?
To enable or disable Snap Assist in Windows 11, you can follow these steps. First, open the Windows Settings and make sure that you are in the System tab. If so, click on the Multitasking menu and remove the tick from the When I snap a window, show what I can snap next to it checkbox.
That’s it! Hope you have found it useful.