TLS or Transport Layer Security is a Cryptographic Protocol and is used to secure computer networking. However, we have seen the advancement of this protocol and after so many iterations using TSL 1.0 for security isn’t a good idea. In this article, we are going to see how to disable TLS 1.0 in Windows 11/10.
Disable TLS 1.0 in Windows 11/10
Most of the browsers do not support TLS 1.0, they usually support TLS 1.2. And there are obvious reasons for the same as TLS 1.0 is not very secured. So, since it is not used, disabling the protocol is a wise choice and in this post, we are going to see how to do the same.
These are the two methods by which you can disable TLS 1.0 in Windows 11/10
- By Internet Properties
- By Registry Editor
Let us talk about them in detail.
1] By Internet Properties

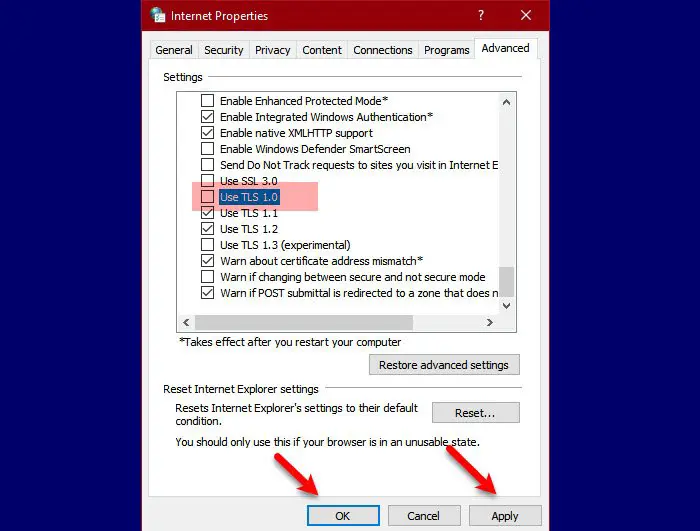
The easiest way to disable TLS 1.0 is via Internet Properties. So, to disable this protocol follow the given steps.
- Search out Internet Options from the Start Menu.
- Go to the Advanced tab.
- Scroll down a bit and from the Security section, untick Use TLS 1.0, and click Apply > Ok.
This way, you have disabled TLS 1.0 on your system.
Related: A fatal error occurred while creating a TLS client credential (10013)
2] By Registry Editor

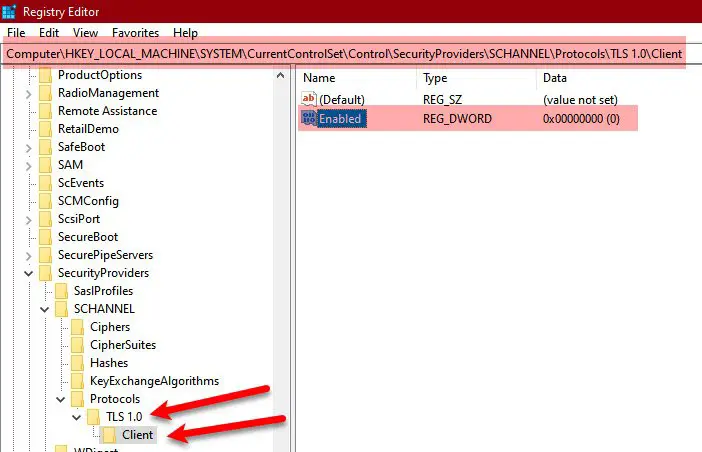
To disable the protocol by Registry Editor, launch Registry Editor from the Start Menu and navigate to the following location.
HKEY_LOCAL_MACHINE\SYSTEM\CurrentControlSet\Control\SecurityProviders\SCHANNEL\Protocols
Right-click on Protocol, select New > Key, and name it “TLS 1.0″. Now, right-click on TLS 1.0, select New > Key, and name it “Client”.
Right-click on Client, select New > DWORD (32-bit) Value, and name it “Enabled”. Now, since the default value of Enabled is 0, TLS 1.0 will be disabled. However, if you want to enable the protocol, just change the Value data to 1.
This way, you have disabled TLS 1.0 on your computer.
Hopefully, you can disable TLS 1.0 with the help of these two methods.
Read Next: How to enable or disable TLS 1.3 in Windows 11/10.