When you start up your Windows 11/10 PC, it takes around 10 seconds of delay. This delay helps Windows OS start System Services and load System files for smooth functioning. It occurs to improve performance and makes everything smoother on your device. However, if you have a powerful device, you could disable this startup delay so that the startup items start functioning as soon as you start the device. In this guide, we will show you how to enable and disable Windows 11/10 Startup Delay using a simple Registry hack.
Before you begin working on the Windows Registry, I would suggest you back it up first, so that you can revert it back if something goes wrong. By the way, if you follow the instructions properly, then such a problem will not happen.
Read: How to measure Startup time in Windows.
Disable Startup Delay in Windows 11/10

To disable Windows 10 Startup Delay, right-click on the Start button and select Run from the power user menu.
In the text field, type Regedit and press enter to open the Registry Editor.
Click on the Yes button, if you see the UAC prompt asking for confirmation to run the app as admin.
In the Registry Editor window, copy and paste the following key to the address bar and hit enter.
HKEY_CURRENT_USER\Software\Microsoft\Windows\CurrentVersion\Explorer\Serialize
If you find the Serialize key on the respective location then fine, else you will have to create it manually.
So, in case the Serialize key doesn’t exist on the given address, right-click on the Explorer (parent key) and select New > Key from the menu list.
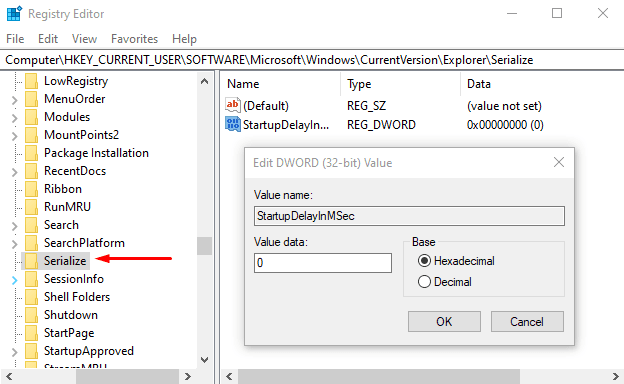
Once the new key is created, name it Serialize. Thereafter, select Serialize and move to the right pane.
On the blank area, do a right-click and select New > DWORD (32-bit) Value.
Then name the new DWORD StartupDelayInMSec and hit Enter to save it.
After naming the new key, double click on it and make sure the Value data is set to 0.
Now click the OK button and close the Registry Editor window.
To apply the changes, you will have to restart your Windows device.
Read: Force Windows to always boot using Fast Startup or Hybrid Boot.
Enable Windows 11/10 Startup Delay
In case you ever need to re-enable Windows 10 Startup Delay, simply open the Registry Editor window and go to –
HKEY_CURRENT_USER\Software\Microsoft\Windows\CurrentVersion\Explorer\Serialize
Now move to the right pane and right-click on the StartupDelayInMSec key then select the Delete option.
At this time, a confirmation box will appear and ask you to delete the key, select Yes.
Let us know if this made any material difference to your PC.
Related:
- How to delay startup programs in Windows using Freeware or Task Scheduler
- Programs taking a long time to open? Decrease Windows Desktop apps loading time during Startup
Leave a Reply