All Windows 11/10 computers include the Windows Insider Service (wisvc) regardless of the participation in the Windows Insider program by users. The wisvc is considered an unnecessary service for users who don’t wish to join the Insider program.
To many, ‘non-required’ services running on their PC may hamper performance. In this post, we will show you the various ways to disable Windows Insider Service on Windows 11/10.
How to disable Windows Insider Service
The following are the ways you can achieve this task;
- Via Services console
- Via Command Prompt
- Via PowerShell
Let’s see the description of each of the methods.
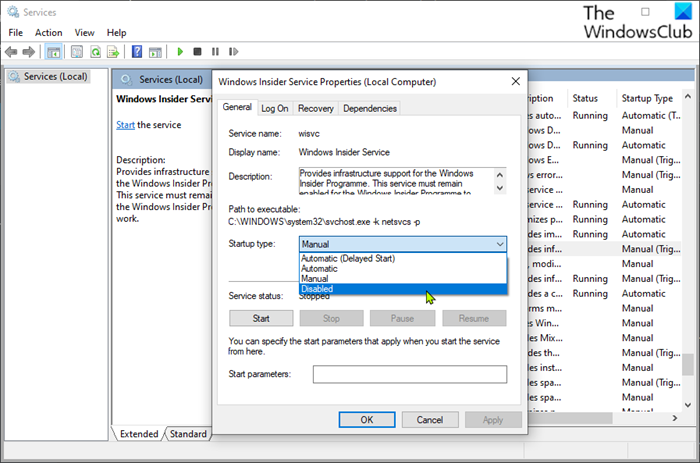
1] Disable Windows Insider Service via Services console

- Press Windows key + R to invoke the Run dialog.
- In the Run dialog box, type
services.mscand hit Enter to open Services. - In the Services window, scroll and locate the Windows Insider Service entry.
- Double-click on the entry to open its properties window.
- In the properties window, on the General tab, click the dropdown on Startup type and select Disabled.
- Click Apply > OK to save changes.
You can now exit the Services console.
2] Turn off Windows Insider Service via Command Prompt
Do the following:
- Invoke the Run dialog.
- In the Run dialog box, type
cmdand then press CTRL + SHIFT + ENTER to open Command Prompt in admin/elevated mode. - In the command prompt window, type or copy and paste the command below and hit Enter.
sc config "wisvc" start= disabled
You can now exit CMD prompt.
3] Disable Windows Insider Service via PowerShell
Do the following:
- Press Windows key + X to open Power User Menu.
- Tap A on the keyboard to launch PowerShell in admin/elevated mode.
- In the PowerShell console, type in or copy and paste the command below and hit Enter.
Set-Service wisvc -StartupType Disabled
You can now exit the PowerShell console.
How do I change from Windows 11 Insider to stable?
To change from Windows 11 Insider build to the Stable build, you can make use of the Windows Settings panel. Open the Windows Settings by pressing Win+I, and go to Windows Update > Windows Insider Program. Then, you can choose the setting as per your requirements. Whether you want to do the opposite, i.e., opt for the Insider program or not, you can use the same setting.
Do you need Windows Insider program for Windows 11?
If you want to try new and upcoming features before anybody else, you can opt for the Windows 11 Insider program. However, if you are a regular user, who wants to use the OS for browsing the internet, watching videos, and doing other regular work, there is no need to use the Insider build. It is as simple as that.
That’s it!
Leave a Reply