If, when you try to repair your Windows System Image, and DISM fails with Error 0x800f081f or 0x800f0906, The source files could not be found, then this post may interest you.
DISM fails, The source files could not be found, Error 0x800f081f or 0x800f0906
If the DISM Tool fails, you have 2 options – clean up the system components, and specify an alternative Windows image repair source, which will then be used to repair a corrupted Windows image. You can do this using the Group Policy.
Normally, during the repair operation, the automatic corruption repair provides files. But of this itself has got corrupted, you can use a specified repair source on your network or use Windows Update to retrieve the source files that are required to enable a feature or to repair a Windows image.
Clean up system image components

Open an elevated command prompt windows, type the following and hit Enter:
Dism.exe /online /Cleanup-Image /StartComponentCleanup
Once the operation is completed,the DISM Tool /RestoreHealth command and see if it works.
If it does, great, else you will have to proceed to the next option.
DISM fails The source file could not be downloaded

If you receive an Error 0x800f081f or 0x800f0906 The source files could not be downloaded message, then you will have to set an alternative source file. Read on to learn how to do this.
Configure an alternative Windows Repair Source
You can configure your system to use an alternative repair source, via a Group Policy setting, Run gpedit.msc to open the Group Policy Editor, and navigate to the following setting:
Computer Configuration > Administrative Templates > System
Now in the right pane, double-click on Specify settings for optional component installation and component repair setting.
Select Enabled and enter the Alternate source file path. You may also choose:
- Never attempt to download payload from Windows Update
- Contact Windows Update directly to download repair content instead of Windows Server Update Service (WSUS).
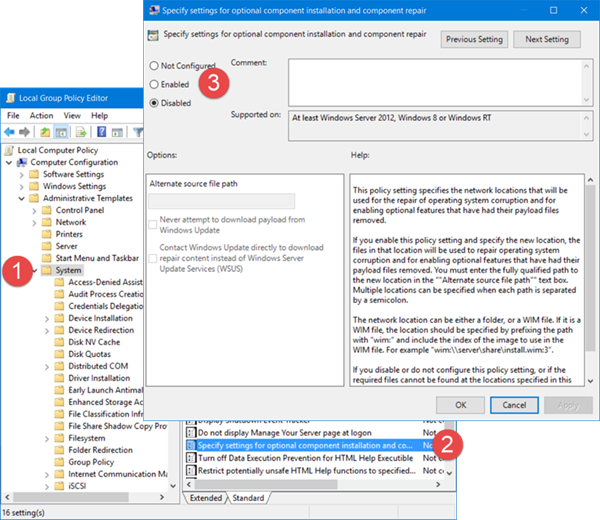
This policy setting specifies the network locations that will be used for the repair of operating system corruption and for enabling optional features that have had their payload files removed. If you enable this policy setting and specify the new location, the files in that location will be used to repair operating system corruption and for enabling optional features that have had their payload files removed. You must enter the fully qualified path to the new location in the “”Alternate source file path”” text box. Multiple locations can be specified when each path is separated by a semicolon. The network location can be either a folder, or a WIM file. If it is a WIM file, the location should be specified by prefixing the path with “wim:” and include the index of the image to use in the WIM file. For example “wim:\\server\share\install.wim:3”. If you disable or do not configure this policy setting, or if the required files cannot be found at the locations specified in this policy setting, the files will be downloaded from Windows Update, if that is allowed by the policy settings for the computer.
Click Apply/OK and exit.
Remember that you will need to keep and maintain a repair source that is current with the latest servicing updates, etc, on your network.
Related tip: To use a running Windows installation as the repair source, or use a Windows side-by-side folder from a network share or from a removable media, such as the Windows DVD, as the source of the files, you can use the following command to run DISM Offline:
DISM.exe /Online /Cleanup-Image /RestoreHealth /Source:C:\RepairSource\Windows /LimitAccess
Here you will have to replace C:\RepairSource\Windows with the location of your repair source.
Once the process is complete, DISM will create a log file in %windir%/Logs/CBS/CBS.log and capture any issues that the tool finds or fixes.
Read next: Fix DISM Errors 87, 112, 11, 50, 2, 3, 87,1726, 1393.
How do I fix a DISM failure?
To fix a DISM failure, launch Command Prompt as an administrator by pressing Win + R, typing “cmd,” and hitting Shift + Ctrl + Enter. Then, enter the command Dism.exe /online /Cleanup-Image /StartComponentCleanup and press Enter. This process helps resolve common system component issues, potentially fixing the DISM failure.
I’ve been battling with a Laptop all week. The BIOS got corrupted and it wouldn’t turn on. Now having learned to desolder, re-flash and replace that, the machine is still unstable, and it seems because certain parts of Windows have got corrupted.
At one stage I couldn’t even run the ‘Settings’ config (had to create a new admin user in the end).
An SFC /scannow first drew my attention to a corrupted .NET4 clr.dll; Having found that, it seems impossible to get Windows 10 to agree to just re-download the and install the offending file(s). DISM /restorehealth is giving 0x800f081f even after a /startcomponentcleanup.
I’m on ‘Home’ so no gpedit.msc luxury here. Just want to do your final step and make it re-install from Microsoft….any idea what the corresponding registry key to say ‘just get it from microsoft (and don’t come back until you have fixed everything)’ would be?
If you had to physically replace a BIOS in a laptop, that’s a major hardware change. Reinstalling Windows from a disc would be your best bet as I’m sure other Windows files would need to be updated as well. Your Windows licensing may have been re-triggered to use a new key too. Best to just reimage/reinstall Windows.
Thank you. Using the Local Group Policy Editor to allow for Windows Update to provide repair content though didn’t work. I still get an error 0x800f081f The source files could not be found. Is it necessary to restart the computer to get this to work?
I’m starting to think that the /source parameter cannot use a UNC network path. Can anyone verify?
I did exactly as described (I’m familiar with doing these sorts of things) and (in summary) this is the error I get:
“Microsoft Windows [Version 10.0.15063]
Error: 87
The source option is not recognized in this context.
For more information, refer to the help.
The limitaccess option is not recognized in this context.
For more information, refer to the help.
The DISM log file can be found at C:WINDOWSLogsDISMdism.log”
The location of the Windows directory I chose was from a mapped network drive. There are no other problems on this PC which I am aware of. Any reason why the /source command wouldn’t be working? Thanks!
I am missing the “Specify settings for optional component installation and component repair setting” setting in group policy. What should I do?
Why would you have to remove the BIOS? Nearly all motherboards today use dual-BIOS technology so you can recover the BIOS from a backup on the chip. Too late now, I’m sure, but you should look into that if there’s ever a next time.
Scroll down. It is not a folder – not a yellow icon.