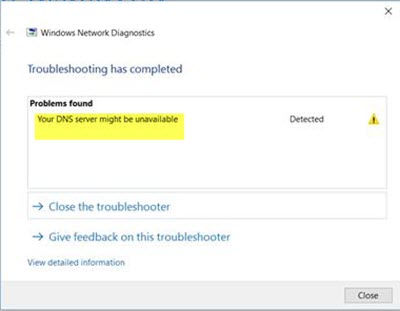
If you are experiencing problems with the internet connection and the Windows Network Diagnostic Troubleshooter displays Your DNS Server might be unavailable message, here are some possible solutions that you might like to use. Although sometimes restarting the Wi-Fi router can solve your problem, you may need to try other solutions as well.

What Does “DNS Server Not Responding” Mean?
A DNS Server is responsible for resolving the domain names that you type in your browser to the IP address. It is then used by your device to access that website.
It can be your router or a computer server that finally resolves it for you. If you receive an error—DNS Server Not Responding—then it means your computer or device couldn’t find the right DNS server address to resolve the domain name when you enter the website.
The problem with the DNS server could be anything. It could be that it is turned off or has an IP conflict or DNS errors or configuration issue or software on your computer overriding the DNS server settings or router settings or problems like a virus or malware has disabled it.
Your DNS Server might be unavailable
Before getting started, you should check the ‘ping status’ and try using another browser as well. If you face packet loss issues or none of your browsers can open any website, you need to follow these solutions.
- Flush DNS cache
- Use Google Public DNS
- Disable VPN/antivirus/firewall software
- Disable Proxy
- Reset Router
- Reset TCP/IP
- Switch to a different browser
- Change Secure DNS in browser
- Start Your Computer In Safe Mode
- Disable Secondary connections.
1] Flush DNS cache
DNS Cache helps Windows to bypass DNS servers and directly access the website IP based on experience. However, it needs to be refreshed from time to time, so if the IP has changed, it can get new ones, let you browse as expected.
If you have been using the Windows OS for a long time, you may know that you can fix most internet connection-related issues by flushing the Windows DNS cache. It helps when some websites are opening and some are not. So open Command Prompt with administrator privilege and run this command-
ipconfig /flushdns
You will see a Successfully flushed DNS Resolver Cache message once the job is done.
You may want to also renew the IP address by running these commands in the CMD window:
ipconfig /release ipconfig /renew
Check if this works for you.
2] Use Google Public DNS
A public DNS is a DNS server that anyone on the Internet can use to resolve DNS queries. Public DNS servers are free of charge and more reliable as they do not go down and are refreshed dynamically, so the IP resolution does not fail.
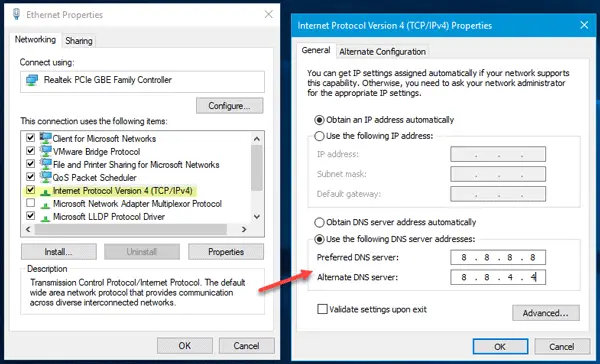
If your DNS server has an issue at the moment, change your DNS settings. You can temporarily switch to Google Public DNS service. To get started, press Win + R, type ncpa.cpl, and hit the Enter button—Right-click on the active network profile and select Properties. You should find Internet Protocol Version 4 (TCP/IPv4) in the list, which you need to select before clicking on the Properties button.

After that, select Use the following DNS server addresses and enter the following addresses-
- Preferred DNS server: 8.8.8.8
- Alternate DNS server: 8.8.4.4
In case you use IPv6; you need to use these-
- Preferred DNS server: 2001:4860:4860::8888
- Alternate DNS server: 2001:4860:4860::8844
Save your settings and check whether you are getting any issues or not.
There are many Public DNS Servers such as Cloudflare. You can also use them based on the features they provide with the DNS.
Similar error: The server DNS address could not be found, DNS PROBE_FINISHED_NXDOMAIN
3] Disable VPN/antivirus/firewall software
If you have recently installed any VPN, antivirus programs, or firewall software, you should try disabling it. Sometimes, such software are known to create issues – and so we need to rule out this possibility.
4] Disable Proxy
A lot of users use Proxy server settings in Windows 11/10. There are many scenarios where DNS server settings are configured. If the name resolution server configured is not responding, Windows 11/10 users may need to change the setting or disable it.
If you are using any Proxy server on your system, you should disable it to check if it is creating problems or not. For that, press Win +I to open the Windows Settings panel. After that, go to Network & Internet > Proxy. Now make sure only Automatically detect settings option is turned on. If any other option is turned on, you need to toggle that button to disable it.
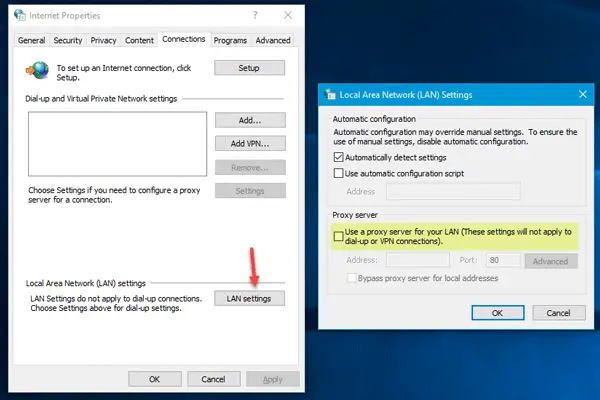
If some malware or adware attacked your system recently, you need to open another option in Local Area Connection (LAN) settings. For that, search for Internet Options in the taskbar search box or Cortana. After opening the Internet Properties window, switch to the Connections tab and click on LAN settings. Now make sure to uncheck the box next to the option—Use a proxy server for your LAN.

If not, deactivate this setting and save your change.
5] Reset Router
Sometimes the Wi-Fi router can create such internet connection issues on Windows 10. If other solutions are not working, you should try resetting them once. However, before that, you can restart it by pressing the power button at the back of the router or unplugging it.
You can check the manual that the manufacturer gave since different Wi-Fi router has various methods to reset. Whichever router you use, you need to enter all the IP addresses once more.
6] Reset TCP/IP
To fix the corrupt TCP/IP, resetting is the best option that you should opt for. When you reset, it clears all-important keys and files related to the TCP/IP stack so everything can start from scratch. To reset TCP/IP, open an elevated Command Prompt, and run the following command-
netsh int ip reset resettcpip.txt
You need to restart your computer to complete this action.
7] Switch to a different browser
If you cannot browse properly with the current browser, you can switch to another browser. You can use Chrome or Edge, or Firefox. It is possible that because of a misconfiguration in the browser or an issue with the operating system, the browser cannot communicate with the DNS Server.
You can also reset the browser and use incognito mode to access the website as a further check.
8] Change Secure DNS in browser

Most of the browsers offer a way to configure secure DNS from within the browser. Chrome and Microsoft Edge offer this under Security settings where you can change the DNS to Cloudflare or Google DNS. If it is already configured to something else, you can choose the automatic option and then try again.
Your browser might need a restart.
9] Start Your Computer In Safe Mode
Safe Mode with networking allows you to troubleshoot any problems. In this mode, the PC boots with the minimum required features and drivers. If you can connect and browse the internet with the same browser, it narrows down the issue with the browser.
10] Disable Secondary connections
If you are connected to the internet using both Ethernet or Wifi or have bridged the connection, try to disconnect, and connect to only one connection. In short, one of the connections may have a DNS issue, and while the other works fine. However, unless you disable one, it is impossible to figure out which connection you should keep and which to disable.
DNS errors are one of the common issues faced by many internet users. It is mostly the ISP that causes all sorts of problems, but the router does that too. One of the quickest ways to find ISP issues is to connect to them and ask them directly about them.
I hope the post was insightful, and the suggestions helped you resolve the DNS server unavailable problem on your Windows 11/10 PC.
Some other related issues and fixes:
I can’t sent my email.