The DNS_PROBE_FINISHED_NXDOMAIN error is very confusing, but it is usually quite easy to resolve. This may be the first time you have seen the issue, but it is actually one of Google Chrome’s most common DNS errors. When you try to open any web page, and you find this error message being displayed, here are some suggestions you can follow:
This site can’t be reached, The server DNS address could not be found, DNS PROBE_FINISHED_NXDOMAIN
Website server DNS address could not be found

What causes DNS_PROBE_FINISHED_NXDOMAIN?
In almost all situations, the IP addresses used by your ISP’s domain name servers are automatically set by your Internet service provider via the Dynamic Host Configuration Protocol. The web page you are trying to connect to cannot be accessed because the DNS lookup might have failed or not loaded. The network service translates a website’s name to its internet address. This DNS error is often caused by having no connection to the internet or a misconfigured network. An unresponsive DNS server might also be the reason for this issue. Another reason could be a firewall preventing Google Chrome from accessing the network.
Let’s get one thing cleared. If the server or website is no longer associated with any IP address, you cannot access it. However, it can still be resolved if the IP has changed, and your DNS or computer is still trying to access the website or server with the old IP. The post looks at various solutions that help you reset the DNS or clear the cache to find the new IP.
Fix DNS_PROBE_FINISHED_NXDOMAIN error
This guide will look at various solutions to clear the old DNS cache and reaccess the website. However, before starting, we strongly suggest using a free VPN and checking if you can access the website. If yes, then follow the troubleshooting methods.
- Clear Chrome DNS Cache
- Flush Windows DNS cache
- Restart PC and the Router
- Change DNS
- Run Network Adapter troubleshooter
- Run Internet Connections troubleshooter
- Reset Network
You will need admin permission for some of the suggestions.
1] Clear Chrome DNS Cache
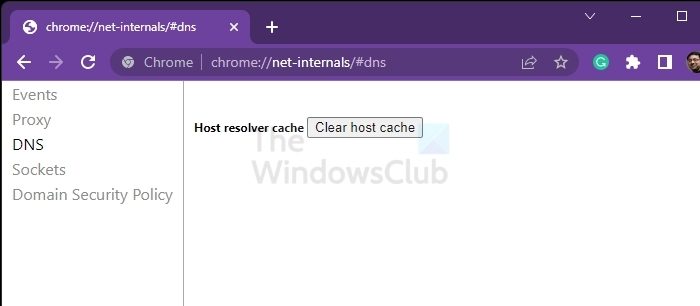
Every browser, including Chrome, maintains a DNS cache that takes precedence of the DNS cache of the PC. It is good to clarify that first and see if the issue gets resolved. You can access it by going to the following in a chrome tab:
chrome://net-internals/#sockets
If this doesn’t help, you can also choose to reinstall Chrome or reset Chrome. So if the DNS cache is corrupt or cannot be refreshed, this will help.
2] Flush Windows DNS cache
First, flush your Windows DNS cache, restart your computer and router and see if that helps.
3] Restart PC and the Router
The easiest way to fix DNS caching is to restart the PC and Router. When the devices are connected for a long time, the data is not refreshed, and the IP gets stale. When the devices are restarted, especially the router, a fresh DNS query is made. This results in a new IP address, and the website can be accessed.
Going one step further, you can configure the router to refresh the DNS cache using the settings on the router. You can also run Flush DNS Command to clear the local PC cache for the network on the PC.
4] Change DNS
The DNS offered by the ISP or the one you are currently using may be causing the problem. You can try to change the current DNS to one from Google, Cloudflare, and other popular DNS. These DNS services stay up to date, and any change in the IP address of the website or server is reflected very quickly.
You could use Google Public DNS and see if that works for you. You need to explicitly change the DNS settings in your operating system use the DNS IP addresses. You don’t need to worry about the procedure; the process of changing your DNS settings varies according to the operating system and version of the operating system or the device which you are using. In this article, we are going to tell you how to show you how to fix this problem on Windows.
The issue we are discussing in this article generally occurs on the Google Chrome browser on a Windows PC. Chrome might display a grey window with one of these messages if something is wrong with the Internet or DNS settings. Every time you type a domain name into the browser, DNS will look for the IP address of the domain name and return the result to you.
First, right-click on the taskbar Network icon and select Network and Sharing Center.
Select “Change Adapter Settings”.
Search for the network connection that is used to connect to the internet, the option might be either “Local Area Connection” or “Wireless Connection”.
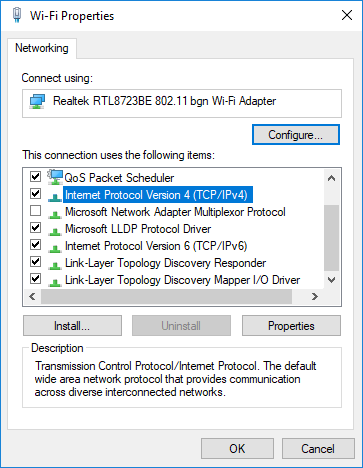
Right-click on it and click Properties.
Choose the new window to select “Internet Protocol 4 (TCP/IPv4)” and then click the Properties button.
Click the checkbox for “Use the following DNS server addresses” in the new window.

Enter in 8.8.8.8 and 8.8.4.4
Finally, click OK and exit.
5] Run Network Adapter troubleshooter
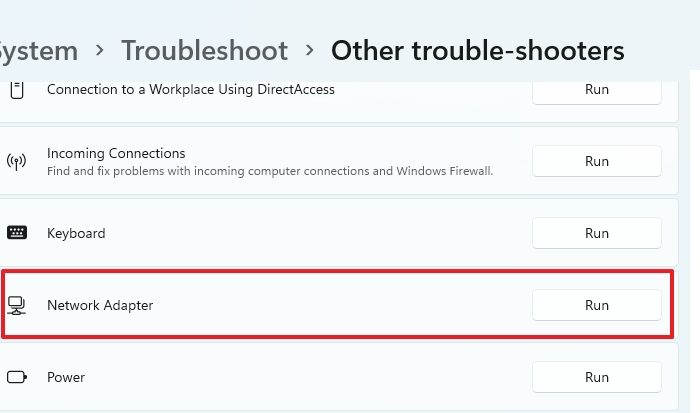
Windows offers built-in troubleshooters to resolve many problems that usually need manual intervention. Network Adapter troubleshooters can fix issues that either the WIFI or the Ethernet adapter might be facing, which are generally temporary.
- Open Windows Settings using Win + I
- Navigate to System > Troubleshoot > Other troubleshooters
- Locate Network Adapter troubleshooter
- Click on the Run button next to it
- It will launch the wizard and compress the process
- Once done, try to reaccess the website and see if you can reaccess the website.
6] Run Internet Connections troubleshooter
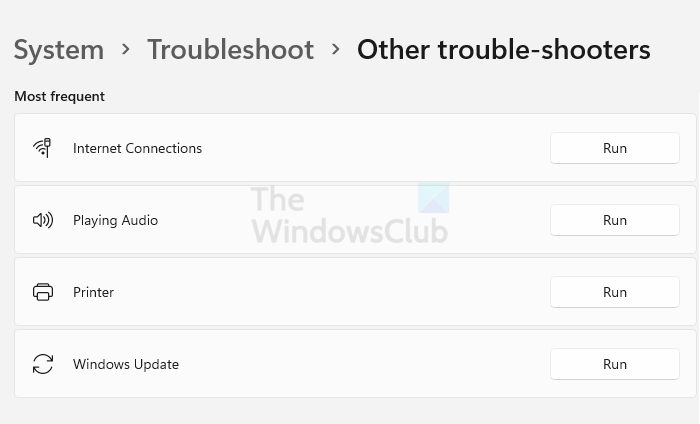
Next is the Internet Connections, which allows you to check if your PC can connect to the internet. The default is setting checks with the Microsoft website, but you can add the one you cannot access. It will then perform the troubleshooting for that website and might fix it or give you tips on what is wrong with it.
Go to Windows Settings > System > Troubleshoot > Other troubleshooters. Locate and run the Internet Connections troubleshooter. Follow the wizard to complete the process, and once done, check if you can access the website.
7] Reset Network
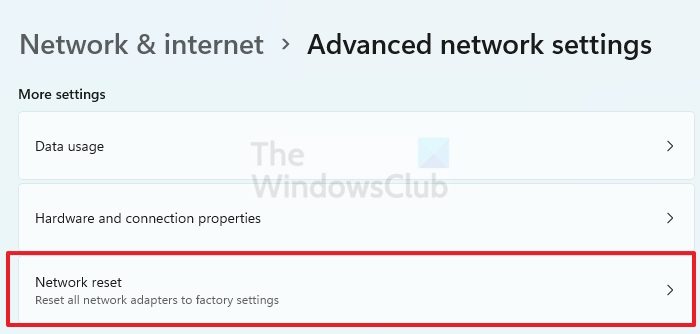
The next step is to reset the network adaptor by reinstalling all the adapters to set other networking components to their original settings. It is available as part of Windows Settings.
Navigate to Network & Internet > Advanced network settings > Network reset. Click on the Reset now button, and let it complete the process. Once done, you will need to reconnect to the network again and change any settings.
Read: Your computer appears to be correctly configured, but the device or resource DNS server is not responding
How do you reset your DNS on Windows PC?
You can run ipconfig /flushdns command on the terminal with admin permission. Windows will execute the command to renew the DNS cache every time a network request is made.
Read: Your DNS Server might be unavailable
How do you find the IP address of a website?
You will have to use online domain tools to find a website’s IP address, but it may not be the actual IP address. Many websites use proxy services that hide the primary IP address to protect the website from unauthorized access.
Leave a Reply