Windows 11 is one of the hottest topics in the tech world, some love this new iteration of Windows, whereas, some don’t. Whatever the case is, you should at least try using it before coming to a conclusion. A lot of users with ARM-based processors are deprived of trying Windows 11, well, not anymore. We are going to see how you can download and install Windows 11 ARM with ISO.

Is Windows 11 available for ARM?
Yes, Windows 11 is available for ARM-based devices. In fact, even Windows 10 was available for these kinds of devices. One thing to note here, the latest iteration of Windows uses the new ARM64EC application binary interface (ABI) for ARM devices. This allows developers to make sure the new OS runs with x64 devices with no loss in speed.
Says Microsoft, ARM64EC is a new application binary interface (ABI) for Windows 11 on ARM that runs with native speed and is interoperable with x64. An app, process, or even a module can freely mix and match ARM64EC and x64 as needed. The ARM64EC code in the app will run natively while any x64 code will run using Windows 11 on ARM’s built-in emulation. The ARM64EC ABI differs slightly from the existing ARM64 ABI in ways that make it binary compatible with x64 code. Specifically, the ARM64EC ABI follows x64 software conventions including calling convention, stack usage, and data alignment, making ARM64EC and x64 interoperable. Apps built as ARM64EC may contain x64 code but do not have to, since ARM64EC is its own complete, first-class ABI for Windows.
If you are not getting the official updates, check the steps mentioned in this post to install Windows 11 ARM on your system.
You should also know that there are some limitations in the Windows 11 ARM Operating System. We have mentioned them below.
- Your PC may not be able to use Windows Fax and Scan.
- Since it is an ARM-based PC, there are some third-party apps, games, and secure software that may fail to work on it.
- Any game which uses OpenGL version 3.4 or later won’t run.
- Some devices won’t work properly because of a lack of drivers.
If you are ok with these limitations, go ahead and install the ARM-based Windows 11.
Download and install Windows 11 ARM with ISO

Before installing Windows 11 ARM with ISO, you need to first get the required ISO file. Follow the prescribed steps to download the ISO of Windows 11 ARM.
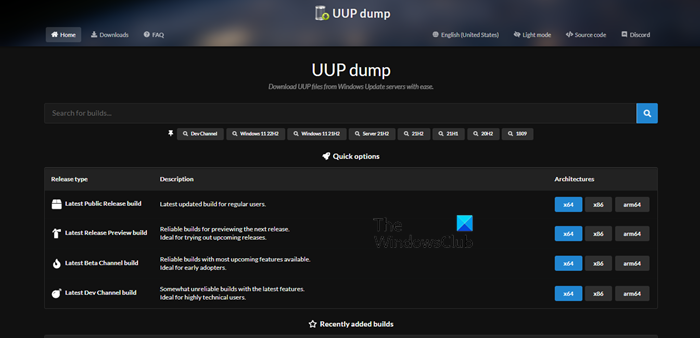
- Open your browser and visit uupdump.net.
- Search “Windows 11” in the search box.

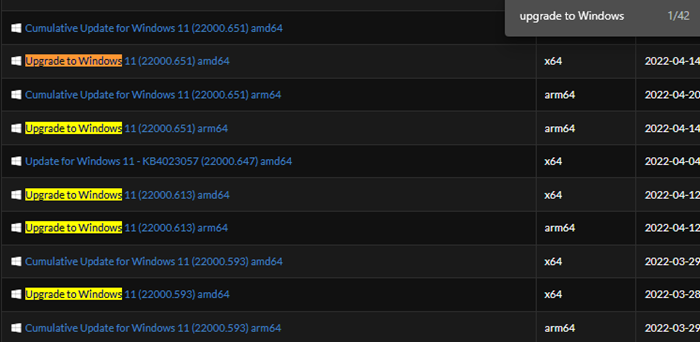
- Hit Ctrl + F, type “Upgrade to Windows 11” and click on a version of Windows 11 ARM.
- Select a language and click Next.
- Select Edition and click Next.

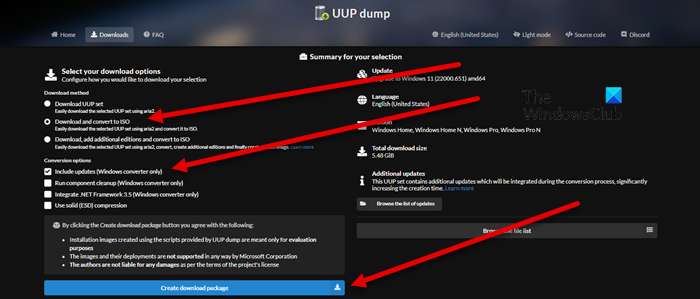
- Under Download methods, select Download and convert to ISO, and under Convesion options, select Include updates.
- Click on Create download package.
- A Zip package will be created.
- Extract it and click and open uup_download_windows.cmd file
- The script will run and download the required files.
- After completion, the terminal will turn blue, which indicates that the ISO building is in process.
- Finally, you need to hit 0 to exit.
An ISO will be saved where you extracted the ZIP folder.
Now, you can use this ISO to create a bootable Windows 11 installation to install it on a virtual machine. We have a guide to install Windows 11 on VMWare, VirtualBox, and HyperV, but you can install it on any virtual machine platform.
Also Read: How to install Windows 11 on Mac using Parallels Desktop
How do I download and install Windows 11 ISO?
To download Windows 11 ISO, follow the prescribed steps.
- Visit microsoft.com.
- Go to the Download Windows 11 Disk Image (ISO) section.
- Expand the drop-down list and choose Windows 11.
- Click the Download button.
- Select a language from the list and click on Confirm.
- Click the 64-bit Download button.
That’s how you can download Windows 11 ISO. To install it on your system, you need to create a bootable USB. So, plug a USB into your system and download and open Rufus. Open the app, in Boot Selections, select Disk or ISO Image, click on Select, then, go to the location where your ISO file is stored and add it. Select other required options and click Start. After creating a bootable USB, go and change the boot order from BIOS to boot from USB. Then, follow the on-screen instructions to install Windows 11 on your system.
Also Read: How to download Windows 11/10 ISO without using the Media Creation Tool.
Leave a Reply