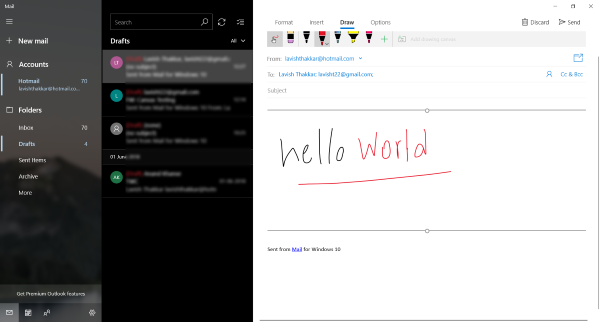
Email has been the most formal mode of communication, and it is usually difficult to express everything in writing. Also, with the generation of devices that support touch and pen-based inputs, typing everything down does not seem obvious. If you own one of those Microsoft Ink compatible pens or any other pen-based input, you can easily leverage the feature we are going to talk about in this post. In this post, we’ve covered the Draw feature in Windows Mail app that lets you quickly send a handwritten note or a drawing over the email.
How to Draw in Windows Mail app

The feature is compatible with all sorts of inputs. You can use a pen, touch or a pointing device such as a mouse. It is a great add-on to the Mail application and really lets the users take advantage of their Surface Pens. You can use Draw feature to send drawings, handwritten notes, or just anything else. Sometimes, it is intuitive and even faster than typing everything in an email.
To use the Draw feature, all you need to do is open your Mail app. Now click on New mail button and go to the body section. Click on the Draw tab adjacent to Format and Insert tabs. Now click on ‘Add drawing canvas’ to create a new canvas. The newly created canvas will be highlighted, and all the pen tools will be enabled. Now you can scribble anything inside this canvas.
There are a few default pen options available which are quite enough for most of the tasks. You get a black and a red pen. Then you have a slightly thicker galaxy (blue) pen followed by a yellow highlighter. Remember that this is not just it, you can easily create custom pens. Click on the plus icon and choose the type of tool you want to create, a pen or a highlighter. Choose the size of the tip and then select a color. A large variety of colors is available, and you can always click on More Ink Colors to get a complete set. Once you’ve created a custom pen, you can use it on any drawing canvas.
Before you start drawing something, you might need to follow an additional step if you want to draw using a mouse or touch. Click on the first button in the toolbar to enable drawing with mouse or touch-based inputs.
You can add as many drawing canvases to the email and draw as much as you want. Also, the drawings are compatible with all the email clients that support images. The drawings are first converted to PNG files and then attached to the email. So anyone who is not using the Mail app can also view drawings easily. If your recipient is also using Windows 10 Mail App, he/she can draw over the existing drawing to make some changes and send it back to you.
The draw is a great feature for the Mail app. It can save your time that goes into writing every detail in the e-mail. Also, it makes it simpler to share quick notes, guides, diagrams or simply anything. If you are an avid Windows Ink user, you must try this feature out in Mail App.
Read next: Enable or Disable Focused Inbox feature in Mail App.
Leave a Reply