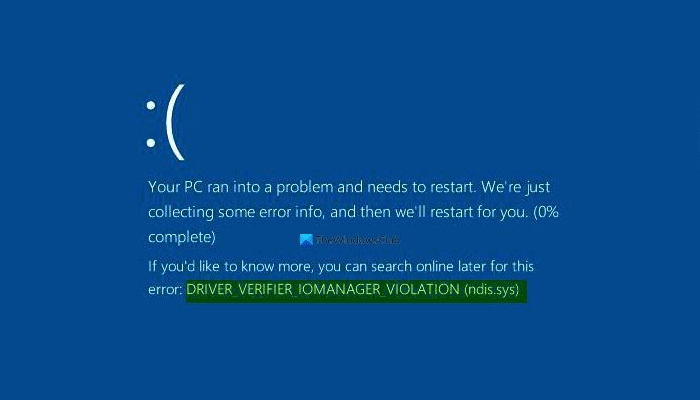
While using a Windows 11/10 PC, you may encounter different errors. If you encounter a DRIVER VERIFIER IOMANAGER VIOLATION Stop Error, bug check value of 0x000000C9, on your Windows 11/10 PC, then know that this stop error occurs when a system file or drive like ntoskernel.exe, hidclass.sys, ndis.sys, etc. gets corrupted or crashes.

Your PC ran into a problem and needs to restart. We’re just collecting some error info, and then we’ll restart for you (0% complete)
If you’d like to know more you can search online later for this error: DRIVER_VERIFIER_IOMANAGER_VIOLATION (ndis.sys)
In this guide, we have explained some fixes that will help you to get fix this issue. So, let’s get started.
DRIVER VERIFIER IOMANAGER VIOLATION
The following potential fixes will be carried out to fix the DRIVER VERIFIER IOMANAGER VIOLATION error on Windows 11/10:
- Delete Driver Verifier Manager settings
- Remove the newly installed software
- Update the device driver
- Perform a Clean Boot
- Update BIOS or firmware
- Restore your System to an earlier point
If you can log in normally, good. Otherwise, you can boot into Safe Mode, enter the Advanced Startup options screen, or use the Installation Media to boot to be able to carry out these instructions.
It is always good to create a system restore point first.
Let’s now see them in detail.
1] Delete Driver Verifier Manager settings

In order to fix this issue, delete the driver verifier manager settings and see if it helps.
To get it started, right-click on the Start menu and choose Run from the menu list.
In the Run dialog box, type verifier and press enter.
Click on the Yes button for the UAC Prompt you get on your screen.
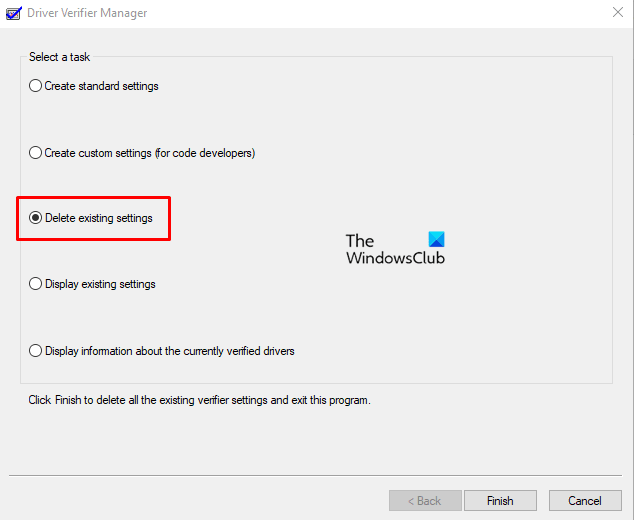
In the Driver Verifier Manager window, select Delete existing settings, and click the Finish button.
Restart your computer and check if it solves the problem, if not then proceed to the next solution.
2] Remove the newly installed software
If you have recently installed any software on your PC then remove it temporarily and see if this makes the error solved.
To remove the software, open the control panel first.
Once it opens, locate Programs and Features from the list of control panel items and then open it.
Now search for the newly installed programs and then uninstall them one by one.
After the successful deletion, restart your PC and check for the error.
If this solution fixes the problem, replace them with other applications.
3] Update the driver
As we mentioned earlier, a corrupted.missing, or crashing system file or drive file can cause this error to occur. So you need to update, roll back, or reinstall the driver that is mentioned along with the error message. In our image ndis.sys is mentioned. So you need to search on the internet to find out what ndis.sys is.
Ndis. sys is a Windows system file related to Network Driver Interface Specification. Being essential part of the Windows operating system, ndis. sys is digitally signed by Microsoft and is located in the \System32\drivers folder.
In this case, you need to update, roll back, or reinstall the Network drivers. Running Windows Update, using Device Manager, or using the built-in tool of the OEM are the best options.
You can use Windows Settings to update drivers as well. For that, press Win+I and go to Windows Update.
Click on Advanced options > Optional updates > Driver updates.

If any driver update is available, it is suggested to install that.
If you have an older version of Windows, you can follow the procedure as follows:
- Right-click on the Start button and select Device Manager from the menu list.
- In the Device Manager window, locate the concerned device driver from the list.
- Once you find it, right-click on it and select the Update driver option from the context menu.
Thus you need to update, rollback, or reinstall the mentioned offending driver.
If you see an exe OS file mentioned, you may want to run System File Checker.
4] Troubleshoot in Clean Boot State

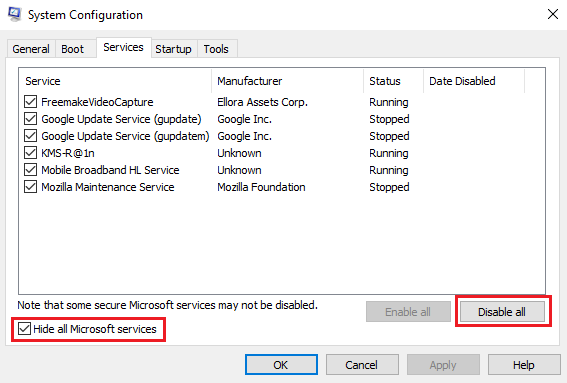
You can troubleshoot further manually by performing a Clean Boot. A Clean Boot starts a system with minimal drivers and startup programs. When you start the computer in clean boot, the computer starts by using a pre-selected minimal set of drivers and startup programs, and because the computer starts with a minimal set of drivers, some programs may not work as you expected.
Clean-boot troubleshooting is designed to isolate a performance problem. To perform clean-boot troubleshooting, you must disable or enable one process at a time, and then restart the computer after each action. If the problem goes away, you know that it was the last process, which was creating the problem.
5] Update BIOS or firmware
In case, you’re still encountering the issue, you can try to update your system BIOS or firmware on your computer.
6] Restore your System to an earlier point
If none of the above methods help you to fix this, restore your system to an earlier point. This will roll back your Windows to previous working conditions when your system was working correctly.
Let us know if any method helps to fix this issue.
Read: Fix KERNEL AUTO BOOST INVALID LOCK RELEASE BSOD on Windows
How to fix BSOD DRIVER_VERIFIER_DMA_VIOLATION?
To fix the DRIVER_VERIFIER_DMA_VIOLATION error in Windows 11/10 PC, you need to disable the Driver Verifier first. Then, you can update the SSD driver, update your BIOS, run the System File Checker, use the DISM tool, etc. If nothing works, you need to reset your PC.
How to disable Driver Verifier in BIOS?
To disable the Driver Verifier in BIOS, you need to delete all the settings. For that, open the Driver Verifier Manager and choose the Delete existing settings option. Next, click the Finish button. You can do the same through Advanced Startup as well. For that, you need to enter this command: verifier /reset.