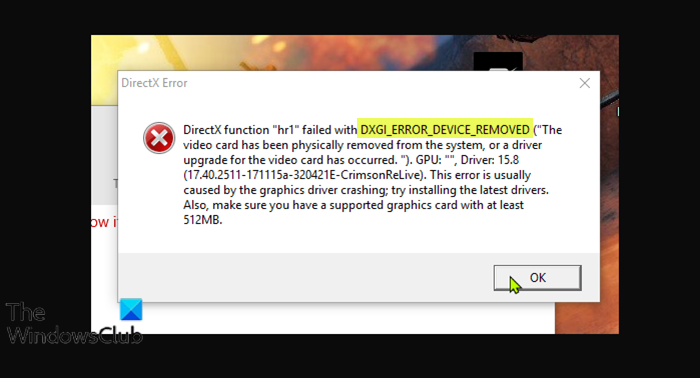
PC gamers are reporting the issue whereby while playing any game on their Windows 11 or Windows 10 computer they encounter an error which causes the game in play to end abruptly. The ensuing error prompt indicates DXGI_ERROR_DEVICE_REMOVED. In this post, we provide the most adequate solutions to this issue.

What is a DirectX error?
A DirectX error that you may encounter on your Windows PC is related to DirectX, and generally indicates your PC has experienced a DirectX failure. If you receive such error message, to resolve the issue, ensure you have the latest version of DirectX installed on your system.
DXGI_ERROR_DEVICE_REMOVED error
If you’re faced with this DXGI_ERROR_DEVICE_REMOVED issue, you can try our recommended solutions below in no particular order and see if that helps to resolve the issue.
- Restart graphics adapter driver
- Update graphics driver
- Manually install/update DirectX
- Troubleshoot using DirectX Diagnostic Tool (DxDiag)
- Modify the registry
- Turn off Shadow play
- Disable Anti-Aliasing feature
Let’s take a look at the description of the process involved concerning each of the listed solutions.
1] Restart graphics adapter driver
Since this DXGI_ERROR_DEVICE_REMOVED issue can be caused by the graphics/video card driver crashing on your Windows 11/10, you can simply restart the graphics adapter driver. If it’s not a serious or fatal driver issue, then this action will get you up and running; otherwise, continue with the solutions below.
2] Update the graphics driver
This solution requires you to update your graphics card drivers. You can either update your graphics drivers manually via the Device Manager, or you can get the driver updates on the Optional Updates section under Windows Update. You may also download the latest version of the driver from the video card hardware manufacturer’s website.
If updating the drivers didn’t help, you can completely uninstall the graphics driver using Display Driver Uninstaller, and then download the latest version of the driver and install it on your Windows PC.
3] Manually install/update DirectX
This solution requires you manually download and install DirectX and see if that helps to resolve the issue. You may also update the current version of DirectX running on your Windows PC. Proceed with the next solution if the issue is unresolved.
4] Troubleshoot using DirectX Diagnostic Tool (DxDiag)
This solution requires you to troubleshoot the DirectX issue caused by the video game using the DirectX Diagnostic Tool (DxDiag).
5] Modify the registry

Since this is a registry operation, it is recommended that you back up the registry or create a system restore point as necessary precautionary measures. Once done, you can proceed as follows:
- Press Windows key + R to invoke the Run dialog.
- In the Run dialog box, type regedit and hit Enter to open Registry Editor.
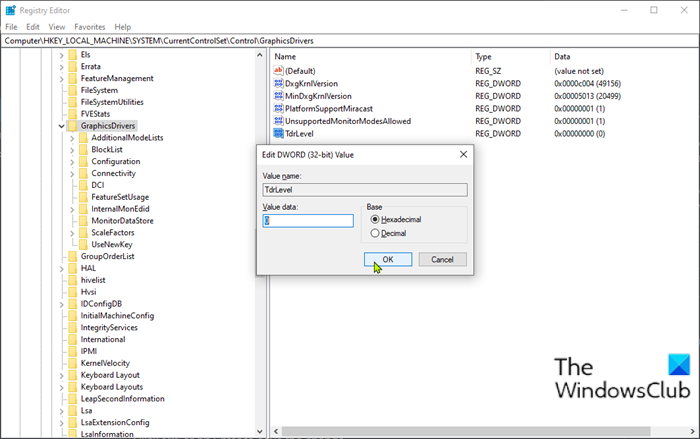
- Navigate or jump to the registry key path below:
Computer\HKEY_LOCAL_MACHINE\SYSTEM\CurrentControlSet\Control\GraphicsDrivers
- At the location, right-click on the blank space on the right pane and then select New > DWORD (32-bit) Value to create the registry key and then rename the key as TdrLevel and hit Enter.
TdrLevel specifies the initial level of recovery. The default is to recover on timeout, which is represented by value 3. The default value is 2 seconds. TDR is the acronym for Timeout Detection and Recovery – a feature of the Windows operating system which detects response problems from a graphics card, and recovers to a functional desktop by resetting the card.
- Double-click on the new entry to edit its properties.
- Input 0 in the Value data field.
- Click OK or hit Enter to save the change.
You can now exit the Registry Editor and restart your PC. On boot, check if the issue is resolved. If not, continue with the next solution.
6] Turn off Shadow play
Most of the affected users have NVIDIA graphics cards installed on their Windows computers – NVIDIA Shadow play is used to capture in-game footage on supported systems.
This solution requires you to turn off Shadow play. Here’s how:
- Press the Windows key, then type geforce experience.
- Select GeForce Experience from the search result.
- In the GeForce Experience window, go to the General tab.
- Now, toggle the button for IN-OVER OVERLAY to Off.
- Exit the GeForce Experience window.
Check if the issue is resolved. If not, try the next solution.
7] Disable Anti-Aliasing feature
To disable Anti-Aliasing feature in NVIDIA control panel on your Windows PC, do the following:
- Open NVIDIA control panel.
- In the control panel, click on Manage 3D settings on the left pane.
- Click on Global settings.
- Next, click on the Antialiasing-FXAA feature and set it to Off.
- Repeat for all other listed Antialiasing features.
- Click Apply when done.
- Exit NVIDIA control panel.
- Restart PC.
Hope any of these solutions work for you.
How do I fix DXGI_ERROR_DEVICE_HUNG?
While gaming on your Windows 11/10 PC and encountering the error DXGI_ERROR_DEVICE_HUNG, it’s most likely due to overclocked graphics cards for higher performance. Other reasons, like outdated drivers or malfunctioned system files, can trigger this error. You can try several fixes, including updating your graphics adapter drivers and manually installing/updating DirectX to the latest version.
Leave a Reply