If your cursor gets stuck while dragging it from one display to another, you need to turn on Ease cursor movement between displays settings. After doing so, your cursor will move to the nearest position on the second display, even if they do not share the same border. You can enable or disable this setting using Windows Settings and Registry Editor.

How to Ease cursor movement between displays using Windows Settings
To ease cursor movement between displays in Windows 11 using Windows Settings, follow these steps:
- Press Win+I to open Windows Settings.
- Head to the System > Display.
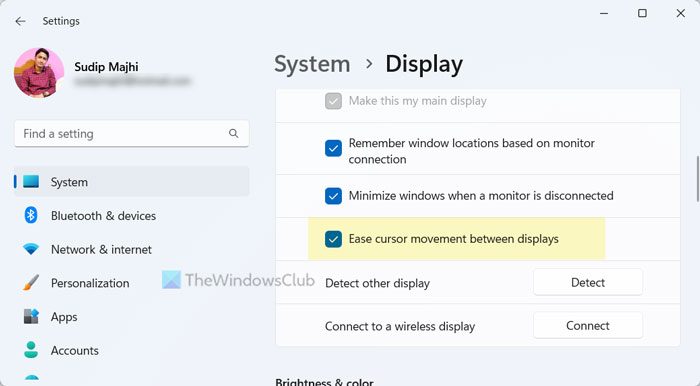
- Expand the Multiple displays section.
- Tick the Ease cursor movement between displays checkbox.
To learn more about these steps, keep reading.
To get started, you need to open the Windows Settings panel. Although there are many methods, you can press Win+I to open it quickly. Then, make sure that you are in the System tab. If so, click on the Display menu on the right-hand side.
Here, you can find an option called Multiple displays. You need to click on it to expand the corresponding section.
Following that, find the Ease cursor movement between displays option and tick the respective checkbox to turn it on.

However, if you want to turn it off, you need to remove the tick from the checkbox.
How to Ease cursor movement between displays in Windows 11 using Registry
To ease cursor movement between displays in Windows 11 using Registry Editor, follow these steps:
- Press Win+R to open the Run prompt.
- Type regedit > click the OK button > click the Yes button.
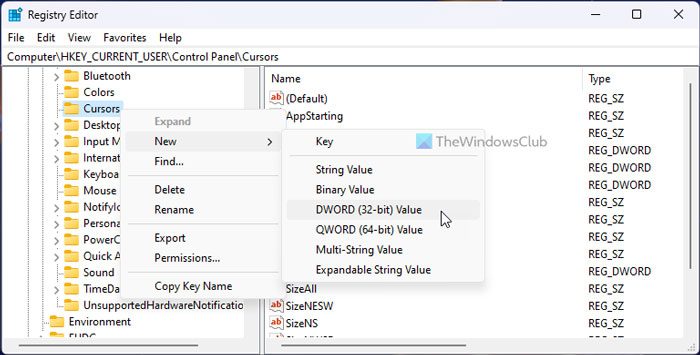
- Navigate to Cursors in HKCU.
- Right-click on Cursors > New > DWORD (32-bit) Value.
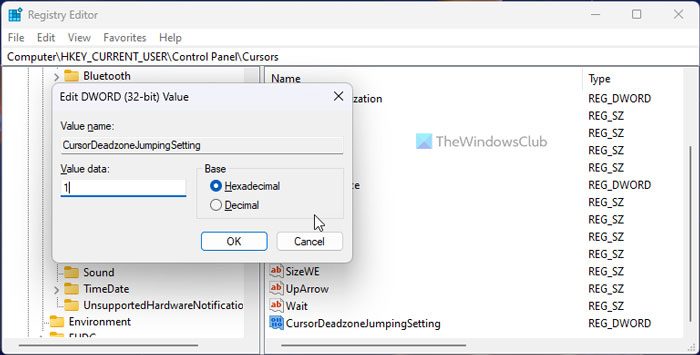
- Set the name as CursorDeadzoneJumpingSetting.
- Double-click on it to set the Value data as 1 to turn on.
- Keep the Value data as 0 to turn off.
- Click the OK button.
- Restart your computer.
Let’s delve into these steps to learn more.
First, you need to open the Registry Editor. For that, press Win+R > type regedit > click the OK button. Then, click on the Yes button on the UAC prompt to open it on your PC.
Once the Registry Editor is opened, navigate to the following path:
HKEY_CURRENT_USER\Control Panel\Cursors
If you can find a REG_DWORD value named CursorDeadzoneJumpingSetting, you do not need to create it. Otherwise, you need to create it manually. For that, right-click on the Cursors key, select New > DWORD (32-bit) Value, and set the name as CursorDeadzoneJumpingSetting.

By default, it comes with a Value data of 0. If you want to turn off this setting, keep it that way. Otherwise, double-click on it and set the Value data as 1 to turn it on.

Finally, click the OK button, close all windows, and restart your computer to get the change.
That’s all!
Read: Monitors showing different colors in dual monitor setup
How do I stop my cursor from jumping in Windows 11?
To stop your cursor from jumping in Windows 11, you need to check your mouse drivers first. If there is no such problem, you need to check the connection irrespective of the connectivity source. If you use a laptop, you need to change and check the touchpad sensitivity as well.
How do I allow my cursor to move between monitors?
There is no need to do anything if you want to allow your cursor to move between monitors. No matter whether you use Windows 11 or Windows 10, you can move your cursor from one to another without prior permission. The functionality gets activated immediately after connecting the second monitor.
Leave a Reply