Backing up important data is always a good approach so that it can be easily recovered if something goes wrong. However, it would be a tedious job to back up a folder manually. But, using a folder sync solution you can perform it relatively in an easy way. In this guide, we are going to introduce a simple and efficient tool to data back and to synchronize your folders. It is a quick, easy-to-use, and straightforward application named Echosync.
Echosync is a free data backup and folder synchronization software for Windows 10 that comes in an executable file format. To create the backup of your important data, this application uses differential synchronization. This software is currently available only in six languages i.e. English, French, Italiano, Spanish, German and Russian. To run the program, you must have the .NET Framework 4.7.2 or higher version.
Echosync Data Backup & Folder Synchronization software
This application doesn’t require the installation process in Windows, just like other traditional programs. That means you don’t need to install it to run the procedure. You only have to download the zip folder, extract it, and then run the Echosync.exe to get started. You can also run the EchosyncLauncher executable file to open the application with admin rights. It will let you sync files that are locked by any other process.
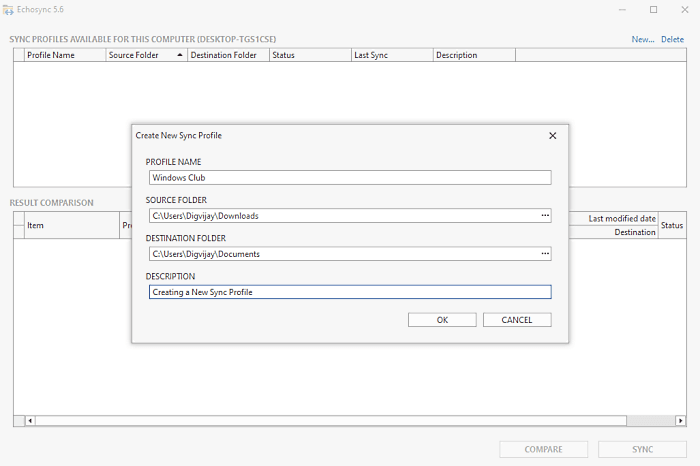
The first time you run the executable file, it prompts a pop-up menu to create a new sync profile. In the pop-up menu, you need to give a profile name, choose the source and destination folders, and type in any optional text description. Click the OK button to add the profile.
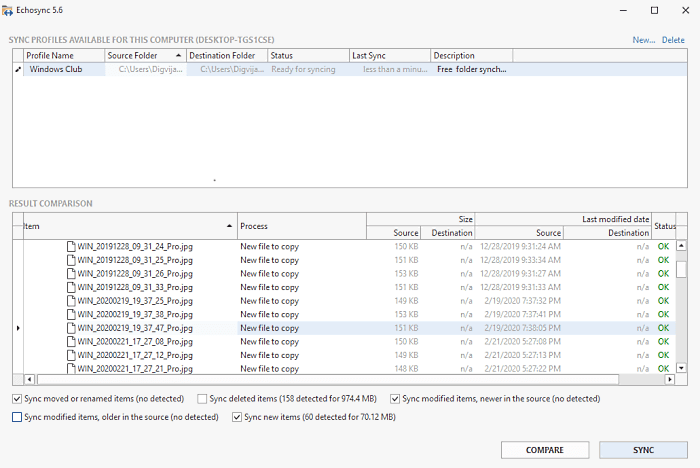
After creating the sync profile, you will get a pretty clear interface consisting of a two-pane design. The newly synced profiles you create are listed in the upper pane, where each profile shows the corresponding information, such as profile name, source and destination folder, status, last sync, and description.
To create a new sync profile, navigate to the top-right corner of the task box and click on the New link. Alternatively, you can use the Delete option to remove the selected profile.
If you move toward the bottom of the screen, you will get a few options related to folder synchronization.
Here, the first option lets you sync those moved or renamed files. To do this, simply click on its respective checkbox. In the same way, you can check the second option if you need to sync the deleted items.
However, the third option lets you sync modified items that are newer in the source directory. Likewise, the fourth option allows you to sync modified folders that are older in the source folder. The fifth and last option are used to sync a new item, which means items that are currently not available in any of the folders. Thus, it is now clear that synchronization is also a two-way process.
As you make your selection regarding sync items, click on the button below, Comparison. It will preview the results in the pane named Result Comparison. At this time, the application scans two folders to list the changes in the Result Comparison box.
The first column shows the folder name and respective path, along with the list of identified files. The second column shows those actions that Echosync has been directed to take. It all depends upon the action you choose in the toolbar, that is –
- New file to copy – It denotes that a file is missing from one of your directories.
- Missing file to delete – This option implies that a file that was removed from one folder will be duplicated
- Newer file to copy – It states that the file is now modified and now it is time to sync the new version.
- Older file to copy – This option reveals that an older version has been found in the source folder.
Moving ahead to the next column, you will get the size of the source file and destination file. And next, it displays the timestamp of both assigned folders. At the bottom of the screen, it shows the identified file number and its size as well.
If everything seems to be fine, then click on the Sync button. In a moment, the status of each file will be listed in the Results pane. If the status reads OK, a successful sync operation is needed. Once you successfully perform the synced process, you may need to manage it and view the synchronization log. To do it, simply right-click on the sync profile and select the respective options from the context menu.
If you like this freeware tool, then navigate to the official website and download it.

