You must have noticed that many programs installed on your machine often require administrative rights to start. Having admin rights in Windows 11/10/8/7 lets you make changes to the system that can affect all other users. In other words, any program that you decide to run as an administrator makes it more accessible to the computer when it runs.
The User Account Control notifies you before changes are made – not all changes, but only those which require administrator-level or elevated permissions. Whenever you run some programs, you may get to see the UAC Prompt first. Only after you give your consent, will the program run. This is a security feature in Windows. The key lies in understanding what can be done and how changes to admin rights or elevated privileges can be achieved without compromising security.
How to grant or get Elevated Privileges in Windows 11/10
Let us see the various options and scenarios.
- Open elevated Command Prompt window
- Make program always Run as Administrator
- Turn off Admin Approval Mode using Secpol
- Grant Elevated Privileges.
Let us see them in detail.
1] Open elevated Command Prompt window
While you can carry out many tasks using the CMD, some tasks required elevated privileges to carry out. Windows 8.1 lets you easily open Command Prompt (Admin) using the WinX menu. This post shows how you can run Command Prompt as an Administrator.
Read: How to create shortcut with elevated privileges to run a Program.
2] Make program always Run as Administrator
If you want to make a program always run with admin privileges, right-click on the program’s executable file, select Properties. Here, select the Run this program as an administrator box. Click Apply > OK. This post will show you in detail, how to make applications always Run as Administrator.
3] Turn off Admin Approval Mode using Secpol
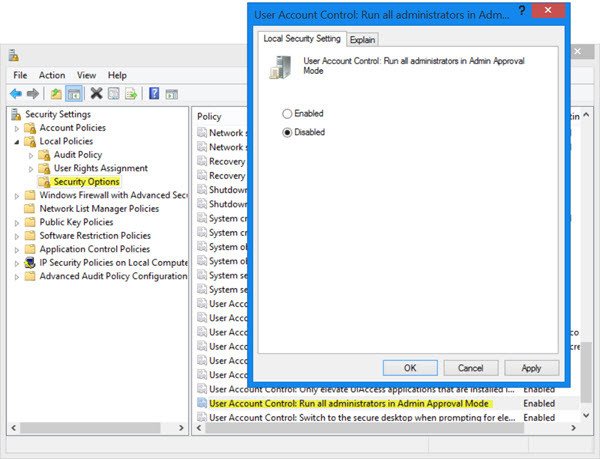
Run secpol.msc to open the Local Security Policy and navigate to Local Policies > Security Settings. In the right pane you will see a setting User Account Control: Turn on Admin Approval Mode. Double-click on it and select Disabled.

This policy setting controls the behavior of all User Account Control (UAC) policy settings for the computer. If you change this policy setting, you must restart your computer. The options are: (1) Enabled. (Default) Admin Approval Mode is enabled. This policy must be enabled and related UAC policy settings must also be set appropriately to allow the built-in Administrator account and all other users who are members of the Administrators group to run in Admin Approval Mode. (2) Disabled. Admin Approval Mode and all related UAC policy settings are disabled. If this policy setting is disabled, the Security Center notifies you that the overall security of the operating system has been reduced.
Mind you, this WILL downgrade your computer’s overall security!
4] Grant Elevated Privileges in Windows 11/10
A Standard user does not have any special permission for making changes in the server administration. He may not have the following privileges: Adding, deleting, modifying a user, shutting down the server, creating and administering Group Policy Object, modifying file permissions, and so on.
But a user with admin rights can do much more than the standard user. The rights, however, are granted after he is given elevated privileges for each level in one of the groups viz, Local Server, Domain and Forest.
When a user is added to one of the groups they get extra power to do more than the standard user. They get extra User Rights. These are the rights or configurations that control “who” can do “what” to the computer. When configured, each computer can support a unique set of administrators controlling different areas of that computer.
There are over 35 user rights per computer. Some of the most common user rights that control elevated privileges over a computer are listed below:
- Shut down the system
- Force shutdown of the remote system
- Log on as a batch job
- Log on as a service
- Backup and Restore files and directories
- Enable trusted for delegation
- Generate security audits
- Load and unload device drivers
- Manage auditing and security log
- Take ownership of files and other objects
The user rights are deployed using Group Policy (Local/Active Directory), which allows for consistent control of server access.
Moreover, each file, folder, and Registry key has an Access Control List (ACL). The list provides standard permissions, like
- Full control
- Modify
- Read
These standard permissions enable easier configuration over the objects. In short, ACL is a sort of list of users, groups, and/or computers that are granted permissions over the object associated with the ACL.
These how-to’s may also interest you: