This is a follow-up to my previous article on setting up outlook.com in desktop Outlook. Though I could not still figure out how to connect aliases with Outlook Connector for Hotmail, it is possible to set up outlook.com manually. I also found a way to set up outlook.com aliases in a way that you can send emails using aliases directly via Microsoft Outlook desktop.
This article discusses email settings for Outlook.com that you can use with Microsoft Outlook desktop. Now Outlook does almost everything automatically. Even though you choose the manual option, it does most things automatically.
Setting Up Outlook.com Email account With Outlook Desktop
You can go ahead and try setting up Outlook.com ID, using Outlook Connector for Hotmail. Some people said in the comments there, that they were successful in setting up the main account to function with Outlook desktop using the connector. In case it does not work for you, try the following.
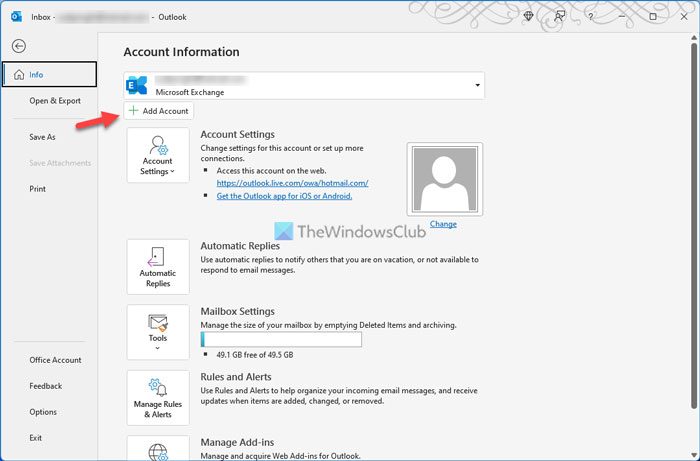
Click File Menu and then Add Account

In the Email Settings Wizard that opens, select the last option that says Manually Configure Server Settings…
Click Next
Select Internet E-Mail and then again click Next
You will get E-Mail Settings dialog box. Enter the following details:
1. Your name
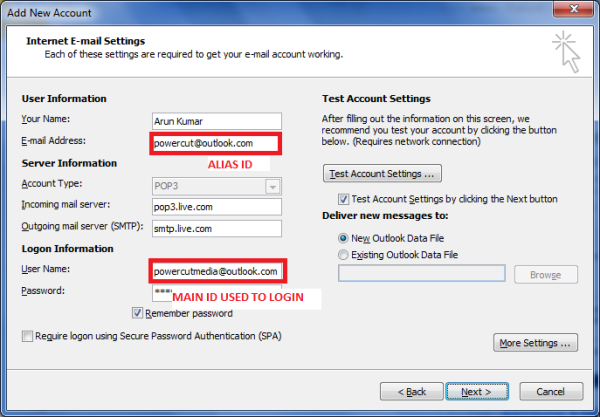
2. Your outlook.com email ID (the primary one)
3. Select POP3 under the drop down list next to Account Type
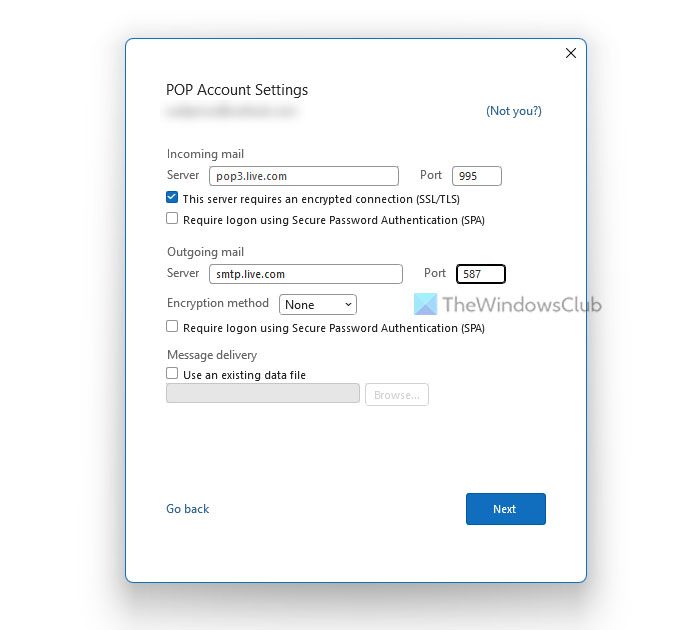
4. Incoming Mail Server will be pop3.live.com
5. Outgoing Mail Server will be smtp.live.com
6. Under Logon Information, enter your email ID (the main outlook.com ID that you entered at step 2 above). Remember to include the domain outlook.com. For eg, if your email ID is abc@outlook.com, enter complete abc@outlook.com in User Name
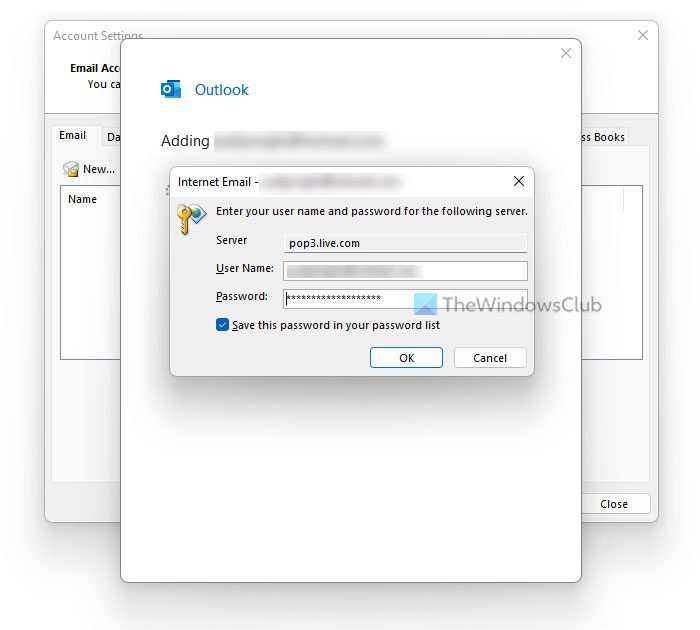
7. Type your password and check the box saying Remember Password

8. Click the More Settings… button
9. On the Outgoing Server tab, click to tick My Outgoing Server (SMTP) Requires Authentication
10. Make sure the radio button saying Use Same Settings As My Incoming Server is selected
11. Go to the Advanced tab
12. Click to select This Server Requires An Encrypted Connection (SSL)
13. The value in the Incoming Server (POP3) text box should change to 995
14. Enter 587 in the text box next to Outgoing Server (SMTP)
15. In the drop down list next to Use the Following Type Of Encrypted Connection, select TLS
16. Drag the slider under Server Timeouts to minimum 2 minutes

17. Click OK to go back to Email Settings dialog box
18. In the Email Settings dialog box, click Test Account Settings…
19. At this stage, Microsoft Outlook will check the settings you have entered by trying to log into the incoming server and by sending a test message via the outgoing server. If the tests are successful, you will get a Congratulations message.
20. Click Close to close the Test Account Settings dialog box
21. Click Next and Finish to close the Email Settings Wizard
With the above email settings for outlook.com, you can now receive and send emails using the primary ID you created with outlook.com.
Setting Up Outlook.com Alias With Microsoft Outlook Desktop
The procedure to create an account for alias is same as the above with minor changes. You need to enter your alias email ID in the text box saying Email Address and main ID in the text box saying User Name. See the image below for reference.

All the other email settings for outlook.com will remain the same as above. Once the alias account is created, you can easily send emails through the alias by selecting it in the From field of New Email window. If you face any problems setting up outlook.com aliases in Microsoft Outlook desktop, please let us know via the comment boxes below.
PS: I thank Jesse Guthrie for providing me with the settings for setting up Outlook desktop for outlook.com aliases.
What is the difference between Outlook.com and Outlook desktop?
The main difference between Outlook.com and Outlook desktop is the workflow. The former one works on the browser, while the Desktop version works on computers only. The second version is desktop software that you need to install in order to use the email account. It works as an email client for your Windows PC. On the other hand, Outlook.com is a website that allows users to use Microsoft accounts only.
How do I change settings in Outlook desktop app?
To change settings in Outlook desktop app, you need to open the app first. Then, click on the File menu and select Options. It opens the Outlook Options panel. From here, you would be able to change almost any setting as per your requirements. On the other hand, you can also use the Local Group Policy Editor and Registry Editor to make various changes.
If you think that I am prepared to do all that messing about just so I can be a unpaid tester for Microsoft to test their crap then, you are sorely mistaken. This should of been sorted out months ago. It is down to them to get their products right, in the first place NOT mine.
True. They should have enhanced Outlook connector to save us from trouble. But they did not. FYI, the above was tested by me on my computer before I blogged about it.
Also, it sounds odd that MS updated their social connector for Outlook 2013 but did not find time to update Outlook Connector for Outlook 2013. It simply won’t install on 2013?!
My pleasure and I’m happy to be a part of the community. :-)
How to add Outlook.com emails to your Outlook Desktop Client.
Requires Outlook Hotmail Connector:
For those wanting to add outlook.com emails to your desktop outlook client follow these steps:
1. Install Outlook Hotmail Connector: Use one of the methods below:
A. Download Outlook connector from here: https://office.microsoft.com/en-us/outlook-help/microsoft-office-outlook-hotmail-connector-overview-HA010222518.aspx
OR
B. Try to add a Hotmail/Live/Msn account to outlook. The account does not have to be real; just make sure it is a valid email format. Outlook will prompt you to install Outlook Connector
2. After installing close Outlook completely to enable the addon.
3. Open Outlook:
A. Outlook prompts and asks do you want to add a Hotmail account. Click Yes.
In the dialogue box that pops up, enter your outlook.com email (outlook@outlook.com) and name and password then select OK. In a few seconds Outlook will add your account and begin syncing your email.
OR
B. Go to File, select “Add Account”.
Then select “Manually configure server settings or additional server types” and select next.
On the next section select “Other” from the list, then from the box titled “Connect to a server type shown below”, select “Microsoft Outlook Hotmail Connector”.
Select Next.
4. On the next section put in your Name (John Doe), Email (johndoe@outlook.com), Password (johndoe), leave remember password ticked. You may also enter a name for your account under the advanced menu example (John Doe Work) this is what the account will be called in Outlook. Leave the reply E-mail box empty.
5. Click OK
6. Enjoy your outlook.com email from your Outlook client.
Thank you so much for posting your tip here.
Thank you for your blog. Unfortunately, I had done everything as you said, even before I found this site, but i still cannot send mail from an outlook.com alias. Interestingly enough, I think I was able to do it when I had Windows 7. Now, with a clean Windows 8 install, it does not work anymore. I thought I had the outlook connector, but i don’t. Any suggestions?
thanks
Outlook 2010 lets you use alias account if it is POP3 for sending emails (though POP shouldn’t matter as the outgoing is SMTP). Just make sure your alias account is signing in using the main ID & password…
I haven’t yet checked out 2013 as it needs a higher computer configuration plus I dont like it’s too plain look.
Windows OS shouldn’t make any different per what I know.
I did it as POP3 and it does not work. No idea why. It was working before.
What is the error you are receiving? Also, try sending using the outlook.com website and see if it (the alias) is working.
I use Outlook 2010 and have tried to set this up. POP3 works fine for receiving but the SMTP will not let me send email. Using all the recommended steps for Outlook.com server settings still has not worked to any working sent email. I am able to telnet into the SMTP server, STARTTLS, and then send EHLO mail from the SMTP server but cannot in Outlook 2010. Ideas???
thanks for all this and i can send no problem, but my problems is that when someone send to my alias address this does not sync with my desktop outlook 2010, but i can see the email on the outlook web version, please help.
Have you created a separate account for alias in desktop outlook? It should be still visible under main account.