You may notice when you launch the Outlook client on your Windows 11 or Windows 10 computer, your emails are not automatically sent or received as it should normally – all things being equal. This post is intended to help affected Microsoft 365 or Microsoft Office users facing similalr issues with the most adequate solutions.

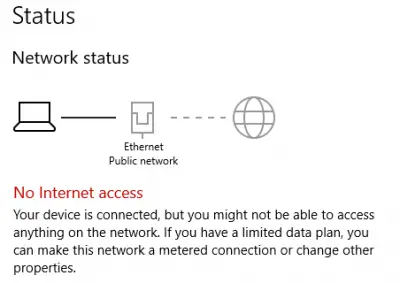
When you start Microsoft Outlook, and Outlook does not automatically perform a send and receive operation to download messages from the server, it could be mainly due to you are not connected to the internet or network.
Emails not automatically Sent or Received at startup in Outlook
If your email messages are not automatically sent or received when you startup Outlook on your Windows 11/10 PC, then you can try our recommended fixes in the order presented below to quickly and easily resolve the issue.
- Check Internet Connection on PC
- Make sure Outlook is connecting to the mail server
- Create a new Send/Receive group in Outlook
Let’s see the description of each of the presented solutions.
1] Check Internet Connection on PC

We start off with the most intuitive solution to the issue of your email messages are not automatically sent or received when you startup Outlook on your Windows 11/10 PC; which is to make sure your PC is not experiencing any sort of internet connectivity issues and as well check and fix any underlying network and internet connection problems you may have at your end. You can run the In you can run the inbuilt Internet Connections Troubleshooter for good measure.
Proceed with the next solution if you tick the box for this task.
Read: Email in Outlook not syncing in Windows; Repair Outlook account
2] Make sure Outlook is connecting to the mail server
Now, the next logical step to follow if you have confirmed you are not having internet or network connection problems at your end and on your device is to move your attention to the mail server. This requires you to make sure that the Exchange or mail server is not offline and fix Outlook is not connecting to the mail server issue you might be having on your Windows 11/10 device. You can also ping the server to determine whether the problem is occurring due to the server or host, and as well check the speed and different network connections (switch between Ethernet and Wi-Fi).
Read: How to make Outlook download all emails from the server
4] Create a new Send/Receive group in Outlook

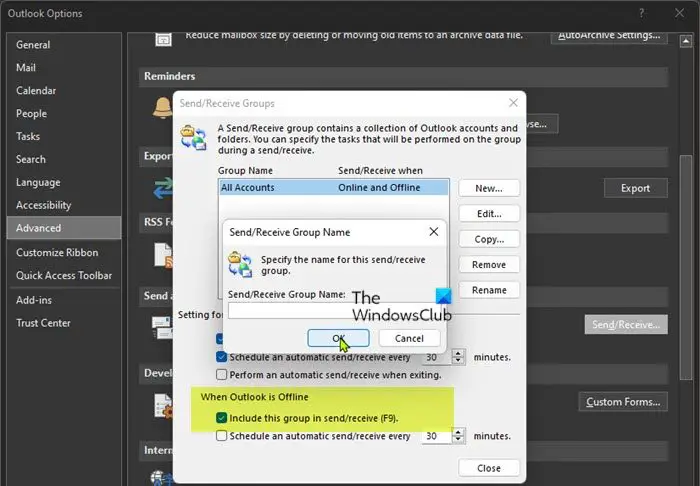
This behavior can occur because of a damaged Send/Receive group within Outlook. So, if you have eliminated internet and network connection issues on both client and server-side, but the issue in hand persists, you can create a new Send/Receive group in Outlook.
To create a new Send/Receive group in Outlook now, do the following:
- Select File > Options.
- Select the Advanced tab on the left navigation pane.
- Scroll down to the Send and Receive section.
- Click the Send/Receive button.
- In the pop-up, select the current group under Group Name.
- Click the Copy button.
- In the pop-up, under Send/Receive Group Name, type the new group name.
- Click OK.
- Now, under Group Name, select the old group name.
- Next, under both When Outlook is Online and When Outlook is Offline, uncheck the option for Include this group in Send/Receive (F9).
- Select Close.
- Restart Outlook.
To create a new Send/Receive group in Outlook 2007 and earlier versions, do the following:
- On the Tools menu, point to Send/Receive Settings, and then select Define Send/Receive Groups.
- Under Group Name, select the group, and then select Copy.
- Under Send/Receive Group Name, type the new group name, and then select OK.
- Under Group Name, select the old group name.
- Under both When Outlook is Online and When Outlook is Offline, clear the check box for Include this group in Send/Receive (F9).
- Select Close.
- Quit Outlook, and then restart Outlook.
That’s it! Hope this post helps you.
Related post: Body of Emails or Text is missing in Outlook
How do I turn on auto-send and receive in Outlook?
Go to the Send/Receive tab. Select the drop-down arrow and choose “Define Send/Receive Groups.”. Next, check the second box that says, “Schedule an automatic send/receive every 30 minutes.” This is how often Outlook syncs your mailbox, not how often you receive mail.
Read: Outlook Cannot send this meeting request
Why are my emails not coming through automatically?
If your emails are not coming through automatically, check to ensure Automatic Email Sync is enabled. You can check if this is why your emails aren’t syncing by enabling the auto-sync option in your email app. The app should then automatically look for new emails and let you know when a new message arrives. You can enable auto-sync from the settings menu of your email app.
Leave a Reply