In this article, we are going to discuss what is SNMP and how to install or enable and configure SNMP service in Windows 10. SNMP which stands for Simple Network Management Protocol is a standard internet protocol that is used to govern and manage communication amongst multiple networking devices connected over an IP. It enables organizations to monitor different networking devices including routers, workstations, modems, switches, servers, printers, etc. SNMP is already configured on most of the networking devices. And, once the protocol is enabled, device performance statistics are stored.
Let us now discuss the main component of SNMP.
Main Components of SNMP
Here are the key components of an SNMP-managed environment:
SNMP manager: It is the central system that manages and monitors the SNMP network. It is also known as Network Management Station (NMS) and runs on a host on the network. The SNMP manager basically queries the SNMP agent, obtains requests,
SNMP agent: It is a software process that gives the status and statistics of a network node when it receives an SNMP query. It is an important component in SNMP management that collects, stores, and transmits monitoring data to SNMP managers.
Managed Devices: These devices include all SNMP-enabled networking devices that you want to monitor, such as printers, routers, wireless devices, etc.
SNMP MIB: SNMP uses an extensible design with hierarchies defined as Management Information Base (MIB) that uses object identifiers (OIDs) network entity management. It is mainly defined as the format of information exchange in an SNMP management model. Each of the network servers has MIB files that are queried to collect monitoring data.
SNMP OID: OID aka Object Identifiers are organized in the MIB database in a tree structure where manageable features of all products are present.
SNMP Versions
There are basically three versions of SNMP that are:
- SNMPv1: The first version of SNMP protocol that is defined in RFC 1155 and 1157.
- SNMPv2c: This is the enhanced version and is defined in RFC 1901, RFC 1905, and RFC 1906.
- SNMPv3: The last version of SNMP as of now that also promotes remote configuration of SNMP entities. It is the most secure version as of yet and is defined in RFC 1905, RFC 1906, RFC 2571, RFC 2572, RFC 2574, and RFC 2575.
Basic SNMP Commands
Here are the main SNMP commands used in the network management model”
- GET: The SNMP manager sends GET requests to the managed devices to receive one or more values.
- GET NEXT: This command is used to retrieve the next OID value in the MIB tree
- GET BULK: This command is used to query and retrieve bulk data from a large MIB table.
- SET: To edit or add values of managed devices, this command is used by SNMP managers.
- TRAPS: Such command is started by an SNMP agent to send a signal to the SNMP manager when events occur.
- INFORM: Another command initiated by SNMP agent including a confirmation when SNMP manager receives the message.
- RESPONSE: This command carries back the values or signal of actions directed by the SNMP manager.
IT organizations can use dedicated SNMP monitoring software like PRTG Network Monitor or Spiceworks Network Monitor to manage and monitor networking devices and performance statistics. Here are some common uses of an SNMP monitoring tool:
- It is used to discover, manage, organize, and monitor network devices in an organization.
- It enables complete visibility of the performance of network devices.
- Analyze various statistics and information of connected network devices like connectivity, availability, performance, bandwidth, traffic, network usage graphs, and more.
- It allows to set up threshold limits for network usage.
- It lets you trigger alerts in case of exceptions or inconsistencies.
Now, let us check out how you can install and enable SNMP service and then configure it on Windows 10.
How to install and enable SNMP service in Windows 11/10
SNMP used to be a preinstalled feature in earlier versions of Windows. However, SNMP is now considered deprecated and is made an Optional Feature/ Feature on Demand (FOD) in Windows 10 version 1809 and later. Windows now recommend using Common Information Model (CIM) that is supported by Windows Remote Management.
In the latest Windows 10 builds, SNMP can be installed and enabled via the Settings app using the optional features option.
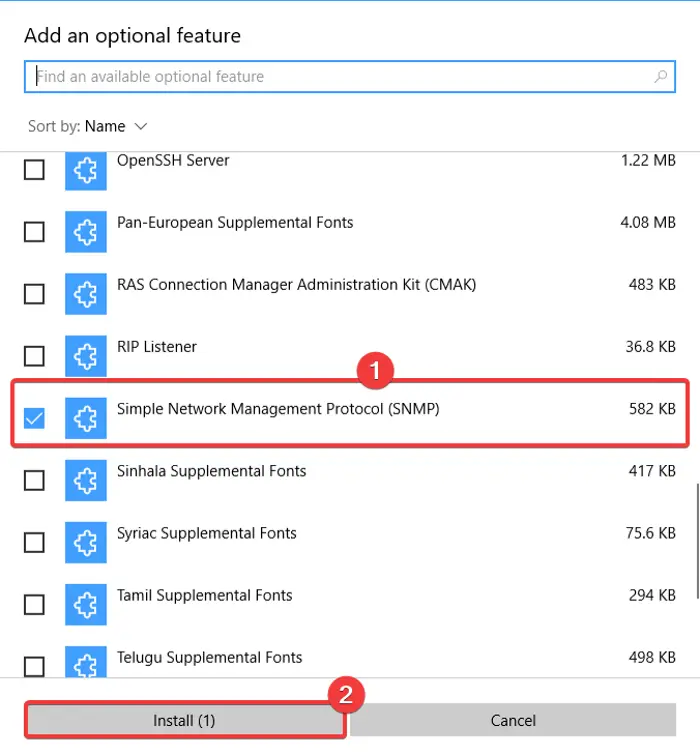
Here are the steps to enable and configure SNMP in Windows 10 using Settings:
- Click Windows + I hotkey to open the Settings App.
- Go to the Apps category and move to Apps & features tab.
- Tap on the Optional features button.
- On the new page, click on the Add a feature button.
- Scroll down to Simple Network Management Protocol (SNMP) and select it.
- Press the Install button to enable SNMP on your PC.
You can also use Control Panel to enable SNMP on your computer if you use an older Windows 10 build or even Windows 8.
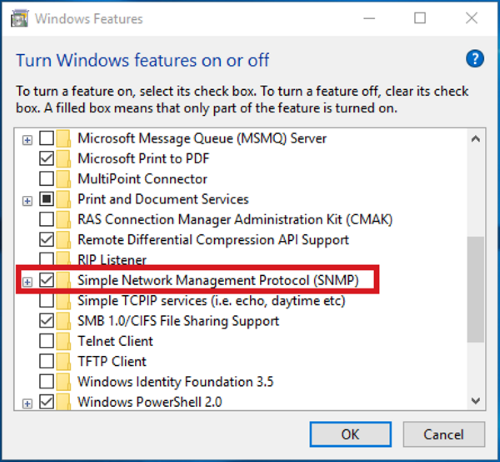
Simply use the following steps for that:
- Open Run using Windows + R and enter “control panel” in it and press Enter.
- Go to the Programs and Features and then click on the Turn Windows features on or off option.
- In the Windows Features list, select Simple Network Management Protocol (SNMP) and press OK to install it.
How to configure SNMP service in Windows 10
After installing, you need to configure the SNMP service in Windows 10. There are two main SNMP services that include:
- SNMP Service – main service to monitor and send information
- SNMP Trap – to receive trap messages from SNMP agents and forward them to SNMP management software.
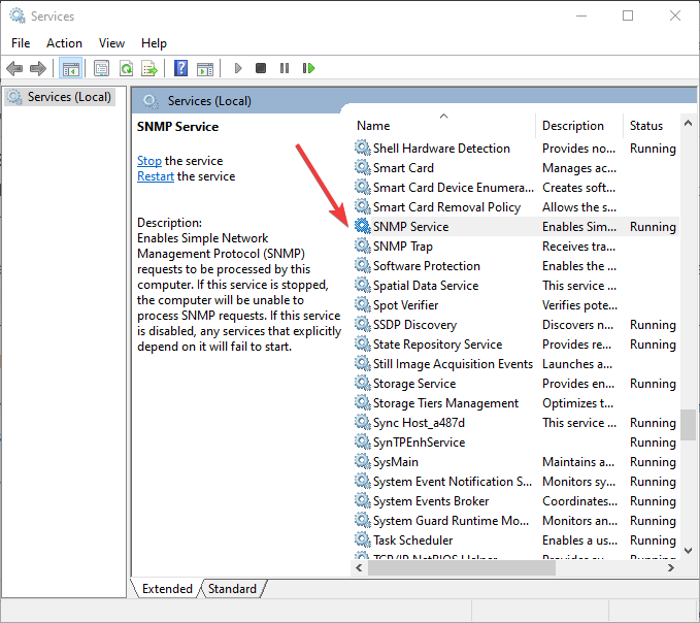
These services must be started automatically after SNMP installation. You can check and configure these from the Services Manager. Simply open the Services app by pressing Windows + R hotkey to evoke Run dialog and entering “services.msc” in it. In the Servies window, scroll down to the SNMP service in the list and see if it is running or not. If it is not running, simply click the Start button to start the SNMP service. Also, set its startup type to Automatic.
You can further set up various SNMP service properties including Agent, Security, etc. Just right-click on the SNMP service and select the Properties option.
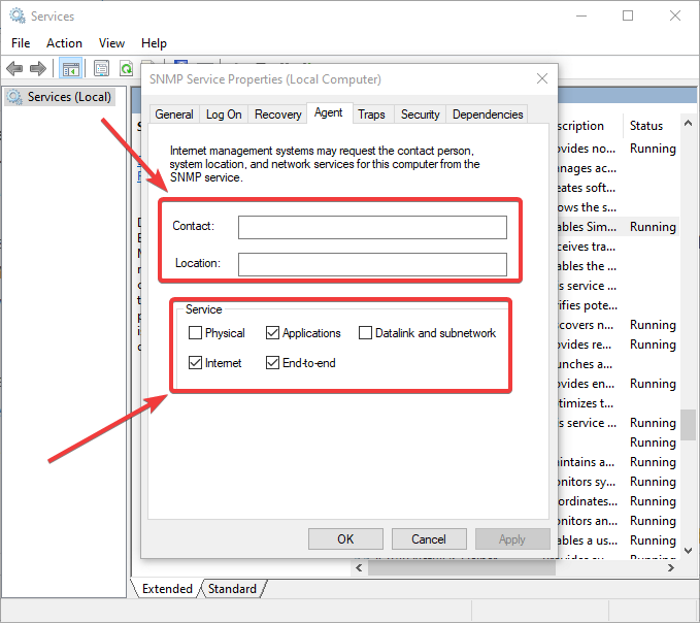
In the Properties window, go to the Agent tab where you can configure the SNMP agent information. You can add contact and location details to specify the user or administrator’s contact name and physical location of the computer. Furthermore, you can enable or disable five services from the list from which you receive monitoring data and send it to the monitoring device. These services include Physical, Applications, Datalink and subnetwork, Internet, and End-to-end.
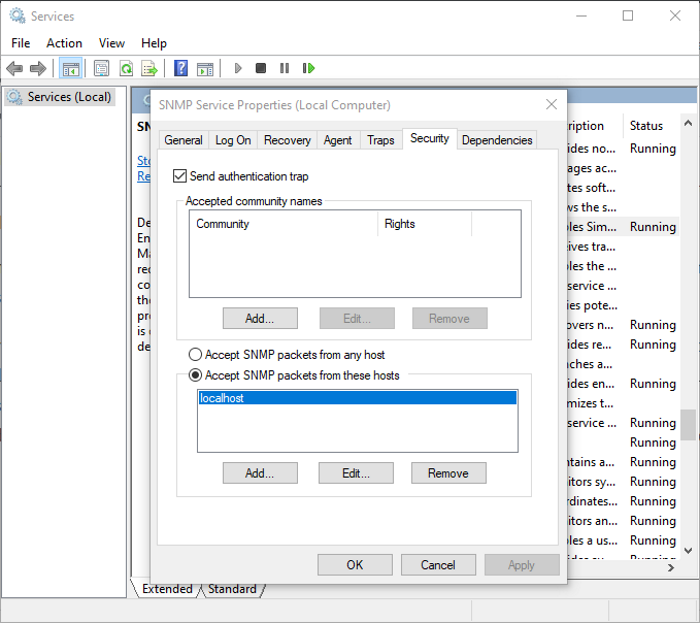
To configure some security-related settings for different SNMP servers, you can go to the Security tab in the Properties window. In the Accepted community names list, you can view and add SNMP hosts that are authenticated for sending SNMP requests. To add a community, click on the Add button and type the community name. You can provide None, Notify, READ ONLY, READ WRITE, or READ CREATE access to a particular community.
You can add a list of SNMP monitoring servers with IP addresses in the list of Accept SNMP packets from these hosts. This is to specify the servers from which SNMP packets are accepted. In case you enable Accept SNMP packets from any host option, no IP restrictions will be enforced on the SNMP agent to receive SNMP packets. This option is not safe and hence is not recommended on public computers.
IT admins can further configure some other settings related to SNMP and monitor all connected networking devices using SNMP management software and tools.
Hopefully, this article helped you learn about SNMP protocol and how you can enable and configure SNMP service in Windows 10.
Now read: Free Network and Internet Traffic Monitor Tools for Windows 11/10.
Leave a Reply