In this article, we will show you how to enable and disable the Find my Device option in Windows 11/10. Find my Device is an important feature of Windows 11/10 that helps you trace your stolen laptop, Xbox, and other accessories. By signing into your Microsoft account, you can also protect your data on your laptop remotely.

Find my Device works only if the location of your device is turned On. Once the location is turned Off, you cannot track your device. By modifying the group policy and registry values of your Windows 11/10 computer, you can disable this feature permanently so that no user can toggle the Find my Device option in the Settings.
Disable the Find my Device option in Settings
We will show you the following two methods:
- By using the Local Group Policy Editor.
- By using the Registry Editor.
1] Local Group Policy Editor
Local Group Policy Editor (gpedit.msc) is a Microsoft Management Console which is used to modify or configure the group policy settings on Windows 11/10. Windows 11/10 Home edition does not come with this tool. Hence, Windows 11/10 Home users can skip this method.

The instructions to disable the Find my Device option are listed below:
- Launch the Run dialog box by pressing Win + R keys on your keyboard. Type
gpedit.mscin it and press Enter. - In the Group Policy Editor, expand the Computer Configuration section.
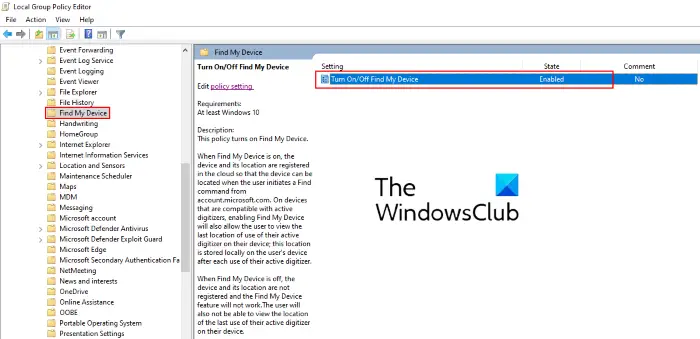
- Now, go to “Administrative Templates > Windows Components > Find my Device.”
- On the right side, you will find a setting, “Turn On/Off Find my Device.”
- Double click on it and select Enabled.
- Click Apply and then OK. This will save the changes you have made.
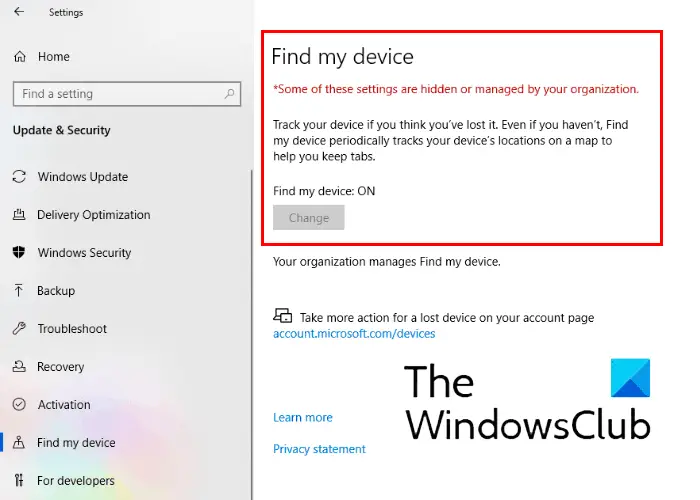
This will disable the “Change” button in Find my Device setting that prevents any person from toggling the location of your laptop. If you do not see any changes, restart your computer.
To revert the changes, go back to step 4 written above and select either Disabled or Not Configured.
2] Registry Editor
Like Group Policy Editor, Registry Editor can also be used to modify Windows 11/10 settings. Be careful while modifying the Registry Values. Serious errors can occur if you make any mistake while modifying the registry values. Hence, it is suggested to create a backup of the registry on your hard drive before you proceed. You can use this backup to restore the registry in case any error occurs.

Follow the below-listed steps carefully:
Launch the Run dialog box. Now, type regedit in it and click OK. Click Yes if you get a UAC (User Account Control) prompt.
In the Registry Editor, go to the following path:
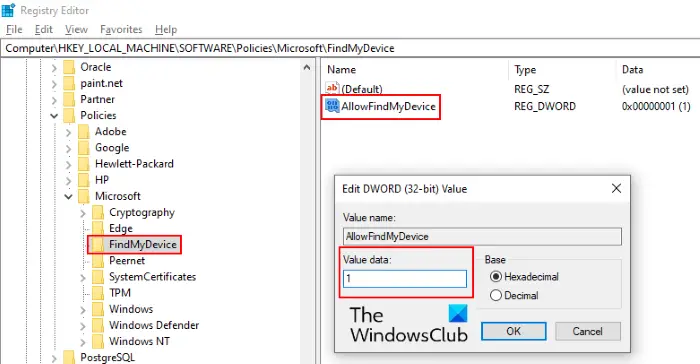
HKEY_LOCAL_MACHINE\SOFTWARE\Policies\Microsoft
Expand the Microsoft key and check whether it contains the FindMyDevice subkey or not. If not, you have to create it. To do so, right-click on the Microsoft key and select “New > Key.” Name this newly created key as FindMyDevice.
Select FindMyDevice subkey, right-click on the right pane, and select “New > DWORD (32-bit) Value.” Name this newly created value as AllowFindMyDevice. Double-click on it and enter 1 in the Value data box.
Click OK to save the changes that you have made.
This will disable the Find my Device option in Windows 11/10 permanently and the following message will be displayed:
Some of these settings are hidden or managed by your organization.
You can check this in the Update & Security section of the Settings app. If the Find my Device option is not disabled on your computer, restart it.
To enable the Find my Device option, go back to step 8 above and modify Value data to 0 or simply delete the AllowFindMyDevice value.
That’s it.
Read next: How to add Cast icon to Microsoft Edge Toolbar.
Leave a Reply