Power users tend to have too many tabs opened in Google Chrome, which can become cluttered at any moment. The big question is, what are the options to keep things clean and easy to navigate? At the moment, Chrome doesn’t have many options to play around with, but it does have one hidden in the Experiments section.
Enable Tab Groups in Chrome browser
This feature is called Tab Groups, and from our extensive use, we can say that it works like a charm. Now, we should point out that using the experimental flag shouldn’t be concerning since Google has enabled the feature officially for some. Therefore, if you have yet to get it, then going the experimental route is your best bet at this time.
Using Chrome’s new Tab Groups feature is super easy, but if you’re having problems learning how to use it, keep reading to improve your knowledge.
Let us look at this in more detail.
Right-click on tabs
To find out if you already have the feature, officially, then right-click on one of your tabs. If you see the words, “Add to new group”, then it’s there. If not, well, we have to take a few steps to get it up and running for you.
Experimental

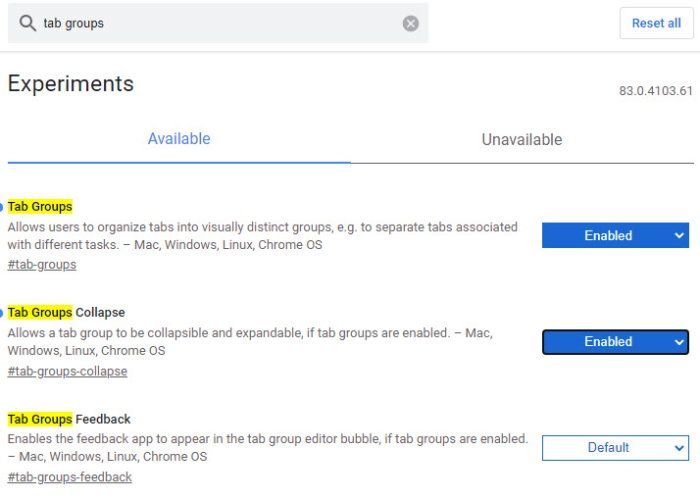
OK, so to do it via the experimental route, please type chrome://flags/ in the URL bar and hit the Enter key on your keyboard. Now, from the box that says Search Flags, please type Tab Groups, and automatically it should deliver the results with those words in the name, all highlighted in yellow.
We should now see two options. Tab Groups, and Tab Groups Collapse. Each is currently set to Default, so go on ahead and change the setting to Enable. There is no need to activate Tab Groups Collapse, but it’s a neat feature that complements regular Tab Groups quite well.
After completing everything, please click on the blue button below with the words, Relaunch to restart the Google Chrome web browser.
How to use Tab Groups in Chrome

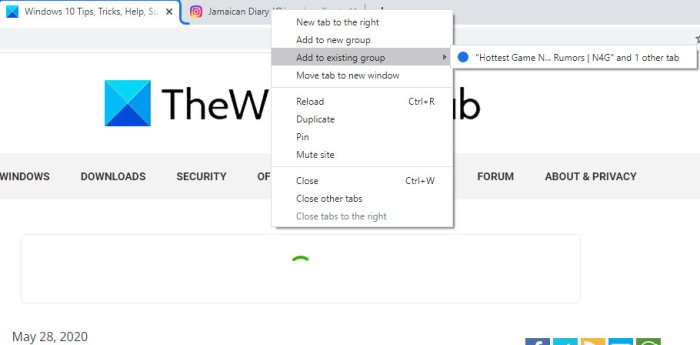
Once the restart is completed, things won’t look different at all, but that doesn’t mean nothing has changed. First, you will want to open your favorite websites, then right-click on one of the tabs. From there, you are required to select Add to new Group to create a tab group.
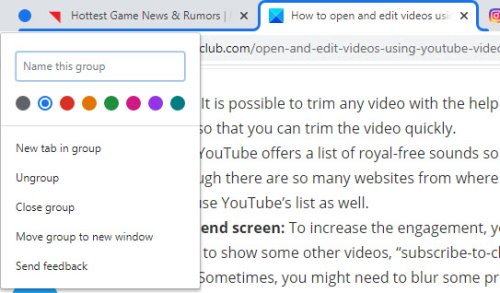
A colored circle will immediately appear next to the tab. You can change the color of this circle by right-clicking on it and selecting one of the eight colors available.
From here, users also have the ability to name the tab, ungroup, close the group, move the group to a new window, and more.

In order to add another tab to the group, right-click on the tab of choice, then select Add to Existing Group.
Bear in mind that users can create multiple groups and use colors to differentiate them.
Furthermore, the ability to merge groups into a single entity is not available as a choice, but we hope this will change in future updates.
Read: How to enable and use Tab Groups in Microsoft Edge.