Checkpoints allow you to save the state of your virtual machine. You can revert your machine’s state when required using the checkpoints. In this post, we will discuss how to enable, create, rename, delete, and restore Checkpoints in Hyper-V.
Hyper-V has two types of checkpoints – Standard Checkpoints and Production Checkpoints.
- Standard Checkpoints capture the virtual machine’s memory state when the snapshot is taken. It’s not a complete backup and can lead to data consistency problems, especially for systems like Active Directory that replicate data between different nodes.
- Production Checkpoints takes a snap of Volume Shadow Copy Service or File System Freeze on a Linux virtual machine and offers data consistency; however, it doesn’t take any snapshot of the virtual machine’s memory state.
Enable or disable Checkpoints in Hyper-V
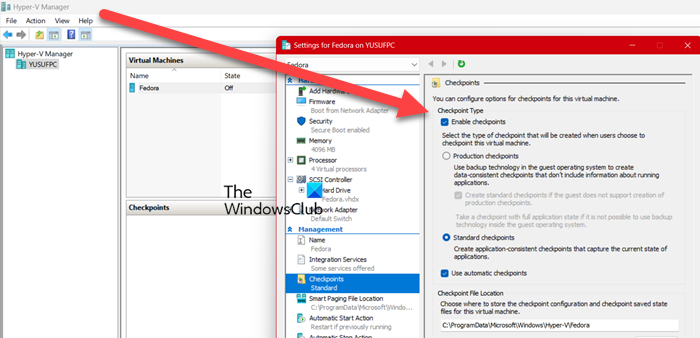
To enable or disable checkpoints in Hyper-V, you can use one of the following methods.
Using Hyper-V Manager
- Open the Hyper-V Manager.
- Select the virtual machine and click on Settings from the right section.
- Then, go to the Checkpoint section, and tick or Enable Checkpoints to enable or disable the feature respectively.
- Click on Apply > Ok.
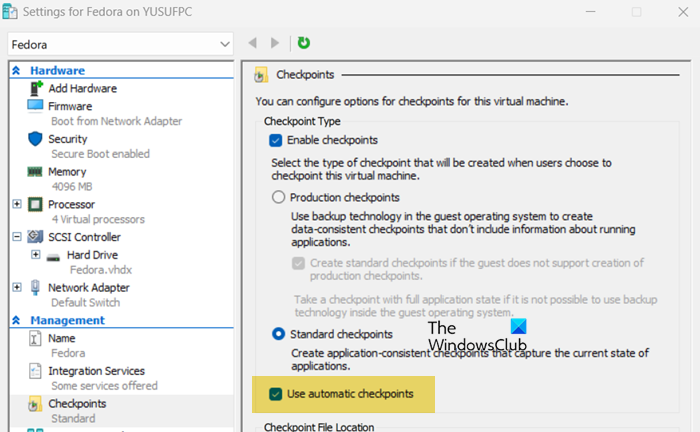
You can also tick the box associated with Use automatic checkpoint if you want to create checkpoints automatically. It will create the checkpoint when the virtual machine starts and delete it when the machine is stopped.
Using Microsoft PowerShell
You first need to open PowerShell as an administrator and then run the commands based on your requirements.
- To enable Production checkpoints for a machine
Set-VM -Name "<VM Name>" -CheckpointType Production
- To enable Production checkpoints for all machines
Set-VM -Name * -CheckpointType Production
- To enable Production-Only checkpoints for a machine
Set-VM -Name "<VM Name>" -CheckpointType ProductionOnly
- To enable Production-Only checkpoints for all machines
Set-VM -Name * -CheckpointType ProductionOnly
- To enable Standard checkpoints for all machines
Set-VM -Name * -CheckpointType Standard
- To enable Standard checkpoints for a machine
Set-VM -Name "<VM Name>" -CheckpointType Standard
- To disable Standard checkpoints for all machines
Set-VM -Name "<VM Name>" -CheckpointType Disabled
- To disable Standard checkpoints for a machine
Set-VM -Name * -CheckpointType Disabled
- To enable automatic checkpoints for all machines
Set-VM -Name * -AutomaticCheckpointsEnabled $True
- To enable automatic checkpoints for a machine
Set-VM -Name "<VM Name>" -AutomaticCheckpointsEnabled $True
- To disable automatic checkpoints for all machines
Set-VM -Name * -AutomaticCheckpointsEnabled $False
- To disable automatic checkpoints for a machine
Set-VM -Name "<VM Name>" -AutomaticCheckpointsEnabled $False
Hopefully, this will do the job for you.
Create a checkpoint in Hyper-V
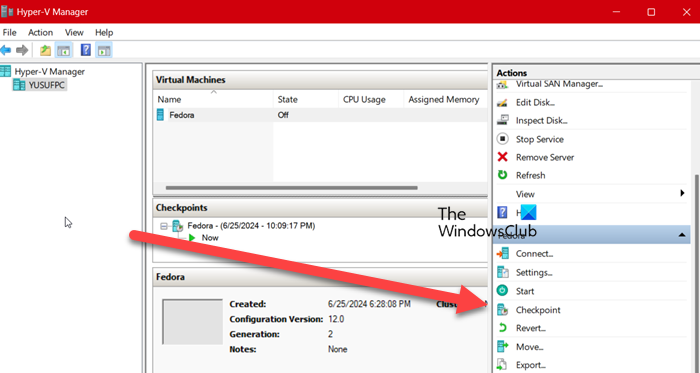
To create checkpoints manually of a virtual machine in Hyper-V, use either of the two methods.
Using Hyper-V Manager
- Open Hyper-V Manager.
- Select your machine.
- Click on Checkpoint from the Actions sections.
This will create a checkpoint of that particular timestamp.
Using Microsoft PowerShell
Open PowerShell as an administrator and then run the following commands.
- To create a checkpoint for Hyper-V Virtual Machine
Checkpoint-VM -Name "<VM Name>"
- To create a checkpoint for all Hyper-V Virtual Machine
Checkpoint-VM -Name *
This will do the job for you.
Rename a checkpoint in Hyper-V
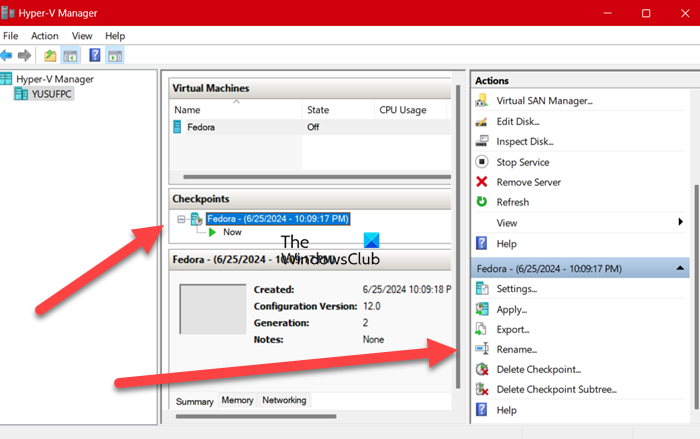
To rename a checkpoint of a virtual machine, you can follow the steps mentioned below.
Using Hyper-V Manager
- Open Hyper-V Manager.
- Select the VM you want to rename the checkpoint of.
- You will see its checkpoint in the Checkpoints section, select it.
- Now, go to the Actions section, and click on Rename. You can then give a name of your choice.
Using Microsoft PowerShell
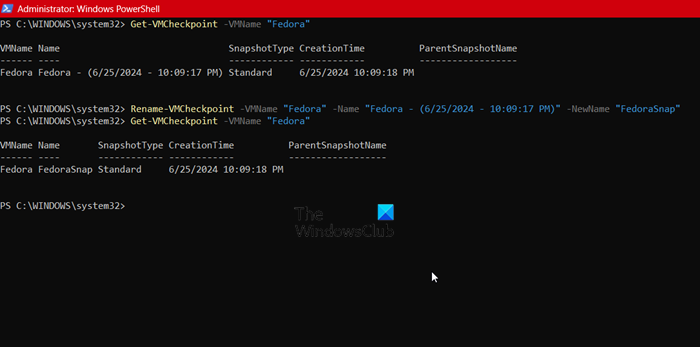
Open PowerShell as an administrator and then run the following command to list all the available snapshots of a particular virtual machine.
Get-VMCheckpoint -VMName "<VM Name>"
Run the following command to rename a particular checkpoint.
Rename-VMCheckpoint -VMName "<VM Name>" -Name "<Checkpoint Name>" -NewName "<New Checkpoint Name>"
Note: Substitute the variables in the command. Before running it, paste the text into Notepad and then do the substitution.
Read: How to schedule System Restore Points in Windows
Delete a checkpoint in Hyper-V
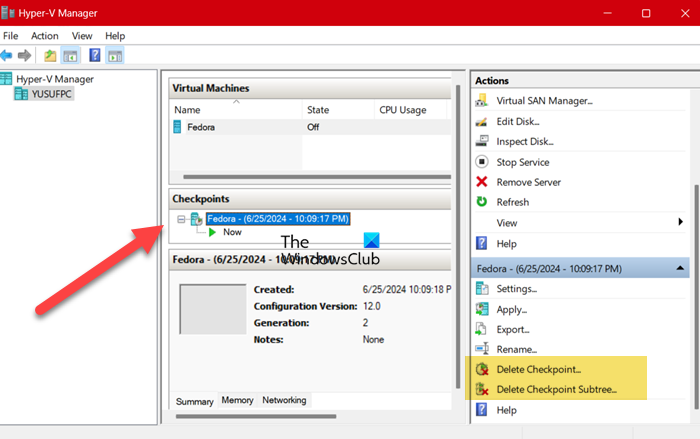
To delete a checkpoint of your virtual machine, use either of the two methods.
Using Hyper-V Manager
- Open Hyper-V Manager.
- Click on the virtual machine you want to delete the checkpoint of.
- Select the checkpoint you want to delete and then go to the Actions section.
- You have to click on Delete Checkpoint to only delete that specific checkpoint, whereas, to delete all the checkpoints, click on Delete Checkpoint Subtree.
- You will get a popup to confirm if you want to delete the checkpoint, click on Delete.
Using PowerShell
Open PowerShell as an admin and run – Get-VMCheckpoint -VMName “<VM Name>” to list all the available checkpoints. Then, run one of the following commands depending on your requirements.
- To delete all checkpoints for all VMs
Remove-VMCheckpoint -VMName * -Name *
- To delete all checkpoints of a particular VM
Remove-VMCheckpoint -VMName "<VM Name>" -Name *
- To delete a specific checkpoint of a particular VM
Remove-VMCheckpoint -VMName "<VM Name>" -Name "<Checkpoint Name>"
Make sure to replace all the variables in the command.
Read: How to enable Hyper-V on Windows 365 Cloud PC
Restore a Hyper-V VM using a checkpoint
Now that we have learned how to create a checkpoint for a virtual machine in Hyper-V, let’s see how to restore a VM using an existing checkpoint.
Using Hyper-V Manager
You first need to open the Hyper-V Manager on your computer, then select the VM you want to restore. Now, you can either revert to the previous state or restore your VM to a previously created snapshot.
To revert back your VM, click on the VM, and select Revert from the Actions section. Click on Revert when the pop-up appears to confirm your action.
To restore your VM to a particular checkpoint, click on the VM, select the Checkpoint, and then click on Apply.
Using Microsoft PowerShell
Open MS PowerShell as an admin and then run the following commands.
To list your checkpoints.
Get-VMCheckpoint -VMName "<VM Name>"
To restore your VM using a checkpoint
Restore-VMCheckpoint -Name "<Checkpoint Name>" -VMName "<VM Name>" -Confirm:$false
Hopefully, now you know how to use checkpoints in Hyper-V.
Also Read: Virtual machine could not initiate a checkpoint, Error 0x800423F4.