Network Discovery in the Windows operating system is a network setting that allows you to set whether other computers on the network can see your Windows 11/107 computer or whether your computer can find other computers and devices on the network. If Network Discovery is enabled, sharing files and printers over a network becomes easier.
If you remember, when you first connected to any network on your Windows PC, you would have been asked if it was Private, Public, or domain-based.
Enable or Disable Network Discovery in Windows
If you are using a standalone PC, you may want to disable Network Discovery, as you will have no use for it. You can turn off Network Discovery using Settings in Windows 11/10 or via the Control Panel or Command Prompt in Windows 11/10. Let us see how to do it.
1] Via Windows Settings
Windows 11

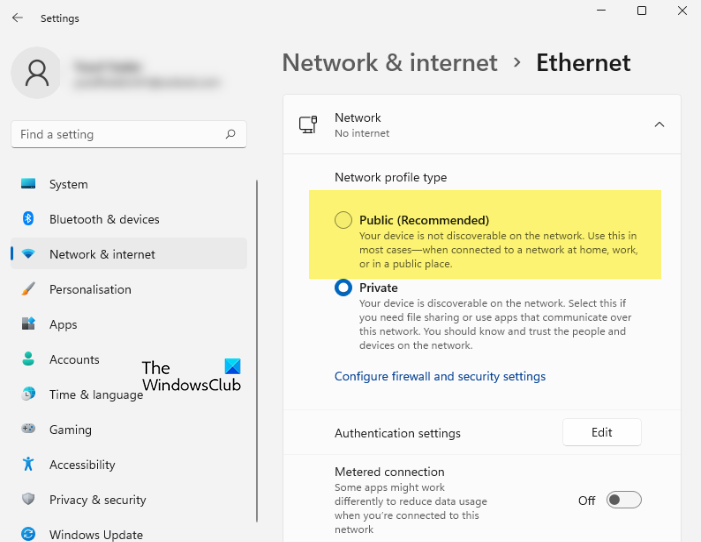
The Private network profile will make your computer discoverable. Therefore, we will see how to change it to Public.
- Open Settings by Win + I.
- Go to Network & Internet.
- Select the network you are connected to.
- Now, choose Public from the Network profile type.
This will make your computer not discoverable. If you want to make it discoverable, you can select Public from the same settings panel.
Related: NetSurveyor: WiFi Scanner and Network Discovery Tool for Windows
Windows 10
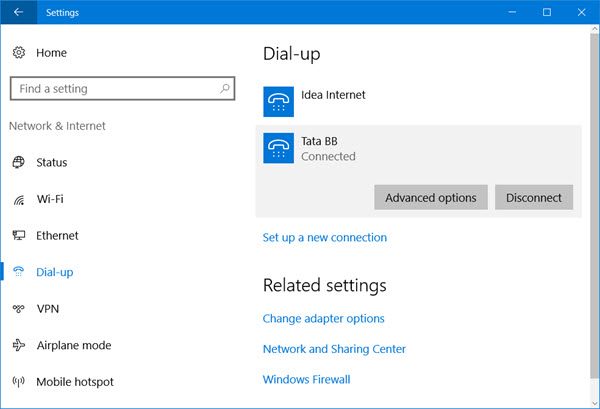
Click on the Start button, open Settings, select Network & Internet, and then Dial-Up (or Ethernet).

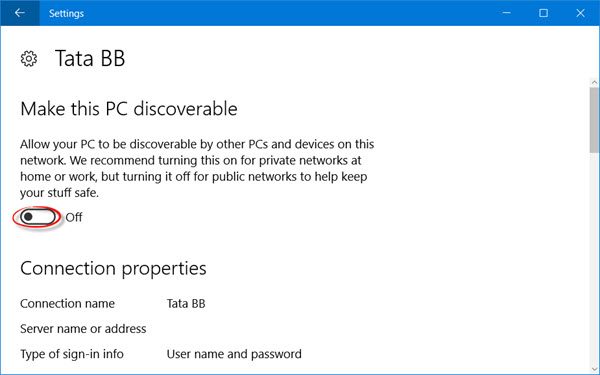
Select the network and then click on Advanced options. From the panel that opens, turn the slider to the Off position for the Make this PC Discoverable setting.

To enable it again, simply move the slider back to the On position.
It is the same for WiFi Networks. Open Settings > Network & Internet > Wi-Fi > Manage known networks > Select a WiFi network > Properties > Turn the slider to the Off position the Make this PC discoverable setting.
For an Ethernet connection, you must click on the Adapter and then toggle the Make this PC discoverable switch.
2] Using Control Panel
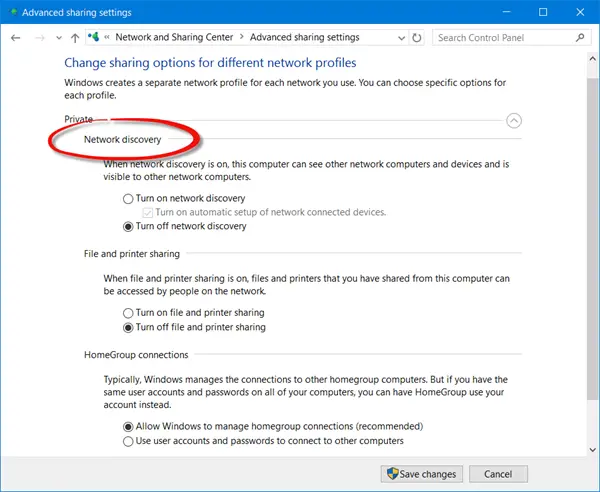
Open Control Panel > All Control Panel Items > Network and Sharing Center > Advanced sharing settings.

Uncheck the Turn on Network Discovery checkbox for Private and Public/Guest profiles.
Save the changes and exit.
3] Using CMD
To turn off Network Discovery, run the following command in an elevated command prompt:
netsh advfirewall firewall set rule group="Network Discovery" new enable=No
To turn on Network Discovery, run the following command in an elevated command prompt:
netsh advfirewall firewall set rule group="Network Discovery" new enable=Yes
In this way, you can enable or disable Network Discovery.
Cannot turn on Network Discovery
If you cannot turn on Network Discovery you may want to Run services.msc to open Services Manager and check if the following services are started and set to Automatic.
- DNS Client
- Function Discovery Resource Publication
- SSDP Discovery
- UPnP Device Host
Make This PC Discoverable switch missing
If you find the Make This PC Discoverable switch missing, open User Account Control settings, switch UAC to Default, click OK, restart your computer, and see.
I hope this helps.
What does it mean when Network Discovery is turned off?
When you turn off Network Discovery, no other computer on that network can discover your computer. This setting is usually recommended for privacy and security. Still, suppose you are an admin of an organization and want to monitor client computers. In that case, you can enable this option in Windows with the help of the given methods to make the computer discoverable.
What is network share in Windows?
A network share is a local folder on a PC that can be accessed by other computers on the network. The PC can access the local folder via the network share and all other PCs in the same network, provided the appropriate access permissions are in place.