In a situation when you have multiple users in your Windows 11/10 PC at home or office, where a Windows User Account needs to be disabled because of a security reason or because that particular user has created a nuisance, it’s a good idea to disable the user account instead of just deleting that account. This way, if you want to enable it later, you can always do that.
Enable or Disable a User Account in Windows 11/10
In this Windows tutorial, I will tell you how you can disable and then, later on, enable a Windows Account. It can be a local account or an account created using a Microsoft Account. It can be achieved using the Computer Management interface or the Command Prompt.
Before you begin, you should know that this works with Windows 11/10 Pro and Windows 11/10 Enterprise editions only, and your account should be an Administrator Account. If you are using a Windows Home version, it’s not going to work for you.
Disable Windows 11/10 User Account using Computer Management

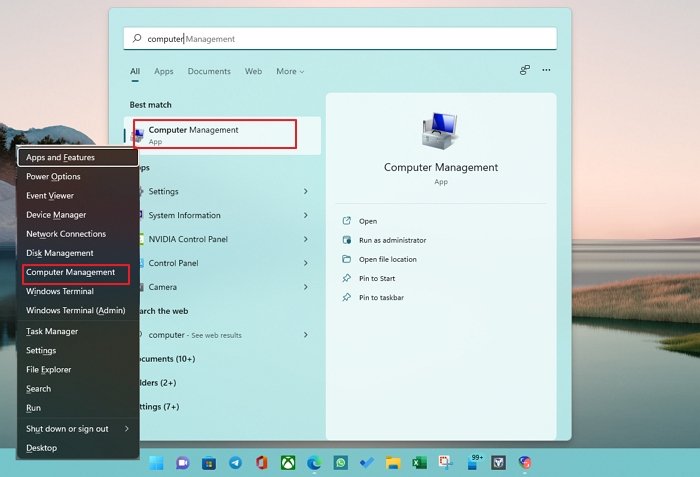
- Search for Computer management by pressing the Start Button and then typing the keyword. It should list it on the top. You can also use Win+X on your keyboard and press G to open it.
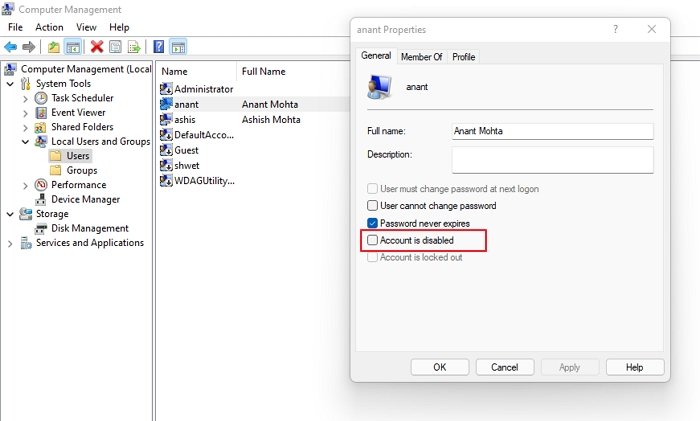
- Next, navigate to System Tools > Local Users and Groups > Users.
- Select the user and select Properties after right-clicking.
- Under the General tab, you should see an option to Disable the Account.
- Check it, click Apply, and then OK.

Interestingly, it will disappear from the Switch Account option and the login prompt once you disable the account. To re-enable the account, trace back the steps, only this time you uncheck the Disable option and apply.
Disable User Account in Windows 11/10 using Command Prompt
If you are a power user who is more comfortable with Command Prompt or Windows Terminal, Windows 11/10 does allow you to run 5-word command to disable and enable an account instantly.
- Make sure to have the account name handy.
- Search for the command prompt using the Windows 11/10 Search on the taskbar.
- Once it shows up, right-click and run as administrator. You will be prompted for a yes or no. Select Yes.
- Now type the following command to disable the account.
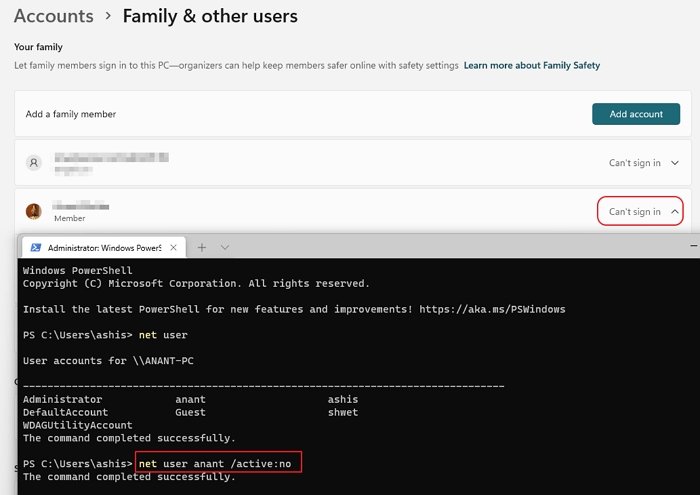
- net user <accountname> /active:no — To Disable.
- net user <accountname> /active:yes — To Enable it back.

Replace <accountname> with the real username. If you do not know the exact name, type net user, and hit the enter key.
What is the use of the Computer Management tool in Windows?
Now that you know about enabling and disabling the account let’s learn a bit about the Computer Management interface in Windows 11/10 for users. Using this, you can :
- Remove the requirement to change the password forever.
- Restrict users not to change passwords at all, which is helpful in the case of kids’ accounts.
- Unlock a user account if it’s locked out because they entered the wrong password multiple times.
- You can also create a new account, which does not need a Microsoft account.
- Enable Guest Account.
- Delete Accounts.
It’s a potent tool, so use it wisely. If you ever delete an account from here, it cannot be recovered, and all the files and data will be lost forever. Use it carefully.
Can you disable or enable the Microsoft Linked User account?
It is possible to disable or enable any account, including the Microsoft-linked account. The option is also available in Windows Settings > Family & other users. Click on the Block Sign-in button available with the account, and the user will not get access to their account.
How to remove an additional administrator account from Login Screen?
There can be more than one admin account in Windows. If you are already an admin and see an additional account with the name Administrator on the Login screen, you can choose to remove it. That account is a local account that can be useful in a specific scenario, but if nobody is using it, it’s best to either delete it or disable it.
You can use the above-mentioned Windows terminal method and run net user administrator /active:no
Leave a Reply